HydroLynx
Well-Known Member
Accurately constructing a small DWC system for the rapid germination of 20 seedlings
Introduction:
This project designs and constructs a small system that can germinate 20 seedlings. A bubbler system i.e. Deep Water Culture (DWC), is a simple way to hydroponically cultivate plants. Advantages include simplicity, no pumps needed, the reservoir itself billets plant roots which minimises materials needed, can grow a single large plant, can be adapted to grow many smaller plants, excellent hydration as roots constantly sit in solution. Disadvantages include: O2 deprivation possible esp under hot temperatures, large volumes of nutrient solution is needed, dependent on solution agitation to wet the netpot medium which is important for initial root growth,
Materials:
PP plastic tote with flat lid, black & opaque
20 x 5cm netpots
20 x rockwool plugs
4 times airstone
airpump
Measuring tape + awl (old dart) + drill press + hole-cutter
Craft knife
White plastic
Bread-tags for plant labels
Methods:
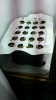
The bubbler system uses a tote, which can optimally (spacewise) fit x seedlings in some unknown grid size. So the distances of rows and columns of a grid had to be determined. Mathematically, the factors 4 x 5 = 20 form the tote’s grid dimensions, as the lengths 4 and 5 nicely match the oblongarity of this grid, so there will be 4 rows of 5 netpots. Arguably, other factors such as 3 x 6 = 18 or 3 x 7 = 21 create dodgy lengths and grid shapes for the tote lid. Also, 20 seedlings is a nice round number for operating multiple systems.
Though, this grid requires precise fitting on the tote lid so that the netpot rows run straight along it. Netpot drill-centres are the points that need precise fitting, which are marked off with an awl. So, baselines for the grid had to be established on the lid. Firstly, the corner netpots for the grid were fitted simply by placing a netpot as deep into their respective corners as practical, and marking off their centre points on the lid. This marks the entire system’s size and spacing, ie the distance d of the rows and columns. These corner points also serve as a baseline for where the rest of the row and column netpots should go.
Next, the 1st and last netpot of each row of the grid were fitted, in-line with corner netpots. This part is tricky as one cannot simply divide the row distance d by the number n of netpots—error results in the form of 1 extra netpot per row! The total distance d of that row and thus the intervals i for netpot spacing is given by: i = d / (n – 1). “Why divide by (n – 1) ?” you may ask, because you already have placed and accounted for the last netpot in each row. So the intervals were marked off along a ruler to give even and precise netpot spacing of 4 rows of 5 plants, thus providing all drill points for hole-cutting.
The totes were completely opaque and black, which is great for keeping light and algae away from the system and roots. However, black is the most unfavourable external lid colour as the system ideally should reflect light back onto plants, and esp to keep the lid cool under lighting. So a white plastic sheet with holes cut for netpots was constructed and snapped in place using the seedling netpots.
Results:
All came out accurate enough, and the propagation worked very well. The only negative issues were unsightly algae growth on the plug-tops so some clay pebbles or white opaque disk should be used. Also the 4 week old main stems were found to be hollow while cropping.
Introduction:
This project designs and constructs a small system that can germinate 20 seedlings. A bubbler system i.e. Deep Water Culture (DWC), is a simple way to hydroponically cultivate plants. Advantages include simplicity, no pumps needed, the reservoir itself billets plant roots which minimises materials needed, can grow a single large plant, can be adapted to grow many smaller plants, excellent hydration as roots constantly sit in solution. Disadvantages include: O2 deprivation possible esp under hot temperatures, large volumes of nutrient solution is needed, dependent on solution agitation to wet the netpot medium which is important for initial root growth,
Materials:
PP plastic tote with flat lid, black & opaque
20 x 5cm netpots
20 x rockwool plugs
4 times airstone
airpump
Measuring tape + awl (old dart) + drill press + hole-cutter
Craft knife
White plastic
Bread-tags for plant labels
Methods:
The bubbler system uses a tote, which can optimally (spacewise) fit x seedlings in some unknown grid size. So the distances of rows and columns of a grid had to be determined. Mathematically, the factors 4 x 5 = 20 form the tote’s grid dimensions, as the lengths 4 and 5 nicely match the oblongarity of this grid, so there will be 4 rows of 5 netpots. Arguably, other factors such as 3 x 6 = 18 or 3 x 7 = 21 create dodgy lengths and grid shapes for the tote lid. Also, 20 seedlings is a nice round number for operating multiple systems.
Though, this grid requires precise fitting on the tote lid so that the netpot rows run straight along it. Netpot drill-centres are the points that need precise fitting, which are marked off with an awl. So, baselines for the grid had to be established on the lid. Firstly, the corner netpots for the grid were fitted simply by placing a netpot as deep into their respective corners as practical, and marking off their centre points on the lid. This marks the entire system’s size and spacing, ie the distance d of the rows and columns. These corner points also serve as a baseline for where the rest of the row and column netpots should go.
Next, the 1st and last netpot of each row of the grid were fitted, in-line with corner netpots. This part is tricky as one cannot simply divide the row distance d by the number n of netpots—error results in the form of 1 extra netpot per row! The total distance d of that row and thus the intervals i for netpot spacing is given by: i = d / (n – 1). “Why divide by (n – 1) ?” you may ask, because you already have placed and accounted for the last netpot in each row. So the intervals were marked off along a ruler to give even and precise netpot spacing of 4 rows of 5 plants, thus providing all drill points for hole-cutting.
The totes were completely opaque and black, which is great for keeping light and algae away from the system and roots. However, black is the most unfavourable external lid colour as the system ideally should reflect light back onto plants, and esp to keep the lid cool under lighting. So a white plastic sheet with holes cut for netpots was constructed and snapped in place using the seedling netpots.
Results:
All came out accurate enough, and the propagation worked very well. The only negative issues were unsightly algae growth on the plug-tops so some clay pebbles or white opaque disk should be used. Also the 4 week old main stems were found to be hollow while cropping.
Last edited: