Very good info! Thanks! I will be making my rails adjustable.I've noticed people mentioning one COB per square foot as a rough guideline. But as with everything else, don't consider that a hard & fast rule. If you're gonna run the COBs soft (my preference) you'll want to crowd 'em in a little bit.
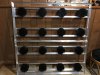
A lot of people are bolting their COBs in place. I made mine so they can slide around on the rails, which is very helpful.
The little M3 screws will accept 1/8" X 1" fender washers. I bought a 100-count box at Home Depot.
Look at the flat face of your COBs. See the outer ring of screw holes? Screw four of the M3's, with one fender washer each, into that outer ring on the COBs. Place your rails so that the fender washers overlap the rail edges. This way the washers pinch the rail when you tighten the screws. I started out re-tightening the screws every time I moved a COB around, but soon realized there was no way they could fall off so I left the screws just a little bit loose.
Just one example of how handy this is. I started with four seeds. One never got past seedling stage (although I gave the poor little thing over a month to try) so it was down to three plants. I re-adjusted the COBs for the new reality without unbolting them and taking the risk of dropping anything.
Best LED's For The Money
- Thread starter Hurdbird
- Start date
I will not be running different intensities / dimming on different strings so I will probably go with one driver. The only thing about the single driver is they seem a lot bigger so I'll have to figure out a good way to mount to the fixture without making it too heavy on one side. Possibly build a second smaller rack for the driver above the fixture frame but then I lose the top height. Any ideas?Depends. If you're sure you're gonna run small groups of lights at different intensities, it might make sense to use more drivers.
If that's not the case, then why introduce more wires and plugs? The COB holders (the Ideal ones anyway) aren't rated for more than 250V, so it appears to me that Timber and etc. are putting as many COBs in a string as they can without breaking that limit.
I think the prevailing logic in matching COBs to drivers is based on 1) serial or parallel wiring, 2) the driver's voltage limit and maximum amperage, 3) the COB voltage requirement.
And, yes, the Meanwell "A" models have an internal adjustment, but the "B" drivers offer a wider output range than the "A"'s when you add a pot. I had a hard time wrapping my head around this whole subject, but it's really simple. The pot connects to the two Dimmer wires on the "B" models. Then you plug it in, then you twist the pot. In real life it's easy. But it's all gotta be right - you can solder the wires to the wrong leads on the pot, for instance.
And where could I find a potentiometer for the 600H-36B? Cobkits are out of stock as well in this driver. Any idea where to order one so I can order everything up?I will not be running different intensities / dimming on different strings so I will probably go with one driver. The only thing about the single driver is they seem a lot bigger so I'll have to figure out a good way to mount to the fixture without making it too heavy on one side. Possibly build a second smaller rack for the driver above the fixture frame but then I lose the top height. Any ideas?
Mellodrama
Well-Known Member
Yes, I have an idea about where to mount the driver. Don't put it on the frame. Mount it outside the closet. I hung mine vertically in a corner so that air flows around all four sides. Vertical encourages air to move past. Don't worry about voltage drop - the voltages are too high to have appreciable losses over several feet of wire.
If you haven't had one of these big drivers in your hands yet, you'll be in for a surprise. They're heavy. No way I'm gonna strap that brick to the frame and hang it right over the plants.
Hopefully someone with more knowledge will step in, but I thought all the Meanwells take a 100K ohm pot. I picked one up at Radio Shack. Here's a thread where I was asking about pots and The Dawg helped out with an illustration.
https://www.rollitup.org/t/cxa3070s-hlg-120h-70-sst-120s.928523/#post-13182615
The resistor seems to be optional from what I've read on the forum. I didn't include it. I'm not exactly sure at this moment what it does.
MediheaLed
Well-Known Member
Just my experiences. I used 3/4" 1/8" thick al. angle for my frame. Plenty strong. On the driver situation, All Ive ever heard was get "B" cuz dimmable, BUT "A" is also dimmable, like melodrama pointed out, just more conveniently, no pots to order, nothing to solder. I have one of each "a" "B". Pots, in lamens, 100k for single drivers. 50k for two, sharing power.
Thanks for all of the help everyone. It is much appreciated. I will be ordering all the parts / pieces I need minus the heat sinks early next week because I will need to wait for a few sites to get them in. Let me know if you hear any sites with them coming in stock. I will post pictures of my progress throughout the build. Got the plants into 5 gallon pots last night but hopefully I can build this light and replace the (3) MARs lights as soon as possible.
Attachments
-
 2.6 MB Views: 18
DesertHydro
Well-Known Member
Northern grow lights on the 10th ishThanks for all of the help everyone. It is much appreciated. I will be ordering all the parts / pieces I need minus the heat sinks early next week because I will need to wait for a few sites to get them in. Let me know if you hear any sites with them coming in stock. I will post pictures of my progress throughout the build. Got the plants into 5 gallon pots last night but hopefully I can build this light and replace the (3) MARs lights as soon as possible.
DesertHydro
Well-Known Member
i dont usually get it but transplant shock is a real thing for a lot of growers. i would think back the lights off until they recover and then hit them hard.
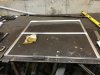
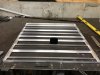
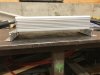
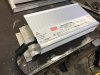
Received my 1"x1"x1/8" aluminum angle iron (6063). Perfect strength to weight ratio. Starting to weld up frames tomorrow. All parts are on the way from COBSKITS:
16 - Citizen 1212 CLU048's, 3,000K
16 - Ideal Holders / Angelina reflectors
1 - MW 600H-36B driver
Thank you to Cobby and all the RIU members for helping me get this far. Still need the following:
A. Heat sinks.
B. Wiring. What gauge required and best place to get it? Worth using Wago connectors?
C. Power cord. Will a 20 amp normal power cord work?
D. Potentiometer. Looking into it now. Which types are the best?
Does any one have a full wiring diagram for this type of set up? Run them in series correct? I will be looking to do (4) rows of (4) lights at 37.5W a piece.
Last edited:
CobKits
Well-Known Member
you'll be 50W or less so have options. ill have 120mm in about 2 weeksA. Heat sinks.
18 ga solid from home depot or online. you wont need many wagos as for the most part youre going cob to cobB. Wiring. What gauge required and best place to get it? Worth using Wago connectors?
id just slap one of these on the driver itself http://www.homedepot.com/p/Leviton-15-Amp-125-Volt-Double-Pole-3-Wire-Grounding-Plug-Black-R50-3W101-00E/205165472C. Power cord. Will a 20 amp normal power cord work?
driver only pulls 6A or so
for your applications anything is fine 100kohm, 1/4W rating is fine, radioshack, newark, digikey, ebayD. Potentiometer. Looking into it now. Which types are the best?
i should stock the latter two....
I've made some good progress on the light. Frame is all welded up for the Cobs and made a mounting bracket for the heat sink. Started assembling the heat sinks / LED's and looking to mount and wire up this weekend. Few final questions:
-Should I install a fuse on the D.C. side? Where would I find one?
-I have the attachd potentiometers for the three potentiometer wires off the drive but what do I do with the (2) DIM wires off of the driver?
I've been trying to post update pictures but won't let me. Something up with the site? Thanks!
Randomblame
Well-Known Member
Hey hurdbird,
at first, there are two sorts of poti's logarithmic and linear, you should look for linear 100k poti's.
Many 100k Poti's have less than 100k, they are around 90-98k. So you have to buy maybe 10 poti's to get 3 useable poti's with real 100-103k. Test them with a multimeter!(red on the left leg black on the right, should be between 99,5 and 103k)
If a poti has only 95k your driver will only output 95% of it's power but not 100%.
With a 110k poti you would output the drivers 100% if the poti is only turned up to 90%.
For this reason we want poti's with true 100-103k to avoid this typ of issues!
And if you want you can also use a real 50k poti for dimming 2 drivers at once or a 34k poti for 3 drivers or 25k for 4 drivers at once.
The poti's will be connected only to the blue and white dimming cords.
Place the poti in front of you on the table so that the 3 connecting legs points to you. You need the left and the middle connector. Solder the blue wire to the middle connector leg and the white wire to the left leg.
Result: turning poti to the left for lowering output and to the right for boosting!
Solder the white wire to the right connector and dimming is vice versa.
Only make sure you connect the blue wire to the middle connector.
Randomblame
Well-Known Member
Unfortunately no picture upload currently since RUI site was attacted what is realy bad because a picture says more as 1000 words.
To your other questions.
Make sure the whole unit is proper grounded for safety reasons and you don't need a separat fuse.
Also add no fuse to the dc circuit it's not needed.
You can add automatic bimetal temperatur switches to the dc circuit for the case a fan fails and a cob is running hot, but thats also not needed if you go with passive cooling.
Thank you! That was super helpful. I went with these POTs.Hey hurdbird,
at first, there are two sorts of poti's logarithmic and linear, you should look for linear 100k poti's.
Many 100k Poti's have less than 100k, they are around 90-98k. So you have to buy maybe 10 poti's to get 3 useable poti's with real 100-103k. Test them with a multimeter!(red on the left leg black on the right, should be between 99,5 and 103k)
If a poti has only 95k your driver will only output 95% of it's power but not 100%.
With a 110k poti you would output the drivers 100% if the poti is only turned up to 90%.
For this reason we want poti's with true 100-103k to avoid this typ of issues!
And if you want you can also use a real 50k poti for dimming 2 drivers at once or a 34k poti for 3 drivers or 25k for 4 drivers at once.
The poti's will be connected only to the blue and white dimming cords.
Place the poti in front of you on the table so that the 3 connecting legs points to you. You need the left and the middle connector. Solder the blue wire to the middle connector leg and the white wire to the left leg.
Result: turning poti to the left for lowering output and to the right for boosting!
Solder the white wire to the right connector and dimming is vice versa.
Only make sure you connect the blue wire to the middle connector.
https://www.amazon.com/gp/aw/d/B01DIZJ6X0/ref=yo_ii_img?ie=UTF8&psc=1
What are the three small brown, black, yellow wires off the DC side of the driver for? Do I just cap them off?
I bought a 13 amp rated shop cord so I was planning on tying that in to the driver AC side so that will definitely be grounded. How would I go about grounding everything else?
I figured something happened with the site because I really wanted to upload pics.
Randomblame
Well-Known Member
Without a picture it's hard to say..
Meanwell AC side normaly has 3 wires blue, brown, green
DC side has 2 wires, black and red
Dimmer has also 2 wires, blue and white,
if there were more wires then there must be a small symbol on the edge of the drivers like for the other wires(DC OUT-, DC in +, aso.)
Meanwell AC side normaly has 3 wires blue, brown, green
DC side has 2 wires, black and red
Dimmer has also 2 wires, blue and white,
if there were more wires then there must be a small symbol on the edge of the drivers like for the other wires(DC OUT-, DC in +, aso.)
Randomblame
Well-Known Member
I've looked into the datasheet for HLG-600H series and you are right it has additional wires.
It is also dimmable to 0 which means you can dimm untill lights go off.
Most other HLG-drivers are only able to dimm to 6% min. via resistance, pwm, 1-10V.
The wires with RC+ and RC-/gnd seems to be for remote on/off control,
the +5v (with gnd) is probably a power source for a 5v fan
And the HLG-600 has a pair of output wires for two parallel dc circuit's, 2x red and 2x black.
Look for and download the datasheet for your driver. There are lots of usefull informations...
Last edited:
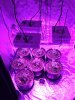
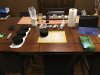
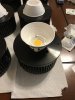
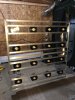
Now that the websites back up and running... here's some updates pics. Made some good progress this weekend. I have the light mounted at 12" OC for testing. Need to start wiring this week!
Attachments
-
 1.9 MB Views: 61
 -
 2.1 MB Views: 59
 -
 1.7 MB Views: 58
 -
 2.4 MB Views: 62
 -
 2 MB Views: 62
 -
 1 MB Views: 58
 -
 1.3 MB Views: 60
 -
 1.9 MB Views: 62
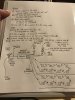
Alright. Wiring happening tomorrow. See wiring diagram attached I put together for the build and future reference. Couple final questions:
1. What type of quick disconnects on AC side connections to LED's so driver and fixture can be separated if required? Best types and places to get them?
2. Can any standard light switch with a box be used as an on / off switch? Any issues with adding a switch here as long as you switch the hot wire?
3. Do they make holders for the POT's? How do you mount it?
4. If no fan or remote on / off being used (5V) on D.C. side, can I just cap wires off? Should I just get a 5V fan to move some air around the canopy because I can?
5. Best way to test PAR levels to make sure 12" OC spacing is adequate for light spread / full coverage?
6. Best way to hang a heavy light fixture without hanging from tent? I'm thinking I'd rather hang it from wood studs above the tent.
Thanks in advance! Looks like the light will be finishing up right when it is needed in the new flower tent.
Attachments
-
 1.2 MB Views: 28
 -
 4.4 MB Views: 26