EB strip panel

Serva

Well-Known Member
Hey guys, got alot of help in this forum, alot of useful informations, so I will document my building here. Maybe someone else will find useful informations, and because I consider myself a newbie at contructing light panels, you are welcome to post suggestions, to improve it, as long I am waiting for the last parts. Hope everything will be finished till chrismas, because this will be a present for my wife to grow spirulina.

Because of that the panel will have a case, and acryl glas cover, low 24V powering, and a few features like a Sonoff Dual, so she can control it by her phone.

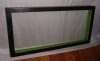
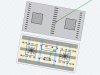
That was my first sketch (35x70cm):
IMG_7239.JPG

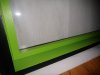
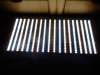
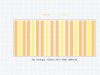
This is the actual strip design, 8mm spacing on the side getting bigger to the middle (16mm):
IMG_7259.JPG
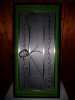
And a siedview (7x35cm):
IMG_7256.JPG
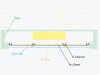
Will use the c-profiles mostly to direct the air flow, and to give the alu sheet more strength (in combination with the cross wised EB strips on the other side).

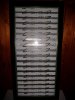
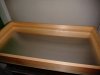
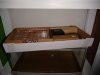
There I just had a look, if everything fits (I am not used to metal or plastic, so there was no other way for me than doing it with wood):
IMG_0651.JPG
So, now I am waiting for the thermal tape to go on...
IMG_0661.JPG

I will try and provide you guys with some readings, when I am finished. I will also try to do some readings without the acryl glas (92% transmission).
 
Last edited:

Serva

Well-Known Member
I am still waiting for this damn chinese thermal tape... Meanwhile I finshed the bottom casing:

IMG_0708.JPG

IMG_0712.JPG

I am not supporting the color my wife picked out:

black

It's too boring for me, so I will do a final decorative painting in green when everything is done.
And she will get a blue digital display at the top deck, showing the draw, and also the fans have a blue led light.

I hope she don't mind (:
 
Last edited:

Serva

Well-Known Member
Finally I got my tape, and directly fucked up the alignment of the strips multiple times... :wall:
IMG_0808.JPG

That made the wiring a little more complicated than planned, but atleast the front is looking fine now.
IMG_0811.JPG

IMG_0800.JPG

I am still missing the digital watt meter and the sonoff...
 
Last edited:

Serva

Well-Known Member
Yes, that looks much better, but remember to deburr the holes before you push the cables through. An additional layer of heat shrink tubing placed where the wires are pushed through the holes would provide some more protection against wear through. Should there be a short circuit, it will be difficult to find the place, so an additional backup layer is not inappropriate. Good luck and I hope you show it to us when you're done.:-)
I deburred and sanded every hole. But I don‘t have a heat gun, so shrink tubing wasn‘t possible. Also the holes aren‘t big enough, I can’t see an additional layer of shrinking fitting into these. But the stranded silicone wire is pretty damn flexible, I only sliced one cable where the hole in the alu sheet and the strip were not matching properly. Will add hot glue (any problems with it?) from the back now, so the cables can‘t move at all.

The case is all wood or plastic, so not dangerous if really a short-circuit will happen.
 

Randomblame

Well-Known Member
I deburred and sanded every hole. But I don‘t have a heat gun, so shrink tubing wasn‘t possible. Also the holes aren‘t big enough, I can’t see an additional layer of shrinking fitting into these. But the stranded silicone wire is pretty damn flexible, I only sliced one cable where the hole in the alu sheet and the strip were not matching properly. Will add hot glue (any problems with it?) from the back now, so the cables can‘t move at all.

The case is all wood or plastic, so not dangerous if really a short-circuit will happen.

Hotglue is okay and gives you a kind of strain relief. Use it sometimes too!
Shrink tube you can also shrink with a lighter, a torch or possibly even with a hair dryer. They need not much heat.
I love these thing below(e3ay, 5$)! Especially when I have to work in tight corners or so.
 

Attachments

Serva

Well-Known Member
A torch like that is already sitting beside my vapman :) good to know, this would work too! If I have a lazy day, I will improve. But after the wiring yesterday, I won‘t rewire now... but I like the result, though it was a pain in the ass, to fiddle all these wires through the holes!

More and more I realize, that the wire stripper was the most valuable 10$ investment I have ever done :hump:
 
Top