cannakis
Well-Known Member
Anyone use this gro-kashi stuff? It seems just like Barley Seed... Any ideas or experience in this?
http://gro-kashi.com
http://gro-kashi.com
Haha thanks brother. What is em1?!Gro kashi is pureed oats sprayed with em1 (lactobacillus)
http://www.hawaiihealingtree.org/how-to-make-your-own-em-1-inoculant-and-bokashi/Haha thanks brother. What is em1?!
So basically I can just sprinkle oats on top of my soil..!?
Yeah I think I saw that link or it was like at organic composted.com...http://www.hawaiihealingtree.org/how-to-make-your-own-em-1-inoculant-and-bokashi/
This is basically em-1. It is a airborne lactic acid microbe that you isolate using milk. A lactic acid bacteria breaks down sugars really fast. You can use it to break down old leaves or to speed up the breakdown of compost. I made it but I never use it.
most minerals can be used to replace azomiteI feel like the lactic acid is doing the real work. They are intense fermenting microbes that work fast. All the other microbes are indegenous microbes he added while probably following the process of the unconventional farmer. You could get a lot of that from a nearby hiking trail if you went off into the brush and scraped some of the organic layer off. That's why I've never bought it.
I think the real secret is adding the mineral azomite and beet juice to the mix. Gives the microbes and fungus an immediate job to do so you always see the huge fungal strands . But that is another reason why i've never bought it since azomite is high in aluminum and those microbes work with very low PH. It always seemed like a bad mix to me cause Im terrified of aluminum toxicity and alzhiemers.
I would just make my own if I though it was needed or needed compostable-like material fast. Beneficial bacteria are everywhere we don't need to add them.
Edit: I would make it because I don't use or like the thought of azomite near my soil.
not true but close . the real recipie is not tightly held at all . i use it with each grow for the last 2 years and am finally getting fruiting bodies of mycillum in between grows ....Gro kashi is pureed oats sprayed with em1 (lactobacillus)
should be cooked in soil; or added after? ( as soil conditioner )not true but close . the real recipie is not tightly held at all . i use it with each grow for the last 2 years and am finally getting fruiting bodies of mycillum in between grows ....
here is the OG recipie from the creator ... your welcome ..lol..via leadsled from thcfarm
Beyond Bokashi Ancestral Fermentations Workshop
By Alan Albin Adkisson
Dry Ingredient List:
* Red Wheat 5 gallon
* Azomite 1 cup
* Sea+Real Salt 1 TBSP
* EM Super Cera 1 TBSP
Liquid Fermentation Ingredient List (plus 1/5 teaspoon EM Super Cera)
* Water 2.5 Gallons (spring water or other non chlorinated, cloromine free water)
* Black Strap Mollasses 2.5 Oz
* Organic Beet Root Juice 2.5 Oz
* Youngevity btt 2.0 organic 2.5 Oz (dry, but mix with your water)
* EM-1 Microbial Innoculant 2.5 Oz
Start potentizing the water you want to use.
I hope I said that right. It is the stirring method used in biodynamic farming or in Dr Emotos work. I use this old ice hash machine. It is perfect. 2.5 gallons warm spring water blessed up with a 1/2 teaspoon EM super cera powder. If you don’t have a ice hash maker, stir the water clockwise for 15 seconds, then counterclockwise, repeat for 5 or more minutes.
Now, every minute or so of mixing, add a liquid ingredient. First the 2.5 oz. Mollases, then 2.5 oz. Beet Root juice, then 2.5 oz. BTT 2.0, lastly 2.5 oz. EM-1. Add the EM-1 last. Once you have your base liquid mixed you can prepare your dry ingredients.
Now for our dry components. We are going to do a five gallon mix. 1 cup azomite 1 tablespoon EM super cera 1 tablespoon mixed sea/real salt.
Stir them up in the cup.
Mix up your five gallons red flake wheat bran with your dry mix. The azomite is an incredible anticaking agent also. Labor saver.
Now you will need 2 1/2 gallons of the liquid fermentation prepared earlier to mix up with your dry mixture.
(if you want to make bigger batches just keep repeating this process till you have finished your desired amount)
Mix it up like bread. Knead it until you find no dry pockets.
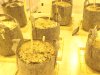
Transfer this now to your fermentation barrel.
Continue to fill your barrel until it is about 7/8 full and packed. I use a barrel liner and at the end I put a loose twist tie on the bag. Then we install the air tight lock ring on the barrel. I have installed an anti siphon valve as a cheap pressure release and put a balloon over that so I can tell when my fermentation is complete. About ten days. You can also use a larger bag tied off over your barrel/bucket and wait for it to puff up a little to see that the fermentation has taken place.
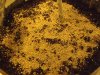
Ten days later this is what it should look like when you open your barrel. I wish you could smell this.
Stomp (Contractor bag lines the barrel)
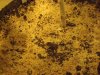
Now we are going to put that fermented Gro-Kashi thru this 1/4 in screen onto a hay tarp out in the sun to dry. We gonna rake it and take care of it like a fine coffee bean or better. If the weather is bad you can use a batch grain dryer or rent one from a farmer.
Hey everybody. The black tarp makes it easy to gather up when it is dry. I am trying to figure out the perfect moisture level currently. I think that you can over dry it.
Before. Its made through fermentation. So, the probiotic bacteria will begin consuming the soil and making humates well before the plant is in. It will balance the soil's NPK and pH.should be cooked in soil; or added after? ( as soil conditioner )
40-60% moisture. Or squeeze it with your hands. It should form a ball and not break but also should not drip. Me and my farmer friends look for a karate chop slice! hahanot true but close . the real recipie is not tightly held at all . i use it with each grow for the last 2 years and am finally getting fruiting bodies of mycillum in between grows ....
here is the OG recipie from the creator ... your welcome ..lol..via leadsled from thcfarm
Beyond Bokashi Ancestral Fermentations Workshop
By Alan Albin Adkisson
Dry Ingredient List:
* Red Wheat 5 gallon
* Azomite 1 cup
* Sea+Real Salt 1 TBSP
* EM Super Cera 1 TBSP
Liquid Fermentation Ingredient List (plus 1/5 teaspoon EM Super Cera)
* Water 2.5 Gallons (spring water or other non chlorinated, cloromine free water)
* Black Strap Mollasses 2.5 Oz
* Organic Beet Root Juice 2.5 Oz
* Youngevity btt 2.0 organic 2.5 Oz (dry, but mix with your water)
* EM-1 Microbial Innoculant 2.5 Oz
Start potentizing the water you want to use.
I hope I said that right. It is the stirring method used in biodynamic farming or in Dr Emotos work. I use this old ice hash machine. It is perfect. 2.5 gallons warm spring water blessed up with a 1/2 teaspoon EM super cera powder. If you don’t have a ice hash maker, stir the water clockwise for 15 seconds, then counterclockwise, repeat for 5 or more minutes.
Now, every minute or so of mixing, add a liquid ingredient. First the 2.5 oz. Mollases, then 2.5 oz. Beet Root juice, then 2.5 oz. BTT 2.0, lastly 2.5 oz. EM-1. Add the EM-1 last. Once you have your base liquid mixed you can prepare your dry ingredients.
Now for our dry components. We are going to do a five gallon mix. 1 cup azomite 1 tablespoon EM super cera 1 tablespoon mixed sea/real salt.
Stir them up in the cup.
Mix up your five gallons red flake wheat bran with your dry mix. The azomite is an incredible anticaking agent also. Labor saver.
Now you will need 2 1/2 gallons of the liquid fermentation prepared earlier to mix up with your dry mixture.
(if you want to make bigger batches just keep repeating this process till you have finished your desired amount)
Mix it up like bread. Knead it until you find no dry pockets.
Transfer this now to your fermentation barrel.
Continue to fill your barrel until it is about 7/8 full and packed. I use a barrel liner and at the end I put a loose twist tie on the bag. Then we install the air tight lock ring on the barrel. I have installed an anti siphon valve as a cheap pressure release and put a balloon over that so I can tell when my fermentation is complete. About ten days. You can also use a larger bag tied off over your barrel/bucket and wait for it to puff up a little to see that the fermentation has taken place.
Ten days later this is what it should look like when you open your barrel. I wish you could smell this.
Stomp (Contractor bag lines the barrel)
Now we are going to put that fermented Gro-Kashi thru this 1/4 in screen onto a hay tarp out in the sun to dry. We gonna rake it and take care of it like a fine coffee bean or better. If the weather is bad you can use a batch grain dryer or rent one from a farmer.
Hey everybody. The black tarp makes it easy to gather up when it is dry. I am trying to figure out the perfect moisture level currently. I think that you can over dry it.
This is total overkill! Way to scare peoplenot true but close . the real recipie is not tightly held at all . i use it with each grow for the last 2 years and am finally getting fruiting bodies of mycillum in between grows ....
here is the OG recipie from the creator ... your welcome ..lol..via leadsled from thcfarm
Beyond Bokashi Ancestral Fermentations Workshop
By Alan Albin Adkisson
Dry Ingredient List:
* Red Wheat 5 gallon
* Azomite 1 cup
* Sea+Real Salt 1 TBSP
* EM Super Cera 1 TBSP
Liquid Fermentation Ingredient List (plus 1/5 teaspoon EM Super Cera)
* Water 2.5 Gallons (spring water or other non chlorinated, cloromine free water)
* Black Strap Mollasses 2.5 Oz
* Organic Beet Root Juice 2.5 Oz
* Youngevity btt 2.0 organic 2.5 Oz (dry, but mix with your water)
* EM-1 Microbial Innoculant 2.5 Oz
Start potentizing the water you want to use.
I hope I said that right. It is the stirring method used in biodynamic farming or in Dr Emotos work. I use this old ice hash machine. It is perfect. 2.5 gallons warm spring water blessed up with a 1/2 teaspoon EM super cera powder. If you don’t have a ice hash maker, stir the water clockwise for 15 seconds, then counterclockwise, repeat for 5 or more minutes.
Now, every minute or so of mixing, add a liquid ingredient. First the 2.5 oz. Mollases, then 2.5 oz. Beet Root juice, then 2.5 oz. BTT 2.0, lastly 2.5 oz. EM-1. Add the EM-1 last. Once you have your base liquid mixed you can prepare your dry ingredients.
Now for our dry components. We are going to do a five gallon mix. 1 cup azomite 1 tablespoon EM super cera 1 tablespoon mixed sea/real salt.
Stir them up in the cup.
Mix up your five gallons red flake wheat bran with your dry mix. The azomite is an incredible anticaking agent also. Labor saver.
Now you will need 2 1/2 gallons of the liquid fermentation prepared earlier to mix up with your dry mixture.
(if you want to make bigger batches just keep repeating this process till you have finished your desired amount)
Mix it up like bread. Knead it until you find no dry pockets.
Transfer this now to your fermentation barrel.
Continue to fill your barrel until it is about 7/8 full and packed. I use a barrel liner and at the end I put a loose twist tie on the bag. Then we install the air tight lock ring on the barrel. I have installed an anti siphon valve as a cheap pressure release and put a balloon over that so I can tell when my fermentation is complete. About ten days. You can also use a larger bag tied off over your barrel/bucket and wait for it to puff up a little to see that the fermentation has taken place.
Ten days later this is what it should look like when you open your barrel. I wish you could smell this.
Stomp (Contractor bag lines the barrel)
Now we are going to put that fermented Gro-Kashi thru this 1/4 in screen onto a hay tarp out in the sun to dry. We gonna rake it and take care of it like a fine coffee bean or better. If the weather is bad you can use a batch grain dryer or rent one from a farmer.
Hey everybody. The black tarp makes it easy to gather up when it is dry. I am trying to figure out the perfect moisture level currently. I think that you can over dry it.
this is the recipie for a off the shelf bokashi soil innuculant named *grokashi * not my recipie .This is total overkill! Way to scare people
Actually i re-read this recipe and it's pretyy nice looking with the azomite. A bit expensive though. Bokashi will allow the user to ferment kitchen scraps. This tek has everything a plant could ever need and some.
To everyone,
im sorry for blowing up this page haha
makes sense; i was worried the cooking might kill off the microherd; ty for the confirmationBefore. Its made through fermentation. So, the probiotic bacteria will begin consuming the soil and making humates well before the plant is in. It will balance the soil's NPK and pH.