Icemud420
Well-Known Member
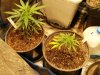
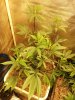
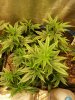
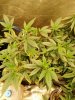
Hey Everyone! I'm back with another grow journal and in this journal I will be doing 2 grows at the same time. I will be starting one tent in flowering and the other tent I will be doing a full grow from early veg to harvest using new white cob led technology. I'm running some new strains which I have never flowered before (originally from clone), a few mother plants that I have kept for a few years, as well as some of the best tangie phenos from my last batch of seeds. Lets get into the grow details I welcome everyone to join in the fun as we do multiple strains in organic recycled soil under new LED technology. Here's the details:
What strains?
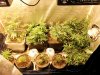
The flowering tent (Budmaster GOD tent) (Currently in flowering)
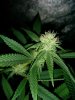
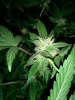
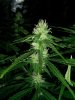
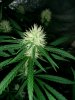
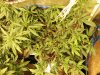
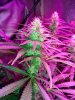
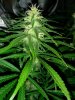
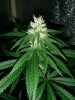
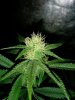
Ogiesel, Black Diamond OG, Fire OG, and 4 of my best tangie Phenotypes from my last run.
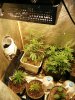
The Veg tent and will be a full grow to harvest (Budmaster COB tent) (Currently in Veg)
Tangie Phenotypes #3, #5, #6, Ogiesel, 2x Black Cherry Soda's, Fire OG, Black Diamond OG, Harlequin
Strain Lineage: (resourced from other sites on the web, not 100% sure of the accuracy)
Fire OG Lineage: San Fernando Valley OG F3 x OG Kush: (60% indica, 40% sativa)
Black Diamond OG lineage: Blackberry kush x Diamond OG (supposedly its a indica dominant offspring of OG Kush, 70% indica)
Tangie Lineage: California Orange (Cali O) x [Skunk #1 x Unknown] Sativa Dominiant
Harlequin Lineage: Columbian Gold 70s x Thailand x Swizerland x Nepal (High CBD strain, Sativa Dom)
Black Cherry Soda Lineage: (nobody really knows the exact lineage of this strain as far as I know, but I was hinted towards it being possibly Airborne G13 X Ortega x C99 x Blackberry x Cherry AK-47 – 20% Indica/80% Sativa")
Ogiesel Lineage: SFV OG Kush x Giesel (Chem Dawg d x Mass Super Skunk) (hybrid I would say is slightly indica dom)
Grow Area Description and equipment
Grow area enclosure:
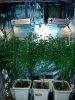
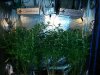
I will be using 2 Hydrohut Silver 2x4x7 tents for this grow. Each tent actually measures about 2 1/2' x 5' x 7'.
Ventilation and temp control:
Each tent contains a carbon scrubber, a 6" hydrofarm extraction fan mounted at the top back of each tent in a similar fashion. The fans are connected with manual speed controllers and usually kept on medium low/medium high depending on my room temp.
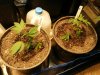
Pot type and size:
Each grow will end up in 5 gallon plastic square pots however the veg tent will start out with the plants in 2 gallon round pots and transplanted when needed into the final 5 gallon plastics pots.
The Soil:
The soil I am using is a recycled (probably 2-3 year old) mix 100% organic soil which is dumped into a large 100+ gallon rubbermaid container in between grows and re-amended in between. Leaves trimmed off my growing plants are dumped into the bin and composted and the soil typically can cook from 3 to 6 months or more and is constantly cycled and replenished with my perpetual grow. Each time the old soil is mixed with the newly dumped soil and cooked with new amendments.
Original soil blend included these items listed below, now I just re-amend it every cycle with some of the below mentioned, but the base mix has not changed and is still the same as day 1.
The Base Soil Mix:
ProMix HP
Worm Castings
Volcanic Pumice
Alaskan Forest Humus
The Amendments:
Azomite (trace minerals and micronutrients)
Calcium Carbonate Powder 97%
Soft Rock Phosphate (Collidal Clay with high phosphorus and CEC value)
Gypsum (Calcium Sulfate)
Crab Meal 2-3-0 23% calcium(also a P source and source of chitin a hormone/growth regulator)
Fish Bone meal. (3-18-0) 24% Calcium
Lava Sand (adds trace minerals and supposedly adds paramagnetic value to the soil)
Crab Shell Meal 2-3-0 23% Calcium
Kelp Meal (also has growth hormones and PGR's, plus trace minerals)
Alfalfa Meal. (2-0-3) (contains Trichontinol which aids in plant growth and health)
Humboldt Myco's Maximum (Beneficial Bacteria and Mycorrizae Fungus)
Epsom Salts (Magnesium Sulfate)
Greensand (0-0-3) (Trace Minerals)
Biovam
TandJ enterprises biominerals
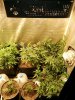
The Lights:
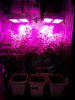
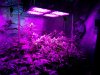
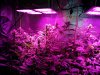
I will be using 2 separate types of LED lights for this grow, both are made by Budmaster. This is the first time I will be using the GOD series (GOD-4)(purple panels) and also the all new white COB-X-4 led lights as well. I'm really excited to be trying these out as many have raved about them and they use some of the best LED chips on the market, Osram and CitiLED chips so they should make for impressive grows. The God lights are made up of multiple OSRAM SSL horticulture grade chips and the COB series uses CitiLED COB's who originated the white cob technology. The COB lights will be used in a full grow from early veg to harvest, and the GOD panels will be used to flower out some plants that were vegging under different lights.
Typical Temp and RH% of the growing area:
Generally my temperatures stay between 72-84F depending on if the lights are on or the lights are off.
My RH% for most of the year is a perfect 50% +/-5% but during the winter months it usually drops to about 5-20% outside, so my tent hovers from around 20%-40% during these times and depending on watering frequency.
Soil PH
I haven't checked this ever. I let the plants do what they need and since using only organics and compost teas the microbes take care of whats needed.
Any Pests ?
I typically don't get pests at all unless I somehow bring in new clones that are infected, however I have had an occasional thrip make its way into my garden in the past as well as some spidermites which is very rare and usually also along with new clones. Pests usually don't bother my garden.
I do keep on hand regiments of organic sprays including SNS products, spinosad and a few products by bonide.
How often are you watering?
Watering volume and frequency depend on the time of cycle. In early veg usually about 1x per week until the roots get larger.
As veg gets to mid later veg I usually will water about 1x every 3-5 days depending on the plants needs and the pot size
In flowering I generally water every day to every 3 days depending on what part of the flowering cycle, usually about 1-3 cups of water each feeding per plant.
Nutrients used:
I do feed my plants with bottled nutrients but everything is organic and/or natural. Even though my soil is rich and hardy, I do use bottled nutrients for issues in correcting deficiencies as well as a good soil drench every few feedings.
My bottled nutrients are:
Earthjuice Grow
Earthjuice Veg
Earthjuice Catalyst
Earthjuice Micro
Earthjuice MetaK
Humboldt Nutrients Equillibrium 12:2 Ca/Mg 1-1-2
Humboldt Nutrients Bloom Natural: 0-10-0 soft rock phosphate
Humboldt Nutrients duece duece: potassium sulfate flowering booster
I also do foliar feeding with certain products including:
cold pressed seaweed
organic b
yucca extract
hydrolyzed fish 2-4-0
potassium silicate
I also make compost tea's on occasion: generally using a combo of the above nutrients and amendments.
Well that's about all the details, Lets get started with the journal! I invite everyone to join in the fun and feel free to ask questions, as long as you keep it positive and productive! enjoy!
What strains?
The flowering tent (Budmaster GOD tent) (Currently in flowering)
Ogiesel, Black Diamond OG, Fire OG, and 4 of my best tangie Phenotypes from my last run.
The Veg tent and will be a full grow to harvest (Budmaster COB tent) (Currently in Veg)
Tangie Phenotypes #3, #5, #6, Ogiesel, 2x Black Cherry Soda's, Fire OG, Black Diamond OG, Harlequin
Strain Lineage: (resourced from other sites on the web, not 100% sure of the accuracy)
Fire OG Lineage: San Fernando Valley OG F3 x OG Kush: (60% indica, 40% sativa)
Black Diamond OG lineage: Blackberry kush x Diamond OG (supposedly its a indica dominant offspring of OG Kush, 70% indica)
Tangie Lineage: California Orange (Cali O) x [Skunk #1 x Unknown] Sativa Dominiant
Harlequin Lineage: Columbian Gold 70s x Thailand x Swizerland x Nepal (High CBD strain, Sativa Dom)
Black Cherry Soda Lineage: (nobody really knows the exact lineage of this strain as far as I know, but I was hinted towards it being possibly Airborne G13 X Ortega x C99 x Blackberry x Cherry AK-47 – 20% Indica/80% Sativa")
Ogiesel Lineage: SFV OG Kush x Giesel (Chem Dawg d x Mass Super Skunk) (hybrid I would say is slightly indica dom)
Grow Area Description and equipment
Grow area enclosure:
I will be using 2 Hydrohut Silver 2x4x7 tents for this grow. Each tent actually measures about 2 1/2' x 5' x 7'.
Ventilation and temp control:
Each tent contains a carbon scrubber, a 6" hydrofarm extraction fan mounted at the top back of each tent in a similar fashion. The fans are connected with manual speed controllers and usually kept on medium low/medium high depending on my room temp.
Pot type and size:
Each grow will end up in 5 gallon plastic square pots however the veg tent will start out with the plants in 2 gallon round pots and transplanted when needed into the final 5 gallon plastics pots.
The Soil:
The soil I am using is a recycled (probably 2-3 year old) mix 100% organic soil which is dumped into a large 100+ gallon rubbermaid container in between grows and re-amended in between. Leaves trimmed off my growing plants are dumped into the bin and composted and the soil typically can cook from 3 to 6 months or more and is constantly cycled and replenished with my perpetual grow. Each time the old soil is mixed with the newly dumped soil and cooked with new amendments.
Original soil blend included these items listed below, now I just re-amend it every cycle with some of the below mentioned, but the base mix has not changed and is still the same as day 1.
The Base Soil Mix:
ProMix HP
Worm Castings
Volcanic Pumice
Alaskan Forest Humus
The Amendments:
Azomite (trace minerals and micronutrients)
Calcium Carbonate Powder 97%
Soft Rock Phosphate (Collidal Clay with high phosphorus and CEC value)
Gypsum (Calcium Sulfate)
Crab Meal 2-3-0 23% calcium(also a P source and source of chitin a hormone/growth regulator)
Fish Bone meal. (3-18-0) 24% Calcium
Lava Sand (adds trace minerals and supposedly adds paramagnetic value to the soil)
Crab Shell Meal 2-3-0 23% Calcium
Kelp Meal (also has growth hormones and PGR's, plus trace minerals)
Alfalfa Meal. (2-0-3) (contains Trichontinol which aids in plant growth and health)
Humboldt Myco's Maximum (Beneficial Bacteria and Mycorrizae Fungus)
Epsom Salts (Magnesium Sulfate)
Greensand (0-0-3) (Trace Minerals)
Biovam
TandJ enterprises biominerals
The Lights:
I will be using 2 separate types of LED lights for this grow, both are made by Budmaster. This is the first time I will be using the GOD series (GOD-4)(purple panels) and also the all new white COB-X-4 led lights as well. I'm really excited to be trying these out as many have raved about them and they use some of the best LED chips on the market, Osram and CitiLED chips so they should make for impressive grows. The God lights are made up of multiple OSRAM SSL horticulture grade chips and the COB series uses CitiLED COB's who originated the white cob technology. The COB lights will be used in a full grow from early veg to harvest, and the GOD panels will be used to flower out some plants that were vegging under different lights.
Typical Temp and RH% of the growing area:
Generally my temperatures stay between 72-84F depending on if the lights are on or the lights are off.
My RH% for most of the year is a perfect 50% +/-5% but during the winter months it usually drops to about 5-20% outside, so my tent hovers from around 20%-40% during these times and depending on watering frequency.
Soil PH
I haven't checked this ever. I let the plants do what they need and since using only organics and compost teas the microbes take care of whats needed.
Any Pests ?
I typically don't get pests at all unless I somehow bring in new clones that are infected, however I have had an occasional thrip make its way into my garden in the past as well as some spidermites which is very rare and usually also along with new clones. Pests usually don't bother my garden.
I do keep on hand regiments of organic sprays including SNS products, spinosad and a few products by bonide.
How often are you watering?
Watering volume and frequency depend on the time of cycle. In early veg usually about 1x per week until the roots get larger.
As veg gets to mid later veg I usually will water about 1x every 3-5 days depending on the plants needs and the pot size
In flowering I generally water every day to every 3 days depending on what part of the flowering cycle, usually about 1-3 cups of water each feeding per plant.
Nutrients used:
I do feed my plants with bottled nutrients but everything is organic and/or natural. Even though my soil is rich and hardy, I do use bottled nutrients for issues in correcting deficiencies as well as a good soil drench every few feedings.
My bottled nutrients are:
Earthjuice Grow
Earthjuice Veg
Earthjuice Catalyst
Earthjuice Micro
Earthjuice MetaK
Humboldt Nutrients Equillibrium 12:2 Ca/Mg 1-1-2
Humboldt Nutrients Bloom Natural: 0-10-0 soft rock phosphate
Humboldt Nutrients duece duece: potassium sulfate flowering booster
I also do foliar feeding with certain products including:
cold pressed seaweed
organic b
yucca extract
hydrolyzed fish 2-4-0
potassium silicate
I also make compost tea's on occasion: generally using a combo of the above nutrients and amendments.
Well that's about all the details, Lets get started with the journal! I invite everyone to join in the fun and feel free to ask questions, as long as you keep it positive and productive! enjoy!