New Growth Yellow. Brown spots. Please, help!!!

girudai

New Member
Hello Community,

Could someone please help me diagnose the problems with my two plants - Lemon Kush and Blueberry Cheesecake.

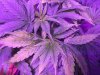
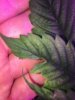
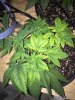
They were growing in coco coir just perfectly (to my newbie opinion) and at some point all the new growth started to become very very yellow, leaves get curly a little and some small holes appear randomly on leaves also weird brown spots...

Some thoughts of the problem:
#1. I might had a pH issue (too low) one time watering (due to a not very good quality pH tester). I think just after this watering this issue (yellow new growth) appeared.
#2. Few days later I noticed that roots are coming through bottom holes of pots like crazy.

So after I noticed a new growth yellow 3-4days later I transplanted them to an airpots and did a DWC system. I see now that some roots are very close to get into the water.

I am watering now with pH ~6 - its a full time drip irrigation and the medium is coco coir. I have an air pump and air stone so water is all filled with oxygen.

Grow setup

A week of DWC (previously - daily watered coco coir). Room is ventilated, but still humid ~65%-70%.

Lights:
1 x Mars Hydro 300 (140w) LED
1 x Some Chinese (80w) LED
Temperature day / night:
~23C / ~16C

Nutrition:
1. Advanced Hydroponics of Holland - Grow 1ml/liter
2. Advanced Hydroponics of Holland - Micro 0.5ml/liter
3. Advanced Hydroponics of Holland - Bloom 0.5ml/liter
4. I also have Canna Magnesium, but do not feed with it yet.
Do I need more / less?

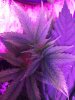
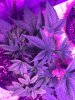
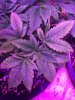
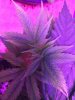
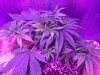
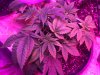
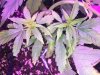
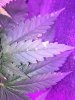
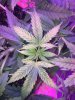
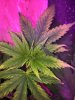
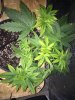
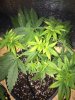
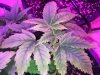
Attaching pictures of 6 week old plants.

Guys, please advice on what to do to them. I read around and figure its an iron deficiency maybe because I had bad pH, but they are still not recovering after few weeks.

I check the bottom of the leaves and do not notice any bugs.

In the pics they do look somehow way better then in reality.
BC2.JPG BC4.JPG BC6.JPG LK1.JPG LK3.JPG LK4.JPG LK5.JPG LK6.JPG LK7.JPG

BC1.JPG
 

stnr420

Well-Known Member
Its hard to say seeing as i dont know the analysis of the nutes your using.however, but that looks like a magnesium deficiency, but you need calcium as well. Coco binds to those elements. I would get a all in one cal mag supplement...add to your water first at 5ml per gallon. Then add your nutes and feed..hand water until runnoff is achieved..i would hand water until your plants are healthy
 

im4satori

Well-Known Member
Nutrition:
1. Advanced Hydroponics of Holland - Grow 1ml/liter
2. Advanced Hydroponics of Holland - Micro 0.5ml/liter
3. Advanced Hydroponics of Holland - Bloom 0.5ml/liter
4. I also have Canna Magnesium, but do not feed with it yet.
Do I need more / less?

you've got a nutrient imbalance or def of some type involving magnesium and maybe more...
take it slow don't do anything yet

give me the npk % amounts and the calcium and magnesium % amounts for each of your nutrient

as for your system set up... ive not seen a set up in coco that has a continues drip 24/7
perhaps im just not aware of this set up

but id be worried about watering coco that much, just me
it seems it would increase your chances at root disease vs periodic watering
 

nfhiggs

Well-Known Member
Nutrition:
as for your system set up... ive not seen a set up in coco that has a continues drip 24/7
perhaps im just not aware of this set up

but id be worried about watering coco that much, just me
it seems it would increase your chances at root disease vs periodic watering
I agree - put your drip on a timer to run 15 minutes at a time for 4-6 times a day.

Calmag is a necessity with Coco.

PH your feed lower - 5.5 to 5.8 is considered ideal for hydro.
 

im4satori

Well-Known Member
Using Coco as a Substrate
Coco produces excellent results for the soilless grower; it is comparable in result to hydroponics systems.

It is a great alternative to the soil grower willing to experiment with a “soilless” medium, yet get comparable results to a hydro grow.

Coco can be used in a hydroponics system, or just put into pots and watered by hand as with any other soil grow. Countless grows for decades have been produced in plain soil, mixed with organics, compost, and perlite among untold other ingredients thrown in.

While soil does have its advantages, it also has more drawbacks: inconsistancy, unwanted (unknown) ingredients, increased chances of over-fertilizing and over-watering. Nearly all of the potting soil used has been sourced from nature contain larva and insect eggs.

The Definition of Coco
Many at first are misled by the use of the term Coco. It has nothing to do with the Cocoa plant at all. In reality, they are the brown fibers that make up the husk of a coconut, which have been washed and buffered. Pure Coco can be used as a substrate, or Coco can also be mixed in with soil.

It can be bought loose in bags; it is also pressed into planks (and bricks). Coconuts are found near beaches, oceans, places that have very salty air. To rid the coco of these salts, the coco is first washed, and then pressure steamed to get rid of salts, and bacteria, germs or anything else that might have been in it. Coco is buffered using water, enriched with Magnesium and lime. The quality of this treatment is dependant to the quality of the Coco. Coconuts cannot be bought from a store, pealed, and mixed into your soil.

(Edit: low quality coco may need to be washed to remove natural salts.)

Coco and PH
The buffering process also means easy adjustment of pH in the Coco, which is imperative when it comes to the optimum uptake of nutrients throughout the plant’s life.

Soil PH can be hard to change, since it takes time to correct, flow check and restore. It takes longer to correct the problem in soil, than it took to cause it.

The PH of fresh Coco is marked on the bag from 5.0 - 7.0, however all of the coco I've tested was always between 6.0 - 6.5. Changing the PH of Coco takes a few waterings of pH-adjusted water, perhaps only one. The medium is very reactive to the PH of the water given to it; this gives coco growers rapid control over pH.

What is important is that you use 6.0 - 7.0 pH water, 6.5 being optimal if in pots.

Oxygen and Coco
Soil has a tendency to become finer after time. The clumps of soil quickly disintegrate, leaving very fine pieces of matter which hold moisture, creating saturated spots, making the soil less and less aerated for roots over the plant’s life. The soil at the bottom of the pots can become a very hostile environment for the roots to grow, making roots suffocate in mud. Coco users rarely find this a problem. Coco almost never disintegrates, leaving the medium well aerated, supplying the roots constantly with enough oxygen, and all saturated spots quickly even out.

Reusing Coco
Another advantage of Coco is the fact it can be re-used. Because Coco is treated so well, you can get up to three grows from the same batch of coco. Coco is inert and does not absorb nutrients within its own fibers, so plants uptake only supplied nutrient-rich water; excess nutrients and salts are washed through with the overflow.

I paid 8 Euros for a 50 Liter bag of coco. 24 Euros in Coco, and I can fill a total of 9 seventeen Liter pots (4.5 gallon) 3 times over. Those 27 plants could go through flowering, and only averaged to .88 euro per pot in coco.

Before reusing coco, you must sift through the Coco looking for any loose root fragments, missed decaying leaves, ect. and remove them.

Advantages and drawbacks
Coco overall has many distinct advantages over soil. I have yet to grow a plant in Coco that hasn’t reached 2-2.5 feet in just 1 month from seed, without any stretching until later in life (without Topping or Fimming). The evenness of watering and the quick and direct changes of pH compares to hydro. The cost isn’t that steep because it can be reused up to 3 times, making the average cost (for myself) .24 cents US currency per US gallon. Well, after using coco, I’ll never use normal potting soil ever again

The only drawback to Coco I have found is that a massive root ball forms very quick while in veg., all my plants were detrimentally root bound in 7 Liter (1.85) gallons of coco after only 3 weeks of growth from seed. If you are ready for the growth, being in pots, and hesitant at all to go hydro with supplies and adjustments, it's just a small hurdle for all the benefits.
 

girudai

New Member
Hello Everyone,

Thank you so much for the answers!

After I did a DWC I noticed a very jumpy pH... I set my pH to 5.5 and after few hours its > 6, next morning its > 8.

After I read your answers I did:
1. changed water in reservoir with 1/4 of the recommended (on bottles) nutes dose (stupid me, I was using full dose)
2. flushed very well with that water
3. removed the dripping irrigation (as some roots are in the water already)
4. turned off one light and moved other one higher

And now I see that my pH is stable 5.5. The running water through coco coir must have made pH unstable before and that was probably very bad on those plants.

Now I see that the leaves that were very yellow before are filling up with green and only tips left yellow. I hope after few days it will recover.

BC1.JPG BC1.JPG BC2.JPG BC3.JPG BC4.JPG LK1.JPG LK2.JPG

@im4satori: There are no way at the moment for me to check the NPK, but I will post them a bit later, maybe we could check if I use it right. Also thanks for a comprehensive description on coco vs soil - I agree, I would never use soil again when I tried coco.

@ALl: Again, thanks people!!!
 

boilingoil

Well-Known Member
Using Coco as a Substrate
Coco produces excellent results for the soilless grower; it is comparable in result to hydroponics systems.

It is a great alternative to the soil grower willing to experiment with a “soilless” medium, yet get comparable results to a hydro grow.

Coco can be used in a hydroponics system, or just put into pots and watered by hand as with any other soil grow. Countless grows for decades have been produced in plain soil, mixed with organics, compost, and perlite among untold other ingredients thrown in.

While soil does have its advantages, it also has more drawbacks: inconsistancy, unwanted (unknown) ingredients, increased chances of over-fertilizing and over-watering. Nearly all of the potting soil used has been sourced from nature contain larva and insect eggs.

The Definition of Coco
Many at first are misled by the use of the term Coco. It has nothing to do with the Cocoa plant at all. In reality, they are the brown fibers that make up the husk of a coconut, which have been washed and buffered. Pure Coco can be used as a substrate, or Coco can also be mixed in with soil.

It can be bought loose in bags; it is also pressed into planks (and bricks). Coconuts are found near beaches, oceans, places that have very salty air. To rid the coco of these salts, the coco is first washed, and then pressure steamed to get rid of salts, and bacteria, germs or anything else that might have been in it. Coco is buffered using water, enriched with Magnesium and lime. The quality of this treatment is dependant to the quality of the Coco. Coconuts cannot be bought from a store, pealed, and mixed into your soil.

(Edit: low quality coco may need to be washed to remove natural salts.)

Coco and PH
The buffering process also means easy adjustment of pH in the Coco, which is imperative when it comes to the optimum uptake of nutrients throughout the plant’s life.

Soil PH can be hard to change, since it takes time to correct, flow check and restore. It takes longer to correct the problem in soil, than it took to cause it.

The PH of fresh Coco is marked on the bag from 5.0 - 7.0, however all of the coco I've tested was always between 6.0 - 6.5. Changing the PH of Coco takes a few waterings of pH-adjusted water, perhaps only one. The medium is very reactive to the PH of the water given to it; this gives coco growers rapid control over pH.

What is important is that you use 6.0 - 7.0 pH water, 6.5 being optimal if in pots.

Oxygen and Coco
Soil has a tendency to become finer after time. The clumps of soil quickly disintegrate, leaving very fine pieces of matter which hold moisture, creating saturated spots, making the soil less and less aerated for roots over the plant’s life. The soil at the bottom of the pots can become a very hostile environment for the roots to grow, making roots suffocate in mud. Coco users rarely find this a problem. Coco almost never disintegrates, leaving the medium well aerated, supplying the roots constantly with enough oxygen, and all saturated spots quickly even out.

Reusing Coco
Another advantage of Coco is the fact it can be re-used. Because Coco is treated so well, you can get up to three grows from the same batch of coco. Coco is inert and does not absorb nutrients within its own fibers, so plants uptake only supplied nutrient-rich water; excess nutrients and salts are washed through with the overflow.

I paid 8 Euros for a 50 Liter bag of coco. 24 Euros in Coco, and I can fill a total of 9 seventeen Liter pots (4.5 gallon) 3 times over. Those 27 plants could go through flowering, and only averaged to .88 euro per pot in coco.

Before reusing coco, you must sift through the Coco looking for any loose root fragments, missed decaying leaves, ect. and remove them.

Advantages and drawbacks
Coco overall has many distinct advantages over soil. I have yet to grow a plant in Coco that hasn’t reached 2-2.5 feet in just 1 month from seed, without any stretching until later in life (without Topping or Fimming). The evenness of watering and the quick and direct changes of pH compares to hydro. The cost isn’t that steep because it can be reused up to 3 times, making the average cost (for myself) .24 cents US currency per US gallon. Well, after using coco, I’ll never use normal potting soil ever again

The only drawback to Coco I have found is that a massive root ball forms very quick while in veg., all my plants were detrimentally root bound in 7 Liter (1.85) gallons of coco after only 3 weeks of growth from seed. If you are ready for the growth, being in pots, and hesitant at all to go hydro with supplies and adjustments, it's just a small hurdle for all the benefits.
Sort of a contradiction with some of the info. For one all coconut trees don't grow next to a saltwater oceans. They can grow 100's of mile from a saltwater source. If it requires washing and buffering to remove K and replace it with cal and mag than there must be something there that enables it to hold on to those elements. Think colloids, same as in a peat product.
No problems here with what you are trying to say, but a lot of that info is old and there is a better understanding of coco coir today.
 

im4satori

Well-Known Member
I don't grow and have never grown in coco so without personal experience all I can do is regurgitate whatever I read lol

ive just notice lots of literature state ph for coco ideally is 6 to 7

but peeps on this site are always suggesting 5.5 to 6

I cant really say with certainty which is better without first hand experience so I usually don't get into it much

perhaps they'll both work
 

boilingoil

Well-Known Member
I don't grow and have never grown in coco so without personal experience all I can do is regurgitate whatever I read lol

ive just notice lots of literature state ph for coco ideally is 6 to 7

but peeps on this site are always suggesting 5.5 to 6

I cant really say with certainty which is better without first hand experience so I usually don't get into it much

perhaps they'll both work
10 year coco grower here. From my experience 5.8 to 6.2 is the sweet spot. 5.5 started to show signs of problems with uptake. This is with a cannabis plant.
Most of the literature your refering to is general gardening Info not specific to any plant species and we know different plant have their own pH they thrive in.
 

im4satori

Well-Known Member
10 year coco grower here. From my experience 5.8 to 6.2 is the sweet spot. 5.5 started to show signs of problems with uptake. This is with a cannabis plant.
Most of the literature your refering to is general gardening Info not specific to any plant species and we know different plant have their own pH they thrive in.
im just curious

have you ever run a grow at a higher ph? 6.5 to 7.0?
 

Johnei

Well-Known Member
You sure that's not LED light damage, raise your lights see if it clears up n a few days, is the effected leaves directly under the LED? or everywhere even down low away from the light? Looks like light damage to me fooling into chasing a nutrient deficiency.

You said something started to green back up, did you by any chance lift lights or spin plants around so affected leaves were then not under the light and that's why it greened up?

editAddon- It's a lot easier to just raise lights a bit and see if that's what's causing it, then chasing nutrient and pH issues. Just sayin..
 
Last edited:

boilingoil

Well-Known Member
Yes, before switching over to RO. my water was 400 ppm with almost 300 of that as CaCo3 with a pH of 8.5 .
So as to not use copious amounts of pH down or sulfuric acid to get my solution to hydro level I let it go at 6.8.
Plants grew ok, not the best, still got good smoke out of them. World of difference after the RO, my yields doubled just from the ability to regulate my pH level for optimal nutrient uptake. And that was just using the cheap CNS-17 nutrients.
 

im4satori

Well-Known Member
Yes, before switching over to RO. my water was 400 ppm with almost 300 of that as CaCo3 with a pH of 8.5 .
So as to not use copious amounts of pH down or sulfuric acid to get my solution to hydro level I let it go at 6.8.
Plants grew ok, not the best, still got good smoke out of them. World of difference after the RO, my yields doubled just from the ability to regulate my pH level for optimal nutrient uptake. And that was just using the cheap CNS-17 nutrients.
ok
ill buy that info

damn that's a lot of calcium.. I mean a fuck ton

your case absolutely requires an RO lol
 

boilingoil

Well-Known Member
ok
ill buy that info

damn that's a lot of calcium.. I mean a fuck ton

your case absolutely requires an RO lol
Yes, a ton of calcium in carbonate form. you should see the build up that happened on the pots. Not to mention all the fixture that aren't run through the RO have to be replaced every year.
 
Top