Nug Machine final MODS ?

fishdeth

Well-Known Member
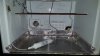
Well, the 3rd run is dun !
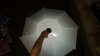
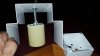
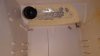
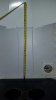
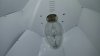
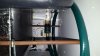
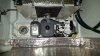
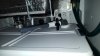
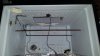
Got some plans to add a parabolic reflector with the Phillips 315W CDM mounted vertically.
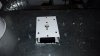
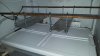
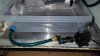
And lowering the root tub gaining an additional 4 inches for veg/stretch room.
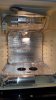
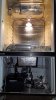
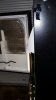
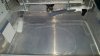
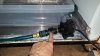
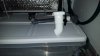
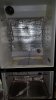
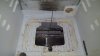
Got up a 5 this morning (couldn't sleep) so I went out to the shed and gutted the fridge.
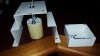
One of the new "kids" is almost ready for its first topping, so I have got to get this show on the road !
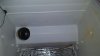
20151214_072021_resized.jpg 20151214_072050_resized.jpg 20151214_072057_resized.jpg 20151214_072108_resized.jpg 20151214_072105_resized.jpg
 

fishdeth

Well-Known Member
This is the former configuration.
I need to find a real shallow tub for the lower res.

20150913_171700.jpg 20150913_171754.jpg
 
Last edited:

fishdeth

Well-Known Member
I am also going to install a parabolic reflector and change the Phillips CDM to vertical mounting.
I wasn't thinking of using it till next run, but I reconfigured it pretty easy from the stock size of 42" diameter, to 28 ".
I loosely bolted the reflector fins to the top plate, then threaded a length of fishing line through the bottom holes and cinched it up.
The overlaps were all different so I averaged the distance of all then drilled 8 holes and bolted it all up.

Added BONUS !
When I ordered this, it was the $42 cheapie with the silver aluminum finish.
The deluxe WHITE model ($20 more and the best reflectivity) is what was in the box
This is really gonna spread the light !!!
Just look at the 4th & 5th pics.
The flash is bouncing around in there.
When I get the lamp mounted vertically in there, AND with the way I reshaped it, the sides are almost 90 degrees from the top, it is going to be unreal !
ALL nugs will be bombarded from EVERY angle with intense light as the curvature of the parabola magnifies/multiplies the light as well.
This just MAY be the thing that pushes the machine over the top.....?


20151206_112625_resized.jpg 20151206_112651_resized.jpg 20151206_114346_resized.jpg 20151206_114422_resized.jpg 20151206_125821_resized.jpg 20151206_125841_resized.jpg
 

fishdeth

Well-Known Member
The mogul socket mounts fairly flush with the top of the reflector and I was afraid the lamp would stick down too far.
The mount had the little square metal junction box screwed on up top with the wire connections inside to the supplied 10 ft ballast cord, then the socket mounted to that.
By eliminating the box, I can wire nut directly to the feed from my ballast and be able to use the socket at its original position, or raise it up to 2 inches higher, placing some of the neck of the lamp through the hole in the top of the reflector.
I will decide the location with the lamp on and then move it up and down to see how it affects the cone of light.
20151211_150957_resized.jpg 20151211_151009_resized.jpg
 

fishdeth

Well-Known Member
OK, after work today, I really got to it !
I drew out the octagonal top plate of the reflector, or at least as much of of it as I could on the ceiling then extrapolated where to cut to give room in the "hump" for the reflector.
Thank goodness the foam insulation was VERY thick.
When I got all the foam out of there, it exposed the screw tips that hold the fan mount on the backside.
They were too long and in the way of the reflector.
I gotta get some shorter ones to reinstall the fan.
It is slightly pushed in on the sides and just touching the back.

20151215_172750_resized.jpg 20151215_192329_resized.jpg 20151215_192339_resized.jpg 20151215_192709_resized.jpg
 

fishdeth

Well-Known Member
I wish I woulda mounted it just a little more toward the rear.
It hits the inside of the closed door.
The door squishes it about an inch.
No problem.
I did have to notch the door partition a bit.
20151215_192529_resized.jpg 20151215_192812_resized.jpg 20151215_194548_resized.jpg
 

fishdeth

Well-Known Member
I got the lamp mount installed thru the ceiling of the box.
I had to pick up 4- 4" bolts to reach thru.
I'll metal tape it in after I adjust the height of the lamp and see ow it affects the light cone.

20151215_192838_resized.jpg
 

fishdeth

Well-Known Member
I am using the "Gas Lantern Routine" this run.
Veg is: 12 on... 5.5 off... 1 on... 5.5 off.
Flower is: 11 0n... 13 off and on time is reduced by 30 minutes every 2 weeks.

Combine that with the new light system and more room to veg/stretch, AND I am going to force even more cold air around the root tub and the res.
I'll not make the same mistake of over-nuting this time either, so the FULL potential of these plants awaits !
:weed:
 

Gregor Eisenhorn

Well-Known Member
GLR is the way to go, saves up on the electricity bill. :D

Nice reflector by the way, it looks like some kind of weapon of mass destruction. So the next grow is going to be somewhat vertical is that correct? Or are you still going to Scrog/Mainline?
 

fishdeth

Well-Known Member
I also read where the extra hour of light in the middle of dark fools the plant into thinking it was another day, albeit a short one.
Yea, the plants will be mainlined again, and I will keep my screen a little lower to spread the colas around the perimeter more. I will actually let them stretch up into the reflector.
I can get 30" tall plants with the new configuration.
I will then concentrate on nurturing some of the choice side branches.

20151216_083545_resized.jpg 20151216_083550_resized.jpg 20151216_083637_resized.jpg
 

fishdeth

Well-Known Member
Aww dudes, and dudettes.
I have got this plumbing HOOKED UP !!!

First of all, after I lowered the upper surrounding tub, the root tub used to sit on these aluminum pieces, right on the support rods.
I drilled a bunch of holes and got these open eye bolts, U shaped at the top... perfect.
The steel support rods sag a little under the weight of all that water.
So now I have adjustability built in to keep the top of the root tub flush with the surround tub, so it helps support the lid that the net pots rest in.
20151217_045512_resized_1.jpg
 

fishdeth

Well-Known Member
You can see that I installed a much wider res.
I want to run the water shallower with a slight air gap under the res.
This will give more surface area of the water to be cooled.
Got the fill valve installed in it and filling while I finish a couple things up top. (takes a little while to fill).
20151217_161835_resized.jpg
 
Last edited:

fishdeth

Well-Known Member
I decided to run the pump externally to have better control over the flow with the built in shutoff valve.
MUCH easier than that stupid turny thing they put on the front of most pumps.
And the garden quick disconnect allows me to quickly take the pump out of the way to remove the res for cleaning.
20151217_162029_resized.jpg 20151217_161948_resized.jpg
 
Last edited:

fishdeth

Well-Known Member
But before you can remove it, you need to empty the system.
I also put a quick disconnect up top on the feed line, just uncouple it and attach a piece of leftover hose to drain.

You can also see that I have relocated the receptacles for more room for the air umps to sit in that recess.

20151217_162002_resized.jpg 20151217_161527_resized.jpg
 

fishdeth

Well-Known Member
I had to make a longer pivoting drain arm from the root tub and I have it going into a cut piece of a P trap to get the water flowing better through the nylon stocking filter (not yet installed)
20151217_162123_resized.jpg 20151217_162209_resized.jpg
 
Top