cannatricks
Well-Known Member
I was putting this up n my grow Journal https://www.rollitup.org/grow-journals/461792-rotational-grow-set-up-3-a.html and decided I would copy it here, for anyone that would like to see what we do with our nursery/farm.
First off, if your a stickler for sterile soils, don't do your own composting, and are stuck on all the hype about "Brand X soil is the best!" this is not the thread for you. I do things down and dirty, I expect critters, fungi, and bacterias, I actually want them!
Why? Because weed is a plant, and plants deal with this stuff. If you can't control the pests in your garden, then you won't have a garden, no matter how hard you try to keep them out by 'sanitizing' this and that.
My growroom is fully vented to outside and I have no problems with molds, because I keep my humidity down. (I wouldn't use this mix for a contained system, like a stealth grow.)
First the Ingredients
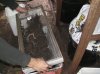
I start with just a few things, first is rocks. if you have a property there is probably somewhere that has some nice rocky soil you can work with. I have a patch where we had gotten a truckload of gravel, and moved it, however the soil underneath was saturated in rocks, so we are slowly getting them out for use in our garden

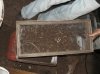
I take these up into little soil screens I have made with a little wooden frame and less then 1/4" holes in the screen
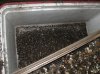

It comes out to just rocks and a little plant matter (straw, maybe some roots)
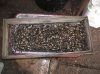
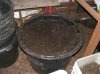
Now we head to my compost pile (I have 2 for different compost pile, one is for goat/chicken manure and plant matter for High N. The other is for fruit and vegetable compost which is high in K/P.)
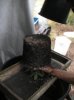
Here is my Vegetable compost that we are pulling from today (I'm getting the babies ready to flower)

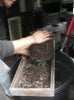
We run this through the screen just as we did the gravel, but keep the stuff that gets strained out, we will use that later!
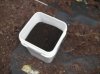
We end up with a deep dark black soil that is super rich in nutrients (this is high K/P ratio.)

Now I combine 50% of this dark rich soil, with 25% manure worm castings for N during the cycle, with 25% peat moss and a dash of sweet lime. The most important thing here is to make sure you get a very very good mix, if there are big chunks of worm castings in your soil you may get burning when the roots get there.


That's it, you should have a great rich soil ready to use. We now have a big bucket of soil, a big bucket of rocks, and a big bucket of all the stuff we strained out of the compost.
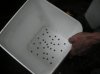
I personally love Pickle Buckets for my plants, they are 5 gallon, and square allowing me to get the most space out of my garden.
I take the buckets and drill them out. All across the bottom, and 3 on the bottom of each side for drainage and airflow.

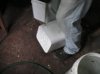

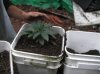
Next we fill the bottom up to the top of the holes we drilled with our rocks. This will provide good air intake for our bottom roots, and also not allow the roots to become rootbound in the bottom of our pots.
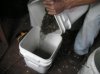
And I fill the bucket about 3/4 full of our new dirt.
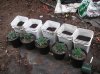
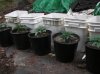
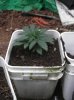
I have 5 little ones going into these today, I would normally not replant so early but we need some buds! So I'm sending these into the flower room with a 1000w cool MH to grow another week and then flower them.

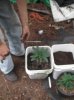
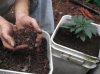
Now comes the tricky part, because I use stones in all my pots, when I replant I want to reclaim those rocks, and be very careful not to destroy the rootball when removing them. I pinch the top between my fingers and flip the whole pot upside down and slide the bottom off. (this works best when the soil is damp, not dry, and not wet)

I then push a little soil off the top, and lay it into our pot, i take my hands and massage the rootball a little once it's in the bucket to loosen up some of the roots. then add soil on top to the surface with about a 2cm gap from where roots start.

Remember that crap we pulled out of the compost? nows the time to use it, I mulch the top layer of my soil with this unbroken down compost, this will break down over time and release a nice slow stream of nutrients to my little plants all through the cycle, if we add molasses to our waterings we will make this break down process go faster and really get the soil alive!
Now you should have a plant ready to go all the way through flower and it should only require very minimal feedings of nutrients. Good Luck!
First off, if your a stickler for sterile soils, don't do your own composting, and are stuck on all the hype about "Brand X soil is the best!" this is not the thread for you. I do things down and dirty, I expect critters, fungi, and bacterias, I actually want them!
Why? Because weed is a plant, and plants deal with this stuff. If you can't control the pests in your garden, then you won't have a garden, no matter how hard you try to keep them out by 'sanitizing' this and that.
My growroom is fully vented to outside and I have no problems with molds, because I keep my humidity down. (I wouldn't use this mix for a contained system, like a stealth grow.)
First the Ingredients
I start with just a few things, first is rocks. if you have a property there is probably somewhere that has some nice rocky soil you can work with. I have a patch where we had gotten a truckload of gravel, and moved it, however the soil underneath was saturated in rocks, so we are slowly getting them out for use in our garden
I take these up into little soil screens I have made with a little wooden frame and less then 1/4" holes in the screen
It comes out to just rocks and a little plant matter (straw, maybe some roots)
Now we head to my compost pile (I have 2 for different compost pile, one is for goat/chicken manure and plant matter for High N. The other is for fruit and vegetable compost which is high in K/P.)
Here is my Vegetable compost that we are pulling from today (I'm getting the babies ready to flower)
We run this through the screen just as we did the gravel, but keep the stuff that gets strained out, we will use that later!
We end up with a deep dark black soil that is super rich in nutrients (this is high K/P ratio.)
Now I combine 50% of this dark rich soil, with 25% manure worm castings for N during the cycle, with 25% peat moss and a dash of sweet lime. The most important thing here is to make sure you get a very very good mix, if there are big chunks of worm castings in your soil you may get burning when the roots get there.
That's it, you should have a great rich soil ready to use. We now have a big bucket of soil, a big bucket of rocks, and a big bucket of all the stuff we strained out of the compost.
I personally love Pickle Buckets for my plants, they are 5 gallon, and square allowing me to get the most space out of my garden.
I take the buckets and drill them out. All across the bottom, and 3 on the bottom of each side for drainage and airflow.
Next we fill the bottom up to the top of the holes we drilled with our rocks. This will provide good air intake for our bottom roots, and also not allow the roots to become rootbound in the bottom of our pots.
And I fill the bucket about 3/4 full of our new dirt.
I have 5 little ones going into these today, I would normally not replant so early but we need some buds! So I'm sending these into the flower room with a 1000w cool MH to grow another week and then flower them.
Now comes the tricky part, because I use stones in all my pots, when I replant I want to reclaim those rocks, and be very careful not to destroy the rootball when removing them. I pinch the top between my fingers and flip the whole pot upside down and slide the bottom off. (this works best when the soil is damp, not dry, and not wet)
I then push a little soil off the top, and lay it into our pot, i take my hands and massage the rootball a little once it's in the bucket to loosen up some of the roots. then add soil on top to the surface with about a 2cm gap from where roots start.
Remember that crap we pulled out of the compost? nows the time to use it, I mulch the top layer of my soil with this unbroken down compost, this will break down over time and release a nice slow stream of nutrients to my little plants all through the cycle, if we add molasses to our waterings we will make this break down process go faster and really get the soil alive!
Now you should have a plant ready to go all the way through flower and it should only require very minimal feedings of nutrients. Good Luck!