Sammy's Fan Leaf Processing Guide for Great Edibles

PsychedelicSam

Well-Known Member
First a bit of background. My caregiver had just harvested his crop of Blue Widow and OG Kush. He usually gives me his sugar trim and popcorn, but this time he asked if I wanted the fan leaves, if they were good for anything. He normally threw them away. He had 35 good plants, so I told him to bring them on. If it had only been a couple of plants I might have passed it up since I was still getting the trim and a heavier volume of leaves are needed for any usage. They were the fully mature leaves. The plants had been flushed for 2 wks prior to being hung so most of the green chlorophyll was leached out of it. My intentions are to use it for topical balms/salves of various sorts so that I won't have to use my premium extraction for it, although it will make a great topical as well as edibles. i wasn't sure how the potency would be and if it would have enough of the psychoactive compounds present for good edibles, but after smoking a joint of the dried fan leaves for a wake and bake, I believe that's a good bet.

There is trick to getting your wet fan leaves to dry up and look like it came from a bale of dank and that is what I'm going to show you tonight. In the 70's we used to go out into the fields and ditches to grab the wild hemp plants then. Had to do it at night and very carefully, though, new or no moon. They'd be 10 ft tall or more, all veg, no psychoactive at all. Back then, people bought and sold oregano and catnip as pot. You couldn't do that these days, not for almost 40 years unless you were really stupid. In the summer during the yearly smoke drought, after all the crapweed had finally been sold to the needy and before the new harvests in Mexico and Columbia, you could sell that ditch weed for low Mex easily, especially if it was dried and cured correctly. I could never stoop low enough to try to sell it to some unknowing college kid so I'd sell it in bulk to someone else for 20 bucks or so. Done right, it can be nice and springy with a smooth smoke and decent smell.

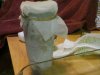
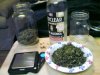
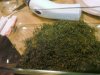
Step 1) Unfortunately I forgot to take a picture of the fresh fan leaf, but it just looked like a lot of wet weeds and filled two paper bags, shown in this picture. The Blue Widow is on the left and the OG Kush on the right. I placed the wet leaf in each bag and left them open to dry out. For the next 2 days I kept stirring the material, turning it over often to promote even drying which is important for cosmetic purposes. That's not as important in this age but I still like it to look pretty. Because I live in Arizona and humidity is non-existent, it dried nicely in 2 days, enough for a joint to burn evenly. Right there it has the green tint you might expect for air dried homegrown. There was 3 oz of the BW and 2 oz of the OG when finished. SUNP0011.JPG

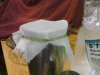
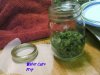
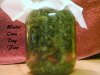
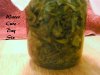
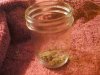
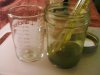
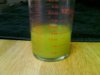
Step 2) If you plan on processing it all into something immediately, then there's no reason to go further than the previous step. But if you just want to use an ounce at a time or something like that, you'll want to cure it so that it will retain it's potency and the aroma and taste mellow. That last part is especially important if there's a chance you may have to smoke some before the next grow is ready to start sampling. This used to be accomplished by a dry ice cure but now there is better and easier technology at our fingertips to make it even better. I use vacuum sealing, in particular, ZipLock Vacuum bags. This is one ounce of the BW fan leaves. SUNP0012.JPG

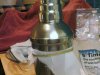
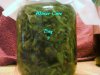
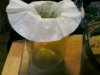
Step 3) Using a battery powered vacuum bag sealer, I pull all the air out of the bag until the bag is form fitting around every piece of the contents, like vacuum packed freeze dry meals. This pulls the moisture from the leaf to the surface where it can evaporate. Depending on the original dryness, you open the bag to release any moisture that has built up then vacuum it up again. Considering that mine is only 3 days away from completely fresh, a lot of internal moisture remains so I will burp it for a week. It's similar to curing with jars but doesn't take as long. Buds can develop the sweet tastes and smoke, too, just like with jars.

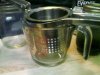
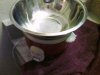
3) Equipment. Vacuum bags, pot and the vacuum. SUNP0014.JPG

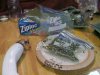
4) After burping for a few minutes each day then vacuum sealing again, stash it away. It won't mold and unlike a jar, it won't break and it takes less room to store it. This way you don't have to keep handling it whenever you want to make something and that will keep it in better condition. SUNP0015.JPG

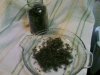
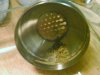
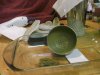
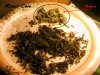
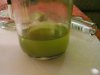
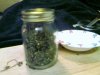
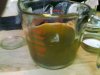
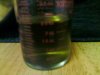
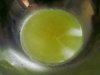
5) In order to give me an idea of the potential value of these leaves, I smoked a fat joint when it was dry enough. After smoking half of it I had a really nice buzz. Rollingjoints with leaf is an art to keep it from turning to powder. In this picture is a joint like the one described here. It looks fat but it is only a half gram. Above the joint is the amount of weed I used for the joint. I was able to get all that leaf into that standard paper without crushing it up. It smoked smoothly and evenly. SUNP0016.JPG

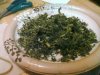
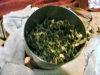
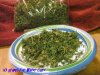
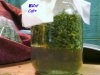
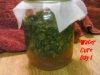
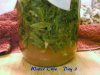
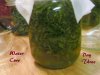
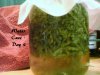
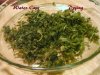
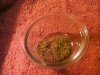
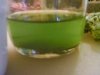
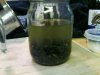
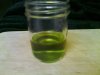
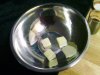
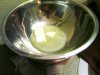
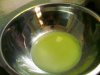
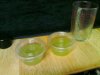
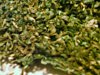
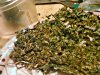
5, 6, 7) This is the leaf after a few hours in the vacuum. The texture and coloring are looking a lot more like good reefer. You can see it if you enlarge the pics. The third picture is of an ounce after a few hours of vacuum and chopping for the decarb of my next project. I don't know if anyone has an interest in storing fan leaves, but this is how I do it.

SUNP0001.JPGSUNP0002.JPGSUNP0003.JPG

I will be following up with a few things to do with it.


PsychedelicSam

Well-Known Member
The guide above was written in December when I first received the fan leaves. A couple of weeks later I got another half pound of the OG Kush leaves. After curing it with the vacuum for a few days, I placed it in quart mason jars for long term dry storage. If placing in the freezer for storage, use vacuum sealing. It's now 6 months later and I still have 2 ounces of the OG Kush left. It hasn't got any mold and a joint will still give me a good buzz. Don't get me wrong. This or any or fan leaf is never going to taste or smell, or smoke for that matter, like the bud of the same plant. In fact it smells like hay but when you're making edibles, it doesn't matter. It doesn't taste much better, either, but there are ways to neutralize that by the way you process your leaf for consumption. Coming up will be ways to do just that.

In the meantime, here's a picture of the same leaf as shown above only 6 months later. Open the picture for the bigger image and you'll see that it still looks good, not all powdery and dried out. The 2 ounces of leaf will give me 12 fluid ounces of good Dragon extraction that I will then transfer to my oil or butter or honey for use in my recipes. Each ounce of this extract gives me a minimum of 20 potent doses, enough for a good batch of brownies or cookies or candy. :leaf:

six months later.jpg
 

PsychedelicSam

Well-Known Member
Martini Shaker Fan Leaf Dry Ice Hash

Since I had all this fan leaf, I decided to make a small amount of dry icehash and I got to thinking that maybe not everybody knows how to do this. Maybe a lot of people think that it can be a project that couldn't possibly be done in their kitchen in fifteen minutes or maybe they think you have to have top trim or bud. Whatever the reason, I decided to put a tutorial in here to show how easy it is for the everyday Joe/Jane.

I'm using these fan leaves I have from Blue Widow and OG Kush, about 7g each and got a return of about 2 grams. That may not seem a lot but remember that it's fan leaves. Not as much as the good stuff would give you but it's decent and the buzz is excellent. It really only takes a couple of hits to get a buzz. I was actually surprised but it is the same trichomes as the bud and it has the same effects. I got loaded.


Anyway, here's how easy it is to have some hash with no big hassles.

These are the things you need to do this at your kitchen table.
Martini shaker-metal
110 mesh screen (I use silkscreen). Cut a square big enough to fit over the top of the shaker with enough left to secure it.
Glass dish or plate
Leather Gloves
Half ounce (up to you) of marijuana, whether fan leaves, trim or buds, grinding not necessary
Rubber band to hold the screen onto the shaker.

1 lb
dry ice SUNP0004.JPG

Half ounce of fan leaves. Break the dry ice into pieces. Always use thick gloves to handle the ice. Cloth will stick to it. After adding a few pieces of dry ice into the shaker, load it with pot. SUNP0003.JPGSUNP0007.JPG

After filling the shaker with dry ice and marijuana, place the screen over the opening and secure it with a rubber band or a wire/plastic tie low enough the the top of the shaker will fit over the top. It will be very tight. After placing the top on the shaker, shake it upright for a couple of minutes. Then turn it over and shake it over the glass dish. Remember to use thick gloves so that your hands don't get frostbitten. The outside will be coated with ice. SUNP0008.JPGSUNP0009.JPGSUNP0010.JPG

I like to keep the lid on for the first couple of minutes after I've turned it upside down. Something in the back of my head tells me that the early shake is the most potent, with there being more plant material present with the continued shaking. The trics cake to the lid and the hash is more golden than later. I scrape it out easily and keep it separate from the rest. I don't know if it is better, but the taste and color are. You shake it over the glass dish with the lid off to collect the hash. You may need to hold on to the screen when shaking up and down so that it doesn't fall off and get waste plant material in it. Then just scrape it up with a card. I got a couple of grams from the dish and about a half gram from the lid. You can see that it's a lighter color. If you have a little herb press, you can press it into a pellet but otherwise it is fluffy and more like kief.

SUNP0012.JPGSUNP0011.JPG

You can now take this hash/kief and use it in your recipes without the worry about the heavy weed taste you'd get from cooking the leaf. Coming soon will be a guide for turning this hash/kief into a potent Dragon extraction which can then be used as a tincture or to transfer the THC to butter, oil or honey for recipes.
 

PsychedelicSam

Well-Known Member
Water Cure for Removing Unwanted Compounds from Cannabis......Part 1

This method is used to clean water soluble plant compounds such as chlorophyll from your cannabis leaves and sugar trim for tastier edibles. It can also be used to clean possible contaminants from your buds. A time you might want to do that with buds is if there were chemical nutrients used in the cultivation and a failure to flush, for whatever reason, or pesticides being used too late. Also, if you use brickweed or other imported reefer where the conditions of growth were uncertain. Fortunately, Paraquat is no longer being used because this would not have helped that. I hope those days are over forever. But this process can wash out the insect parts and other stuff that might have gotten included with the harvesting operation.

The method that I use takes 7 days to complete. The water is pretty clear after 5 days and the extra 2 days as a final flush. I use this method because it was the one I found that made sense. There may be others using less time, even just a quick wash, but I was in no hurry. I used 110 silkscreen in the jar lid to strain each day but next time I'll just poke holes in the metal lid. It takes a lot of movement to get the water through the fine mesh, especially when the wet reefer is laying on it upside down and all the water to refill would run off more than fill the jar. I had to put the screen right up next to the faucet to force it through. But I persevered.

1) 10 grams of Kosher Kush sugar trim and popcorn Water Cure 1.jpg
2) Placed in a pint jar. After seeing how the reefer expanded during the process, a quart might have been better. This time I used the silkscreen screwed over the top and left on for straining and filling. Water Cure 2.jpg
3) This is immediately after adding the water the first time. I use a faucet filter with activated charcoal which removes a lot of the crud in the tap water.Water Cure 3.jpg

4), 5), 6), 7), 8) Days 1 thru 5, taken each day before changing the water. You can see how the water clears each day and is pretty clear by day 5, but still a little there. Remember, that's a maroon towel behind it that's providing a little background color. Water Cure Day 1.jpg Water Cure Day 2 (2).jpgWater Cure Day 3.jpgWater Cure Day 4.jpgWater Cure Day 5.jpg

Part 2 coming in a few minutes.
:)
 

PsychedelicSam

Well-Known Member
Water Cure For Removing Unwanted Compounds from Cannabis.....Part 2


In the previous post we covered the first five days of the water cure. Now we have the last 2 days and drying. You shouldn't get worried if you notice that the reefer smells like sewage from days 3 thru 5, that is as long as you've changed the water everyday. The reefer is cleaned pretty well after the fifth day and the last 2 days is like an extended rinse. This process can also be used as an alternate to winterization. This is done before and winterization is performed after. Both perform the same service. I used trim for this guide but I've used it with fan leaf and also some brickweed for my first experiment.

After it dried it was a deep red and gold with the colors jumping out at ya. The smell and taste are neutral. I lost about 3 grams of weight during the process but I allowed for it in the original weight.

1) Day 6. You can see how the plant material has expanded, making it hard to see the water clarity. Water Cure Day 6.jpg
2) Final day, Day 7. I tried to position the open spots so that you can see that the water is crystal clear. Water Cure Day 7.jpg
3) Spread in glass plate to dry. Had the consistency of stewed spinach. Water Cure Dry a.jpg

4) Fully dried. I had it by the grow lights and the coloring didn't come thru as much as I'd hoped in the picture. It's coloring is beautiful and reminds me of the old days.
The reefer circled at the top of the page is some of the original trim for comparison. Water Cure Dry b.jpg

This process and the dry ice hash posted above are easy ways to improve the quality, not potency, of your resources right in your kitchen or living room or wherever you decide to do it. Bad taste is no longer a reason not to use those leaves, and it makes clean concentrates. Shortly, I will post and easy guide to make a potent Dragon tincture from the fan leaf hash/kief and Dragon for edibles from fan leaves.

I hope these little guides will cause someone, with the resources but maybe not the experience, to utilize that 4 months they've put into their grow, with maybe another few months until the next one, or someone, like me, who knows a grower who doesn't want them, the needed little bit of motivation to try it themselves.

By the way, THC is not soluble in water and is not lost in this process.
 

PsychedelicSam

Well-Known Member
no updates?
Now that I know that someone is paying attention, I'll add more, including a new thread for high potency, simple and easy tinctures and edibles. There doesn't seem to be a lot of traffic in the edibles section here and I'm hoping to change that. But actually, I've had company from out of town for the last week or so and haven't had the time to devote to the write up, but I will proceed now. Expect to see a few new things here and in other threads. Thanks for asking. I'll get busy on it today.
 

PsychedelicSam

Well-Known Member
Dry Ice Fan Leaf Hash Dragon Tincture
KiefRun7.jpg

First, decarb your kief/hash. Dry ice hash doesn't need as much time as other forms due to the partial drying action of the dry ice. The hash should be in as loose a form as possible. If you are using a compressed hash, you'll be able to pulverize it after a few minutes in a warm oven. If you have kief/hash made from brickweed or other older cannabis, thedecarb shouldn't be necessary but a little heat will help with powdering a compressed hash.

KiefRun1.jpg

For the purposes of this guide I am using 1g of kief with 1 fluid ounce of 190 proof Everclear. However, if you can only get 151 or even 80 proof, this would be the process for you because you don't need to reduce the alcohol. Again, the pictures here show 2 ounces of alcohol but they are from my initial project. Since then I have used up to 3g of kief in 1oz of alcohol. With more than 3g I would use a little more alcohol to ensure your kief was well covered and allowing for spillage.

1) Place 1g of loose kief/hash in a small, sealable jar and place it in the freezer for 24 hours. Also have your alcohol in the freezer separately for the same length of time. KiefRun2.jpg

2) After 24 hours in the freezer mix your kief/hash and the alcohol and shake 15 minutes.

KiefRun5.jpg

3) At this point I wanted to mash up those trichomes as much as I could in order to increase absorption. I used a glass wand in disguise as a candy thermometer. I didn't want to use any kind of reactive material for that so that nothing would leach into the solution. The narrow end of the thermometer was perfect, just don't mash too vigorously. I smashed them up for a few minutes, shook again and placed back in the freezer for 4 hours.
KiefRun6.jpg
4) After another 4 hours in the freezer, shake it again and manually agitate with the wand if desired. This is the finished product. There really is no need to filter it unless you want. Remember that if you're only using an ounce of ethanol, some of that ounce will be absorbed by your filter. If you do want to filter, use the smallest area possible and wet your filter with fresh alcohol first. That will reduce the amount absorbed by the dry filter.

KiefRun9.jpg

This process works for any hash. The steps are the same. Coming soon will be a guide on making a Dragon tincture with unprocessed fan leaf to use for edibles. Stay tuned.
 

PsychedelicSam

Well-Known Member
A little later today I will post the first steps in preparing a Dragon extraction from fan leaves to use for tasty and potent edibles. You may see a sister thread about Dragon extractions for tinctures and another coming soon about Dragon extractions for edibles. Each will have similar guides to this one but slightly different. With fan leaf there's not nearly the same trichome count as sugar leaf or buds so the extraction process is simpler. :smile:
 

PsychedelicSam

Well-Known Member
Making a Dragon Alcohol Extraction for Tincture and Edibles With Fan Leaf


I apologize for being so slow in getting this posted. I'm fairly seriously laid up and it can be hard to sit at the computer long enough to get it all put together, but finally this section is finished with pictures. Another reason it took so long is that I decided to make a fresh batch with new pictures instead of using archived material. This is going to cover making a Dragon extraction that can be used for a tincture if desired or edibles. For the edibles, I'll do a solvent transfer to butter and that will come on the next phase.

I used a half ounce of OG Kush fan leaves that I've had since January and was really dry already, crumbly, so I didn't decarb, but if you are using fresher resources, decarb it as needed. Unless it's still pretty fresh and damp, it won't take as long for the decarb process as buds would. I also used 8oz of 190 proof Everclear, or at least that's what I thought at first. I had measured the alcohol left in my bottle a couple of days earlier and I thought it was a cup, 8oz, but I was looking at it from an angle and goofed. Instead, I used 10oz. Not a big deal, just means more reduction to reach the desired potency. So this is a case of don't do as I do, do as I say. The guide is for 8oz of Everclear per 14g of fan leaf. Shown in the picture is the 14g, the Everclear and the remainder of the half pound of fan leaf that I had.

GDprep1.jpg

If your leaves need decarbing, finish that first, just until it's crumbly. Probably not more than 20 minutes at 220°F. Crumble your leaves and place them in a pint jar. An ounce or more should go in a quart jar. As you can see, just a half ounce takes up a lot of room. At this point you place your jar of dry fan leaf and your alcohol separately in your freezer for a minimum of 24 hours.

GDprep2.jpg

After a minimum of 24 hour in the freezer separately, add 8oz of the freezing cold alcohol to your frozen leaves and shake for 15 minutes. Then place the mix back in the freezer for 2 hours.

GD1.jpg

The additional 2 hours is to let it soak a little to get all the THC. It will also pull more of the chlorophyll. Mine were flushed on the plant the last 2 weeks before harvest so a lot of the chlorophyll is already gone and most of the rest gone with the aging process. This also allows some of the other beneficial compounds to be extracted. After 2 hours back in the freezer, shake it again for about 15 minutes, then strain. For this volume I use a glass measuring cup and a potato ricer, but anything that's a fine mesh will work. The finer filter will follow. Here you can clearly see my measuring error. 10oz...oops!
GD2.jpgGD3.jpg GD4.jpg

Next we will run the solution through a paper coffee filter. GD6.jpgGD5.jpg

This is not the finished product. To get it down to a high potency, we must evaporate the 8oz down to 3oz. The most common way to do this is with a double boiler or hot water bath, but you need very good ventilation since alcohol is highly flammable and the fumes explosive if not careful. Don't do it around an open flame or spark. A fan of some sort is advisable. I use a stainless steel bowl on top of a rice cooker. The alcohol will start bubbling above 170°F and will evaporate quickly so keep your eye on it. setup.jpg

This is the finished product. 3 fluid ounce of OG Kush Green Dragon tincture that works great in 8-10 drops. Not droppers....drops. Another reason it took so long to write this up is that I wanted to be sure it fit my criteria. I tried it on several mornings for wake and bake and was very pleased. If it had taken more, I would have reduced the alcohol a little more. That's how you control your potency. GD7.jpg

Since I don't need any tincture (I have a lot), I'm going to use this for edibles. The next, and probably last, guide on this subject will be showing how to turn your Dragon into butter/oil/honey to use in recipes. I get over 20 very good servings with each ounce of solution. The reason I say probably the last is that from there I'll be referring to another of my developing threads that will cover how to turn those transfers into delicious and very simple edibles that anyone can make, even if you're as disabled as me. So stay tuned.
 

Highocaine

Well-Known Member
Very nice guide. To clarify, you used fan leaves from harvest that were already flushed? Would similar results be unachievable using fan leaves/shoots trimmed off during veg? The way I understand it is that the amount of THC during veg is negligible.... but what if you had enough of it?
 

PsychedelicSam

Well-Known Member
Very nice guide. To clarify, you used fan leaves from harvest that were already flushed? Would similar results be unachievable using fan leaves/shoots trimmed off during veg? The way I understand it is that the amount of THC during veg is negligible.... but what if you had enough of it?
You know, Highocaine, I'm hoping so. These leaves were from a 40 plant grow and had been flushed, but I have some fan leaves from a small closet grow that I had collected throughout the grow and I plan on trying it but I'm not sure that I have enough to make a good tincture after reduction. I do know that it will get you stoned if you smoke it, so I'll probably do it but I may add some male plants, too. I have the same amount and I'm interested if it can add to a tincture. It's got a good buzz, too, but there's not much info on males so my curiosity needs to be scratched. I've always gotten a really nice high, not like the females, but nice, during my 40 yr intimate relationship with the plant. Most people throw them away or compost but they are useful. They seem to have a different ratio of compounds or something and have restorative properties. I'll do that when I get paid next week and can afford the alcohol. I'll be sure to post the results here.

Thanks for stopping by, really. It seems that the edibles section here doesn't get a lot of notice compared to others but I'm prepared to go the distance and get my experience out as much as I can while I can. Thanks again.
 

Highocaine

Well-Known Member
No problem! You have good info. Dragon extractions actually seem to be easier than even making butter.. The hardest part, at least for me, is obtaining high proof alcohol. Easier to make on your own than to buy, here.

One really nice thing about this method is that you can alter the potency after the extraction is done! Simmer to increase concentration, add raw alcohol to dilute. Can't do that with butter.

I've been reading a few famous marijuana horticulture books, and the amount of THC found in males is comparable to females (for some types of strains) but only in the non-flowers.

In fact, one passage even suggested never flowering your plants! Just constantly trimming them back and replacing plants that run out of veg "steam", drying what you trim, and smoking it. I think this was from a really old book (Closet Cultivator?) though, so the 1-3% THC content might've been enough for them at the time :P
 

PsychedelicSam

Well-Known Member
No problem! You have good info. Dragon extractions actually seem to be easier than even making butter.. The hardest part, at least for me, is obtaining high proof alcohol. Easier to make on your own than to buy, here.

One really nice thing about this method is that you can alter the potency after the extraction is done! Simmer to increase concentration, add raw alcohol to dilute. Can't do that with butter.

I've been reading a few famous marijuana horticulture books, and the amount of THC found in males is comparable to females (for some types of strains) but only in the non-flowers.

In fact, one passage even suggested never flowering your plants! Just constantly trimming them back and replacing plants that run out of veg "steam", drying what you trim, and smoking it. I think this was from a really old book (Closet Cultivator?) though, so the 1-3% THC content might've been enough for them at the time :P
I love Dragon extractions for tincture and edibles. It makes the cleanest edibles, like with other concentrates, and because you can reduce it gain potency, it makes using the fan leaf much more appealing. And transferring the thc to butter or oil or other things is so much easier than trying to get enough in a couple of sticks of butter using the traditional method.

My males have only gotten to the pre-flower stage when they were just starting to show the sacs, so they didn't get far into flower, but that info is interesting although I hope not to get in a situation to get a male in full bloom. I know that the plants, male and females, are really hardy in veg state. I have one now that I had reveged after flowering because it was so great and I wanted some clones. That damn thing is growing faster than I can keep up. I've heard of wild Thai plants that were actually trees and because they are tropical, they would just keep growing, not budding, year after year after year. Those leaves were supposed to be awesome.
 

PsychedelicSam

Well-Known Member
No problem! You have good info. Dragon extractions actually seem to be easier than even making butter.. The hardest part, at least for me, is obtaining high proof alcohol. Easier to make on your own than to buy, here.

One really nice thing about this method is that you can alter the potency after the extraction is done! Simmer to increase concentration, add raw alcohol to dilute. Can't do that with butter.

I've been reading a few famous marijuana horticulture books, and the amount of THC found in males is comparable to females (for some types of strains) but only in the non-flowers.

In fact, one passage even suggested never flowering your plants! Just constantly trimming them back and replacing plants that run out of veg "steam", drying what you trim, and smoking it. I think this was from a really old book (Closet Cultivator?) though, so the 1-3% THC content might've been enough for them at the time :P
I was going to add this link to my original reply but forgot. This link is for the 151 Dragon Tincture in my other thread. It makes a great tincture using the dry ice hash, very easy and potent. Here it is:

151 Dragon Tincture
 

PsychedelicSam

Well-Known Member
Excellent Write up and + rep for using all that the plant give ya..

Thanks for the good vibes, gioua, and thanks for dropping by and for the rep. It's greatly appreciated. I tell ya, pain can be a great motivator. Just a few short years ago I probably wouldn't have messed with the fan leaves but pain has made me wring the last drop of medication I can get out of my cannabis since it's better than morphine. I just wanted to share the info with others while I can because I know there are a lot of people out there who can't afford to make edibles from their dank bud but they have access to fan leaves that someone else doesn't want or their own. Better than mulching it in my opinion.

In the next couple of days I'll add the process for turning the Dragon into cannabutter or oil.

Thanks again!
 

PsychedelicSam

Well-Known Member
Making Butter with Fan Leaf Dragon Extraction


Today I'm going to show you how to make a fantastic butter with no weed taste using the Dragon alcohol extraction I just made from the fan leaves of some OG Kush. This process is called a solvent transfer and what it consists of is transferring the THC from the Dragon to the butter by the process of reduction, or evaporation.

Using the Dragon that I made in the guide above, I found that from the time I finished making it that I only had about 2.5 oz left from the original 3 oz. I had used some in testing and had accidentally left the lid off the jar and some evaporated.
butter2.jpg Now, ordinarily I would use a 1:1 ratio for Dragon to Butter for good daytime edibles. If I were to do that here, I would wind up with 2.5 ounces of butter, but instead I'm going to concentrate it all into 2 ounces. That will give my butter the same potency as 1.25 oz of Dragon for each ounce of butter. You can easily concentrate your transferred medium in this manner. It's very easy to make your butter double or triple strength just by using a corresponding amount of Dragon. For instance, if you wanted triple strength butter to make something that you want potent but doesn't call for a lot of butter, you would use 3 oz of Dragon in one ounce of butter. If doing that, you could also reduce those three oz of Dragon to 1oz and then do your transfer to the one ounce of butter. 6 of one, half dozen of the other.

I like to use ghee or clarified butter to avoid the solids that are in regular butter but I'm out of ghee and I don't want to take the time to clarify some, so I'm using regular store bought sweet cream unsalted butter. In this case I put 2 oz (4 tbsp) of butter in my double boiler set up and melted the butter butter1.jpgbutter3.jpg before adding the Dragon extraction. butter4.jpg At this point I turn up the heat on my rice cooker until the water is a rolling boil. This will keep the liquid in the bowl at an even 212°F and prevent the butter from burning while allowing the alcohol to boil off rabidly. Please do this with adequate ventilation. butter5.jpg Stir your butter periodically so that the solids don't stick to the bottom and scorch. In this case the alcohol had been fully removed within 20 minutes. Sometimes when I'm not in a hurry, I'll put the mix in a small glass or ceramic dish and set it on a coffee mug warmer for a few hours until the alcohol evaporates, but I didn't want to wait that long this time. When the rapid bubbling stops and there's no more alcohol smell, your butter is finished. The butter itself will bubble a little due to the heat but you'll be able to tell the difference between the rapid alcohol bubbles and the slower, thicker butter ones. The easiest way to tell if you've gotten all the alcohol is to pour your butter into a graduated measuring cup. butter6.jpg. If it equals the same amount or slightly less than the original amount of butter you started with, you're finished. If not, just place it back on the heat until it's there. Butter contains some water which is why it's possible to come out with slightly less volume, plus what little is left in the bowl.

At this point, while the butter is still liquid, I pour a one ounce amount into a portion cup and freeze it for when I want to make something. Since I have 2 oz of butter, I have 2 cups. butter7.jpg

Later, I'll make a box of brownies and post the results as the conclusion to this guide.
 
Top