Hey all. I finally started my worm bin this weekend and should finish it today. I decided to post pics and I have a question on getting started
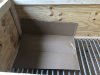
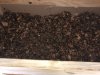
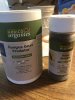
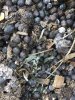
The bin is 6’x3’ and approximately 4’ tall. The worm box is 25” tall. The bottom will be lined with solid cardboard to make a floor with shredded cardboard on top for bedding. I will be starting it by feeding some old compost I have that dried out. I will rehydrate the compost and mix it with biolive. I will then put 5000 red wigglers in to get started. Once it’s up and running, the bin will also get kitchen scraps, shredded plants and old soil with rootballs.
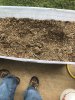
I have enough Compost that I could fill the bin 24” deep to start if I wanted, but I’m guessing that if I did that, the worms would stay towards the top and the bottom would remain untouched.
My question is, how deep should I fill the bin to get started and how long before I can safely add a second layer?
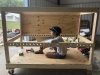
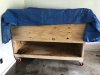
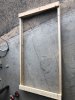
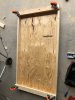
Here is the bin I’m building. I’ll post finished pics once it’s complete
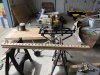
i started by building the base frame and adding 2x4’s to the ends to attach the casters to
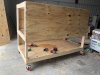
I decked the base and added casters. The casters are 5” and rated for a combined 2200#’s.
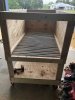
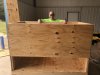
the hardest and most time consuming part was drilling the holes for the 3/4” steel pipe. I clamped the 2x4’s together so when drilling the first piece it would mark the correct location on the second. The holes were drilled with a 1” hole saw on a hand drill. Would recommend a drill-press instead if you have it. I had to stop frequently to let my drill cool down. The holes are spaced 1.5“ part
I built the next frame and got lucky. The holes lined up and the pipe fit perfectly. My cross pieces for the frame are 36” and the pipe pieces are 38” long so they won’t work or if the holes once complete. I miscounted and was short 2 pieces which I’ll pick up today
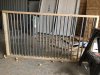
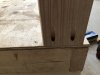
pocket holes to attach the legs to the base and the false bottom. The legs are 15” long which should be enough clearance to harvest while keeping the overall height at 4’
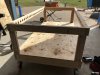
Assembled the base and false bottom
that’s where I am so far. I should be able to finish it this week. I’ll attach upper legs and frame and then deck out the worm box.
The bin is 6’x3’ and approximately 4’ tall. The worm box is 25” tall. The bottom will be lined with solid cardboard to make a floor with shredded cardboard on top for bedding. I will be starting it by feeding some old compost I have that dried out. I will rehydrate the compost and mix it with biolive. I will then put 5000 red wigglers in to get started. Once it’s up and running, the bin will also get kitchen scraps, shredded plants and old soil with rootballs.
I have enough Compost that I could fill the bin 24” deep to start if I wanted, but I’m guessing that if I did that, the worms would stay towards the top and the bottom would remain untouched.
My question is, how deep should I fill the bin to get started and how long before I can safely add a second layer?
Here is the bin I’m building. I’ll post finished pics once it’s complete
i started by building the base frame and adding 2x4’s to the ends to attach the casters to
I decked the base and added casters. The casters are 5” and rated for a combined 2200#’s.
the hardest and most time consuming part was drilling the holes for the 3/4” steel pipe. I clamped the 2x4’s together so when drilling the first piece it would mark the correct location on the second. The holes were drilled with a 1” hole saw on a hand drill. Would recommend a drill-press instead if you have it. I had to stop frequently to let my drill cool down. The holes are spaced 1.5“ part
I built the next frame and got lucky. The holes lined up and the pipe fit perfectly. My cross pieces for the frame are 36” and the pipe pieces are 38” long so they won’t work or if the holes once complete. I miscounted and was short 2 pieces which I’ll pick up today
pocket holes to attach the legs to the base and the false bottom. The legs are 15” long which should be enough clearance to harvest while keeping the overall height at 4’
Assembled the base and false bottom
that’s where I am so far. I should be able to finish it this week. I’ll attach upper legs and frame and then deck out the worm box.
Attachments
-
 3.1 MB Views: 4
Last edited: