@EastCoastGenetix

Well-Known Member
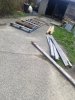
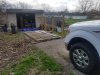
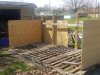
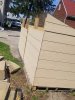
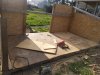
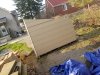
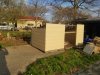
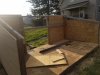
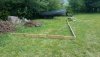
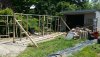
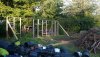
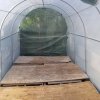
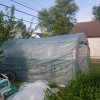
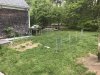
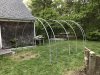
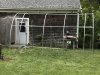
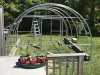
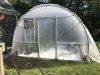
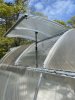
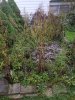
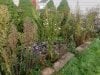
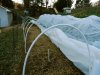
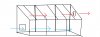
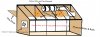
So i have been searching and searching for ways to cut my grow cost. I like growing but it can get costly. In my quest I stumbled into light dep., and the more I read about it the more I was hooked. My biggest cost in growing is my lights or the electric bill. Keeping up with the trend I was using digital ballast. Running (2) 400w MH & HPS in veg and 1k HPS in flower. I also hand lots of fans and multiple exhausts fans running. I stuck with passive intakes because I focus more on removing the hot air. I knew if I could left a window open near my grow, the vacuum from my grow would pull it in a it's been working for ME ever since. So I have made multiple adjustments to lower the running cost of my hobby garden. So here is my take on a diy backyard light dep greenhouse.
 

Attachments

Bignutes

Well-Known Member
I wanted to do something similar but a plant pod. I would be full steam ahead on it but my neighbors are real nosy. I'll be following along.

Making the deprivation automated would make it less of a pain in the ass, that's going to be tough but I think it's doable.
 

@EastCoastGenetix

Well-Known Member
So I woke up on day feeling good! It's the end of March and 70°F on the east coast. Windy as all hell but to nice to be inside any building. I work in the hospitality industry so with the coronavirus threat having me home and on unemployment until it's over, I have to budget smartly. So I went to my scrap pile and dug out some pieces to see what I could build. I ended up with some 2x4 studs, (4) 4x4 post, a few pallets and no idea. But I went straight to my IG page @eastcoast_genetix and I seen a mini greenhouse and boom here we go. Everything I used so far is reclaimed wood from a clubhouse me, my ex girlfriend, and her father tore down for..... FREE!!!

F.Y.I I am CHEAP! I work hard for my money so I rather same as much as I can. I often pick up free wood from Craigslist or Offer Up.

Even the screws I used so far is from that clubhouse. So I used 3 pallets the lined up perfectly on the outside. I had short odd length studs that I used to marry the frame. The length was perfect because I had (2)12' studs that would come in handy and I wouldn't need to cut. Win win!!!
So I had to find a common length for the 4x4 post. That length ended up being 5' 2". So all the post were cut to match. I was stoned hard so trying to use a speed square started to become difficult lol. So I mocked up the front stud post, put two screws in a board. I screwed one end of the board to the 4x4 post and adjust my pitch to the front post and screwed it in to the front post. I marked my cut line with the right angle and I still go the job done stoned. I also marked my cut line for the front post also and went to cutting. My rafters ended up 3' something (sorry) with a 25° cut on one end and 22° on the other. The front post ended up being 4' 1" on the money.
 

@EastCoastGenetix

Well-Known Member
I wanted to do something similar but a plant pod. I would be full steam ahead on it but my neighbors are real nosy. I'll be following along.

Making the deprivation automated would make it less of a pain in the ass, that's going to be tough but I think it's doable.
Yeah that's true but I'm trying to use stuff around me. I started a 25'x15' greenhouse for light dep that Im going all out on but I'm a tight budget until the coronavirus is over and I return back to work. I posted a picture of a YouTube video of a simple way to roll up the tarp with a simple pulley system. Most of the year I would cover it (release the rope and done) around 5:30-6a and uncover (pull the rope tie it up and done) around 9am and it's done for the day. During the winter of I didnt do upgrades I would let it down around 6pm and add supplement light for a few hours under the tarp. But pull up a chair bud and we'll both see what it's worth lol.
 

@EastCoastGenetix

Well-Known Member
So now after starting the build personal issues and the weather prevented me from completing it so far but I'm at a new location so I'm able to double the width and I'm planning on getting a shed for my veg space. Any seeds will be selected branch pollination and I'll harvest and pollen in the shed away for the girls. This micro size light dep greenhouse is what I plan to use to pheno hunt while I have limited space.
 

@EastCoastGenetix

Well-Known Member
I'm going to use thick roofing plywood for both sides and the rear wall. The floor will be a thinner plywood. In my new design I'm going think how to make it easy to assemble, disassemble, and transport the easiest I can. So I probably will take 3 more pallet the same size as the other 3 and marry them together the same way as I did the other ones. And line the up perfectly on footings and join them together with the plywood flooring. The pallets acting as a sub floor will support everything fine.
 

Bignutes

Well-Known Member
How do you propose to seal it? The black poly will do a lot but it's the edges and seams that will be a bugger to close off. I think you could rig up an automation on the cheap from sourcing various parts.
 

@EastCoastGenetix

Well-Known Member
I was going to either velcro the outer edge to the wood. Staple the side touching the plywood. Another way is to use clips or clamps attached to the plywood. It's so many ways to do it. Its will be blocked on the right by a shed. It's cool because the light that is being block by the shed, is during the hours I will have it covered. It will only work if I have discipline. After a round or two or by winter I should be able to get to the full size I started and sell or give the micro version away.
 

@EastCoastGenetix

Well-Known Member
I am BACK! Life isn't the same for me but growing is still a part of me! Since I found out about light deprivation its been a dream to build a light dep greenhouse! It reduces the carbon footprint and make growing more economical.
(So far, all the wood and screws used in all my greenhouse projects has been scrap
laying around.)

But here is where I left off.
The V1 was being build off my plans I drew up. After getting the frame built, I scrapped it because I had more scrap material laying around and decided to put it to good use.

(This is the V1)
20200329_134908.jpg20200329_191532.jpg
So this is as far as I got before scrapping it out and starting over.

Now on to the V2. The V2 and the full version didn't get finished. Me and my girlfriend at the time split and the location that I moved too was very small and I didn't have anywhere to store it so I ended up having to dismantle the V2 and the full size I was working on.

The V2 is just bigger. I doubled the width by adding another row of pallets. Its 3 pallets long x 2 pallets wide. I forgot the actual dimensions of it. I got so close to finishing it and it really hurt to take it down. I needed to build the door, 2 more ribs, and the top and bottom runners on the front to tie all the ribs together, then the plastic, vents and fans. It would've been done!

20200409_141349.jpg20200411_115908.jpg20200411_150324.jpg20200411_180454.jpg20200411_184227.jpg20200411_184253.jpg20200411_184324.jpg
 

@EastCoastGenetix

Well-Known Member
So trying to build 2 greenhouses at the same time,, from scratch or plan that I made wasn't one of my most brightest ideas. It was a ambitious try but, trying to do both lead me to not getting either done. Mainly to unforseen changed and if I would've finished i would've had to part with them anyway!

(Full Version)
The full version is based off the same design as I made for the mini. The mini version was going to be a simple manual dep greenhouse because of the small size but the full size was going to be my fully automated greenhouse. I didn't get very far on this but I did get it started. This project was put on the back burner when the price of wood sky rocketed during the beginning of the COVID pandemic. For this project I was going to have to buy wood to finish the frame and siding to match the V2 i was building at the same time. It was supposed to be 33' x 12'x 8.5'.
20190808_140922.jpg
20190809_141937.jpg
* Picture below is 2 of the 3 back walls to be connected. The 3rd one was built at the sametime is behind the 2 walls standing.
20190808_141005.jpg
*In this picture it stands at 22' x 10' x 8.5'
20190809_193021.jpg
The last wall was never connected before I had to dismantle it.
 

@EastCoastGenetix

Well-Known Member
So now I have a 12' x 7'x 7' from Best Choice Products. It was around $160 after taxes off eBay. I have been trying to figure out away to modify it for internal light dep because I have a active retired nosey elderly neighbor. If I added a retrofit kit that rolls on the outside, it would definitely be a red flag and get his attention more. So I haven't done with this greenhouse besides set it up and added a few pallets and plywood for the flooring. So recently I had a great idea that restarted the flame to get back to getting the greenhouse finished and ready for a spring run.

Here is my 15x7x7 BCP greenhouse.
* i put on a layer of IRAC 6mill plastic before I put on the greenhouse skin that came with it.
IMG_20200618_231117_583.jpgIMG_20200618_231117_599.jpg

So the solution is to add a retrofit to my existing greenhouse but build a enclosure around the greenhouse. One thing that I overlooked up until now is that all internal light dep greenhouses have a double frame. I have seen videos on YouTube with light dep hoop houses inside another greenhouse. I thought it was silly at the time until recently. So now my plan is to build a hoop house around my current greenhouse. So my current greenhouse would get blackout end wall, drip irrigation, carbon filter and exhaust fan, and the retrofit kit. Boom, it'll be ready.
 

@EastCoastGenetix

Well-Known Member
I found this excellent write up @Zeez did for a impressive greenhouse that he built. The cherry on top is he made his greenhouse fully automated with roll up sidewalls and a automatedrid. But, im going to essentially build a greenhouse like his around mine. So far, the only thing I plan to change is how big the ridge vent is and the angle that it opens. I want to make it bigger and I want to have it at a angle that if it rains, the water won't get in.


IMG_4734.jpegIMG_4752.jpegIMG_4767.jpegIMG_4836.jpegIMG_4882.jpegIMG_1270.jpeg
 

@EastCoastGenetix

Well-Known Member
So today is Saturday October 30th,2021. And I decided to get a jump on the 2022 season. I plan to build a fully automated light dep greenhouse but I seen a really really cheap way to do a manual light dep. The structure will cost pennies for the basic structure but I'm going to make a few modifications mainly for the ventilation. The main cost will be soil, nutes, and ventilation.

I want to build one for one dep cycle. I just want to see what kind of results I will get and if I am dedicated enough to pull the tarp every day on time. I plan to run two gardens at the same time. I know, its quite an ambitious task! I want to run a light dep and a auto grow at the same time. The Autos, I want to run in my greenhouse that I will be retrofitting.

The area im going to use is 30' x 10'.
16355962744786725806381717345293.jpg20211028_090957.jpg
I plan to build a caterpillar tunnel (low tunnel) 20'x7'x5'.
DSCN35051-1024x768.jpg
 

@EastCoastGenetix

Well-Known Member
I saved the living soil for my indoor beds but I'm definitely going to need alot more. So I have about 125 gallon of living soil and probably another 10-15 gallon worth of peat and perlite that was never mixed up. I'm going to use coco coir mainly for this.

My idea is to make the peat mix like a super soil! I will go really heavy on the organic fertilizer and let cook until I need it. Its going to be concentrated really strong so I can use 1-1 1/2 gallon in a 7 gallon pot. Im not vegging outdoors so when they go outside I want to flip within a week at most.
20211028_090901.jpg20211028_090921.jpg
 

@EastCoastGenetix

Well-Known Member
Just to give myself a head start I dug through my seed collection to pull out the few fem seeds I have. Im going to pop about 20 seeds total. The goal is to find some stunners for the dep run in the spring. Im trying to the start dep by early- mid of March. That's 5 months until showtime!
20211030_142410.jpg20211030_142236.jpg
 

@EastCoastGenetix

Well-Known Member
I got the seeds soaking. I dropped random numbers of each. Some I only had a single seed left. All fems!

OG Chem OG (SFV OG x TK91)
Panama
Grapefruit Diesel
Koffe Milk
Pineapple Sorbet
Ben & Berries
Dolato Breath
GG4 x Jelly Pie
Terple x Trop Punch Bx1
Ice Cream Cake x Trop Punch Bx1
Blueberry Muffin x Trop Punch Bx1
L.A Wedding Pop x Trop Punch Bx1
Slurricane x Trop Punch Bx1 20211031_124310.jpg
 
Top