Observe & Report
Well-Known Member
OK, someone was dumb enough to do it! Is it a good idea? We will see.
First off, thanks to many folks who have helped and/or inspired me including: flux, supra, psua, pico, bbspills, smokey, gaius, and everyone else here at the RIU LED forum. This is the place to be if you're DIY LED growing.
I pay so much for Cannabis at the dispensary that I decided to grow my own. My outdoor space is not ideal and I want to keep everything low-key so I'm building a cabinet to go in a closet. The closet is more of a wide shallow alcove with very lightweight sliding doors so I need to enclose the grow inside something. Most tents don't fit well in my space and I want it to not obviously look like a grow if I leave the closet door open so I'm converting an ordinary cabinet. I considered converting big totes but decided that top access to the plants would be a huge PITA so I searched for a cabinet that would fit in my space. I also want the whole thing to be as quiet as possible since I spend a lot of time in the room.
I'm tight on vertical space and I feel like every extra inch will mean more buds so I'm using water blocks to cool the COBs. By using water blocks, I can reduce the thickness of the entire fixture, including any space above the fixture necessary for cooling, to about 5/8ths of an inch. Maybe I could get pretty close if I had a thin heatsink mounted to the top with a bunch of those square DC blowers forcing air between the fins. I think it would be a lot louder and I would also need a larger exhaust fan. Cutting holes in the top of the cab and using CPU coolers while disguising it with plastic bins on top would also have been an option with the flowering chamber. I don't have a workshop and I'm not super handy so I probably would have messed it up pretty good. This way I keep use of the top of the cab too. The radiator is also very efficient so overall fan noise should be lower. I'm also thinking about converting to a vertical flowering arrangement once I get things figured out, which should be relatively easy with the thin blocks. I also get all of the heat out of the closet, which is helpful because I have no air conditioning. OK, there is nothing rational about this entire project but please bare with me.
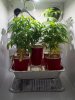
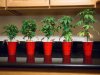
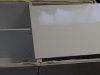
I found this old TV cabinet at a thrift shop. Cost less than a new particle board cabinet and is made from solid, but soft, wood. Flowering chamber is 35L x 17.5W x 31.5H American. Mom and Veg chambers are 17L x 17.5XW x 21H each. Three 4kK Vero 29's in the top, an '18 in each bottom chamber. I'm going to do a continuous modular scrog with low pro hempy buckets and Lucas FN bloom.
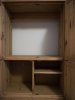
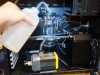
Painting the inside with marine varnish and paint. Seal it up to make it easy to clean and keep mold from colonizing the wood. Painting is hard, stinky work. My wife must really love me.
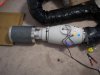
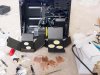
I'm using PC water cooling parts and a case to hold them. It's going to fit right in with the working computers in the closet and room. The pump is top quality and has an integrated temp sensor and fan controller to keep the fans spinning at the minimum. I have found Eheims to be extremely reliable where most small pumps like this are very shoddy and prone to failure (I have kept aquaria most of my life.) The radiator is below the drive bays, all copper, and double the thickness of a normal one. It should do the trick but I have room for more radiators if necessary.
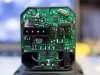
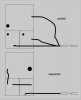
The water blocks are $10 eBay specials. They are kinda sketchy, I hope they don't leak. Good American made ones are like $75 each though. These are cut from solid and have deep scratches on the faces. There are plugs soldered into the holes drilled to make channels. I think maybe the water loops around once though there are two holes in the side. I smoothed out the face with sandpaper and water stones.
My wife is obviously a fantastic babe but she gave me one rule: Do Not Burn Down The House. So I got MeanWell drivers. Three 90 watters to power the '29s in flowering (will be dimmed somewhat), a 60W for veg and a 40 for moms. There won't be any high voltage inside the cab and the only mains wiring I'm going to do is screw plugs onto the existing driver wires.
Clamp on a COB sandwich anyone?

The '18s are glued on with Arctic Alumina. The '29s are clamped on with screws and t-nuts.
Building a cab is a lot of hard work. Endless planning, ordering, visiting the hardware store, etc... Still, it's a lot cheaper than buying a premade one that doesn't have a state of the art lighting system. I have some money left over for a tasty adult beverage so I can relax a bit and take care of what brain cells I still have left.

I thought it would be a good idea to have quick disconnects on the cooling loop so I can pull the cab out and work on it.
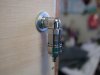
So I knew water cooling was going to be expensive. Check out the prices for pumps, radiators, and reservoirs. Where I got hit, though, was on the fittings. You need a lot and they really add up. The quick disconnects were obscenely expensive and you don't want to cheap out there. Instead of expensive compression fittings I went with barbs and clamps. The water blocks have barbs anyway. I didn't cheap out here, either and got shiny barbs and nice aluminum clamps that seem to be much more secure than the regular type. I have no fear of the tubing being pulled off inadvertently. However, I did nix the idea of using bulkheads for each penetration of the tubing through the cabinet. I only have so much more money than brains. I probably could have hunted down cheaper fittings that didn't come from an overclocking shop. I'm sure I'll forget about the price after a few harvests. In fact, this cab should pay for itself pretty quickly and I'm planning to keep it for a while.
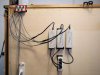
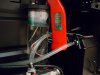
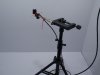
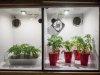
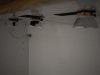
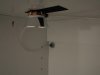
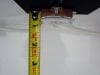
Here's some pics of the flowering lights that I just hung up. You can see how each cob/clamp/block is an individual unit. I <3 Velcro. Industrial strength Velcro is very strong so I'm not worried about them falling. This way I can move them around to get even light. It was either this or shave yaks in Matlab or something for hours to find the perfect spots then be unable to put the lights there because I misdrilled the holes then stripped them out. You can also see how they're a mere 5/8" thin. Some sort of fastener for the tubing is coming.
Next up: wiring and mounting drivers and a dimmer box, installing ventilation and filter, sealing cracks and light proofing, getting the wife regular flowers and something sparkly.
First off, thanks to many folks who have helped and/or inspired me including: flux, supra, psua, pico, bbspills, smokey, gaius, and everyone else here at the RIU LED forum. This is the place to be if you're DIY LED growing.
I pay so much for Cannabis at the dispensary that I decided to grow my own. My outdoor space is not ideal and I want to keep everything low-key so I'm building a cabinet to go in a closet. The closet is more of a wide shallow alcove with very lightweight sliding doors so I need to enclose the grow inside something. Most tents don't fit well in my space and I want it to not obviously look like a grow if I leave the closet door open so I'm converting an ordinary cabinet. I considered converting big totes but decided that top access to the plants would be a huge PITA so I searched for a cabinet that would fit in my space. I also want the whole thing to be as quiet as possible since I spend a lot of time in the room.
I'm tight on vertical space and I feel like every extra inch will mean more buds so I'm using water blocks to cool the COBs. By using water blocks, I can reduce the thickness of the entire fixture, including any space above the fixture necessary for cooling, to about 5/8ths of an inch. Maybe I could get pretty close if I had a thin heatsink mounted to the top with a bunch of those square DC blowers forcing air between the fins. I think it would be a lot louder and I would also need a larger exhaust fan. Cutting holes in the top of the cab and using CPU coolers while disguising it with plastic bins on top would also have been an option with the flowering chamber. I don't have a workshop and I'm not super handy so I probably would have messed it up pretty good. This way I keep use of the top of the cab too. The radiator is also very efficient so overall fan noise should be lower. I'm also thinking about converting to a vertical flowering arrangement once I get things figured out, which should be relatively easy with the thin blocks. I also get all of the heat out of the closet, which is helpful because I have no air conditioning. OK, there is nothing rational about this entire project but please bare with me.
I found this old TV cabinet at a thrift shop. Cost less than a new particle board cabinet and is made from solid, but soft, wood. Flowering chamber is 35L x 17.5W x 31.5H American. Mom and Veg chambers are 17L x 17.5XW x 21H each. Three 4kK Vero 29's in the top, an '18 in each bottom chamber. I'm going to do a continuous modular scrog with low pro hempy buckets and Lucas FN bloom.
Painting the inside with marine varnish and paint. Seal it up to make it easy to clean and keep mold from colonizing the wood. Painting is hard, stinky work. My wife must really love me.
I'm using PC water cooling parts and a case to hold them. It's going to fit right in with the working computers in the closet and room. The pump is top quality and has an integrated temp sensor and fan controller to keep the fans spinning at the minimum. I have found Eheims to be extremely reliable where most small pumps like this are very shoddy and prone to failure (I have kept aquaria most of my life.) The radiator is below the drive bays, all copper, and double the thickness of a normal one. It should do the trick but I have room for more radiators if necessary.
The water blocks are $10 eBay specials. They are kinda sketchy, I hope they don't leak. Good American made ones are like $75 each though. These are cut from solid and have deep scratches on the faces. There are plugs soldered into the holes drilled to make channels. I think maybe the water loops around once though there are two holes in the side. I smoothed out the face with sandpaper and water stones.
My wife is obviously a fantastic babe but she gave me one rule: Do Not Burn Down The House. So I got MeanWell drivers. Three 90 watters to power the '29s in flowering (will be dimmed somewhat), a 60W for veg and a 40 for moms. There won't be any high voltage inside the cab and the only mains wiring I'm going to do is screw plugs onto the existing driver wires.
Clamp on a COB sandwich anyone?
The '18s are glued on with Arctic Alumina. The '29s are clamped on with screws and t-nuts.
Building a cab is a lot of hard work. Endless planning, ordering, visiting the hardware store, etc... Still, it's a lot cheaper than buying a premade one that doesn't have a state of the art lighting system. I have some money left over for a tasty adult beverage so I can relax a bit and take care of what brain cells I still have left.
I thought it would be a good idea to have quick disconnects on the cooling loop so I can pull the cab out and work on it.
So I knew water cooling was going to be expensive. Check out the prices for pumps, radiators, and reservoirs. Where I got hit, though, was on the fittings. You need a lot and they really add up. The quick disconnects were obscenely expensive and you don't want to cheap out there. Instead of expensive compression fittings I went with barbs and clamps. The water blocks have barbs anyway. I didn't cheap out here, either and got shiny barbs and nice aluminum clamps that seem to be much more secure than the regular type. I have no fear of the tubing being pulled off inadvertently. However, I did nix the idea of using bulkheads for each penetration of the tubing through the cabinet. I only have so much more money than brains. I probably could have hunted down cheaper fittings that didn't come from an overclocking shop. I'm sure I'll forget about the price after a few harvests. In fact, this cab should pay for itself pretty quickly and I'm planning to keep it for a while.
Here's some pics of the flowering lights that I just hung up. You can see how each cob/clamp/block is an individual unit. I <3 Velcro. Industrial strength Velcro is very strong so I'm not worried about them falling. This way I can move them around to get even light. It was either this or shave yaks in Matlab or something for hours to find the perfect spots then be unable to put the lights there because I misdrilled the holes then stripped them out. You can also see how they're a mere 5/8" thin. Some sort of fastener for the tubing is coming.
Next up: wiring and mounting drivers and a dimmer box, installing ventilation and filter, sealing cracks and light proofing, getting the wife regular flowers and something sparkly.