PetFlora
Well-Known Member
If you've ever followed my threads and journals you know I think outside the box, looking to simplify hydro methods. Some, like my 3 year effort to simplify HPA, provided good results- but I am now convinced that to get the benefits of HPA, you MUST use an accumulator. I am not ready to make that next move, but what I learned in the process helped me develop my 21st Century F & D System: a system that anyone with minimal skills can copy.
HPA uses short atomized mist cycles under high pressure. Duration of each blast is in the < 1 second range, repeated every ~ 1-3 minutes, depending on volume of the root pod, RH & ambient temps both in/out of the pod. The roots hang freely in air. Due to high frequency of feed cycles, PPMs never go above 600. Small portions fed throughout the course of the day are healthier than 2-4 large meals. Most importantly, multiple portions cause faster growth
Virtually no medium is required, beyond a small starter cube for seedlings, which goes into a small net pot, which goes into a 1.5" PVC Coupler. These are then placed in my DIY bubbler until a decent root system develops, then each is transferred to the main grow system.
I was able to use my first hand HPA experience to rethink F & D.
My 21st Century Flood and Drain
Where most use a cement mixing tubs for a flood table, I use it to catch any leaks or spills.
Where most use Rock Wool, or Hydroton, RW has has too many issues, not the least of which is high cost, there is also the need to dispose after one use; hydroton, is difficult to clean for reuse. Neither allows for the removal or moving of a plant within the tray, or to take a sick/bug infested plant out. I use a small amount of hydroton ( ~ 2") as a cap on each small AP to stabilize the plant and to block the light from the roots.
Lava Rock (LR) is the ideal medium for a number of reasons
1. It is pH neutral
2. It is easy to clean before and after, + it is reuseable
3. Its rough surface is perfect for root development and anchoring plant weight
4. It drains quickly, BUT some nutrient stays behind for root hairs to slurp on
Air Pots (AP)
They bring several important benefits to the system
1. Due to 'air pruning' design, you can grow in smaller pots
2. They promote both lateral root and root hair development
3. They are sturdy- able to hold LR without damage
4. They are reusable for years
No need for transplanting (eliminating shock). I start my plants in small APs, which allows for more plants under smaller lights, then simply drop the small AP (plant and all) into a larger AP and side-fill with LR.
Storage Totes as 'Flood' Tables
These are cheap and come in a wide variety of sizes/volumes. High wall totes are ideal in that the high walls help create a rainforest effect for youg plants. As the main stak grows, they grow above the small amount of humidity
Outboard Rez
I use a 2G cooler, which can easily feed 6 plants because I do not FLOOD. Think advanced Drip
Small Low Pressure Pump
Nothing heavy duty needed as it will be pumping ~ 4-6 ounces of nutrient per plant per feeding cycle. I also use a good size aerator and Oxystone
1/2" PVC
This is needed to deliver the nutes to the plants. It is easily cut with a PVC hand tool, and configured to fit the tote size and distance to the rez. Thinking to get a few romex clamps to affix pvc to the side walls. Nothing permenant as I have not finalized number of heads for proper coverage of each AP
Low Pressure Mist Heads
Here's where it all comes together. As you will see in the photo below, they are strategically placed above the APs. If your pump is too large, the spray will miss the top of each AP.
Each cycle gently sprays the top of the APs with ~ 4-6 ounces of nutrient. Mist Heads can be adjusted left to right as well as angled via twisting the pvc ( a reason NOT to glue). The nutes quickly cascade down and through the coarse LR, feeding the roots. What's left drains back to the rez (assuming you raise the far end of the tote).
Due to the quick draining ability I am able to 'flood' (feed actually) many times each day: how often depends on the size/age of the plants.
Once the plant has ~ 4+ nodes, I increase number of times (and number of ounces) from ~ 4 times a day to upwards of 12, and during early- mid flower, every 20-30 minutes. An analog timer makes this easy to adjust, and settings are not critical, say +/- 10%, no problem
Clearly, you would not want to use high ppm/ec as you would burn the plants up.
Timer
You need a timer capable of ~ 5- 10 second minimum on setting. The one pictured is 23 seconds. I compensate by using fewer mist heads, but plan to replace when it dies
Nutrients
Keeping things simple after having been complex with Dutch Master Gold full line where I was mixing 5 different ingredients per, I came across a thread on IC using Hydroponic Research VEG+BLOOM. One dry mix formula handles veg- flower. No more mixing a bunch of ingredients, no more paying for water to be shipped.
V+B mixes very clean, is PH stable and works amazing. It cut my nute costs by ~ 80%!
TIP Do not exceed 400 ppms unless you are ready to flower as it will signal the plants due to the high percentage of PK. I got preflowers twice, before figuring this out. I backed down to ~ 400 and the preflowers stopped and veg continued.
I will be beginning with 5-6 clones that were taken too late; they all had buds. 3 have reverted to veg, but the others not yet, and may not. I also have some Brand X F1 seeds WWxBubblicious that I will germ with the new moon in a couple weeks.
Hope you enjoy the show
Pictures Answer a Lot of Questions
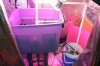
Pic 1 is an 18G tote. It can accommodate 6 small APs
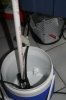
Pic 2 is a 2G Rez. Being a cooler it is easy to keep temps in range by adding a small jug of ice. The riser from the pump can be fixed, but the drop definitely not as it requires adjusting once the larger APs are introduced. Look carefully between the rez and the tote is the drain line. The tote needs to be slightly higher than the lip of the rez to assure complete drain back.
Pic 3 is the 1.2" PVC with low mist heads. It is not necessary (or warranted) to glue any of the angles/pieces
Pic 4 is the timer I have. Its lowest on cycle is 23 seconds. I plant to replace it with one that has ~ 10 second on setting
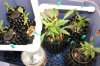
Pic 5 is a large tote (~ 4ft long). As you can see it easily accommodates 4 APs @ 1.1G. This will go in the 2 X 4ft HOT5 8 bulb tent once the clones or seeds have outgrown the 18G tote


I will be transferring my clones from my DIY bubbler into the 18G tote which will go in my 2 X 4 tent under a mixture of a 3 yo UFO 90 R/B ~ 8:1 + a vanity fixture holding 4-6 low watt screw bulb leds, a combination of CW/NW & WW. Total wattage ~ 80-90 watts. I just harvested a lovely unknown strain from this LED set up. Nice larger main cola and solid and tight low branch buds.
HPA uses short atomized mist cycles under high pressure. Duration of each blast is in the < 1 second range, repeated every ~ 1-3 minutes, depending on volume of the root pod, RH & ambient temps both in/out of the pod. The roots hang freely in air. Due to high frequency of feed cycles, PPMs never go above 600. Small portions fed throughout the course of the day are healthier than 2-4 large meals. Most importantly, multiple portions cause faster growth
Virtually no medium is required, beyond a small starter cube for seedlings, which goes into a small net pot, which goes into a 1.5" PVC Coupler. These are then placed in my DIY bubbler until a decent root system develops, then each is transferred to the main grow system.
I was able to use my first hand HPA experience to rethink F & D.
My 21st Century Flood and Drain
Where most use a cement mixing tubs for a flood table, I use it to catch any leaks or spills.
Where most use Rock Wool, or Hydroton, RW has has too many issues, not the least of which is high cost, there is also the need to dispose after one use; hydroton, is difficult to clean for reuse. Neither allows for the removal or moving of a plant within the tray, or to take a sick/bug infested plant out. I use a small amount of hydroton ( ~ 2") as a cap on each small AP to stabilize the plant and to block the light from the roots.
Lava Rock (LR) is the ideal medium for a number of reasons
1. It is pH neutral
2. It is easy to clean before and after, + it is reuseable
3. Its rough surface is perfect for root development and anchoring plant weight
4. It drains quickly, BUT some nutrient stays behind for root hairs to slurp on
Air Pots (AP)
They bring several important benefits to the system
1. Due to 'air pruning' design, you can grow in smaller pots
2. They promote both lateral root and root hair development
3. They are sturdy- able to hold LR without damage
4. They are reusable for years
No need for transplanting (eliminating shock). I start my plants in small APs, which allows for more plants under smaller lights, then simply drop the small AP (plant and all) into a larger AP and side-fill with LR.
Storage Totes as 'Flood' Tables
These are cheap and come in a wide variety of sizes/volumes. High wall totes are ideal in that the high walls help create a rainforest effect for youg plants. As the main stak grows, they grow above the small amount of humidity
Outboard Rez
I use a 2G cooler, which can easily feed 6 plants because I do not FLOOD. Think advanced Drip
Small Low Pressure Pump
Nothing heavy duty needed as it will be pumping ~ 4-6 ounces of nutrient per plant per feeding cycle. I also use a good size aerator and Oxystone
1/2" PVC
This is needed to deliver the nutes to the plants. It is easily cut with a PVC hand tool, and configured to fit the tote size and distance to the rez. Thinking to get a few romex clamps to affix pvc to the side walls. Nothing permenant as I have not finalized number of heads for proper coverage of each AP
Low Pressure Mist Heads
Here's where it all comes together. As you will see in the photo below, they are strategically placed above the APs. If your pump is too large, the spray will miss the top of each AP.
Each cycle gently sprays the top of the APs with ~ 4-6 ounces of nutrient. Mist Heads can be adjusted left to right as well as angled via twisting the pvc ( a reason NOT to glue). The nutes quickly cascade down and through the coarse LR, feeding the roots. What's left drains back to the rez (assuming you raise the far end of the tote).
Due to the quick draining ability I am able to 'flood' (feed actually) many times each day: how often depends on the size/age of the plants.
Once the plant has ~ 4+ nodes, I increase number of times (and number of ounces) from ~ 4 times a day to upwards of 12, and during early- mid flower, every 20-30 minutes. An analog timer makes this easy to adjust, and settings are not critical, say +/- 10%, no problem
Clearly, you would not want to use high ppm/ec as you would burn the plants up.
Timer
You need a timer capable of ~ 5- 10 second minimum on setting. The one pictured is 23 seconds. I compensate by using fewer mist heads, but plan to replace when it dies
Nutrients
Keeping things simple after having been complex with Dutch Master Gold full line where I was mixing 5 different ingredients per, I came across a thread on IC using Hydroponic Research VEG+BLOOM. One dry mix formula handles veg- flower. No more mixing a bunch of ingredients, no more paying for water to be shipped.
V+B mixes very clean, is PH stable and works amazing. It cut my nute costs by ~ 80%!
TIP Do not exceed 400 ppms unless you are ready to flower as it will signal the plants due to the high percentage of PK. I got preflowers twice, before figuring this out. I backed down to ~ 400 and the preflowers stopped and veg continued.
I will be beginning with 5-6 clones that were taken too late; they all had buds. 3 have reverted to veg, but the others not yet, and may not. I also have some Brand X F1 seeds WWxBubblicious that I will germ with the new moon in a couple weeks.
Hope you enjoy the show
Pictures Answer a Lot of Questions
Pic 1 is an 18G tote. It can accommodate 6 small APs
Pic 2 is a 2G Rez. Being a cooler it is easy to keep temps in range by adding a small jug of ice. The riser from the pump can be fixed, but the drop definitely not as it requires adjusting once the larger APs are introduced. Look carefully between the rez and the tote is the drain line. The tote needs to be slightly higher than the lip of the rez to assure complete drain back.
Pic 3 is the 1.2" PVC with low mist heads. It is not necessary (or warranted) to glue any of the angles/pieces
Pic 4 is the timer I have. Its lowest on cycle is 23 seconds. I plant to replace it with one that has ~ 10 second on setting
Pic 5 is a large tote (~ 4ft long). As you can see it easily accommodates 4 APs @ 1.1G. This will go in the 2 X 4ft HOT5 8 bulb tent once the clones or seeds have outgrown the 18G tote
I will be transferring my clones from my DIY bubbler into the 18G tote which will go in my 2 X 4 tent under a mixture of a 3 yo UFO 90 R/B ~ 8:1 + a vanity fixture holding 4-6 low watt screw bulb leds, a combination of CW/NW & WW. Total wattage ~ 80-90 watts. I just harvested a lovely unknown strain from this LED set up. Nice larger main cola and solid and tight low branch buds.