Concord Dawn
Well-Known Member
I've already started germinating the 4 bag weed seeds I have for my 2nd soil grow. The veg box is setup and ready to go with lights, fans, pots and trays, and a 2nd gravity fed watering system I made using a 1 gallon milk jug, 1/4" hose, a T, and a 1/4" barbed shut off valve. I will be using the veg box for a drying cabinet from the last grow in about a week, so the new plants will then go into the flower cabinet. I think after the last grow, things will work out good again this time, so here we go.
BOUGHT:
NEW VEG BOX
U-HAUL X-LARGE BOX 4.00
SCALE 8.99
10" FAN 5.35
Hyponix potting soil 1.06
2 - BULBS, 2 - Y's, 1 - PLUG TO SOCKET ADAPTER, EXT CORD 11.00
29.40
FLOWERING BOX (I had all of this from the last grow, but just to show the amount I have spent)
 
LIGHT SETUP: BULBS,FIXTURE,SPLITTERS 37.00
THERMOMETER W/ HYGROMETER 7.00
U-HAUL GRAND WARDROBE BOX 13.00
MYLAR BLANKET THING 3.00
5" ROUND FAN 2.00
80mm DC FAN 2.50
3-80mm DC FANS 9.00
6" DC FAN 9.70
6" DC FAN 11.77
SOIL PH METER 8.12
USED 12 VOLT DC POWER SUPPLY 11.00
JIFFY-7 PEAT PELLETS 2.13
2-1/4" ON/OFF VALVES 2.00
114.72
THINGS I HAD:
TIMER 0.00
1 - 10" POT W/ PIE PAN 0.00
STRING FOR LST 0.00
2 - 6" POTS FOR SOIL AND PIE PANS 0.00
POWER STRIP 0.00
1/4" HOSE, T's 0.00
80mm DC FAN 0.00
NUTES 0.00
EXTENSION CORD 0.00
CHAIN 0.00
TACKS 0.00
DUCT TAPE 0.00
PH KIT 0.00
0.00
  
SEEDS:
I'm used bag seeds that I have again for this next grow, I wanna get one more grow in before I order some good seeds. The stuff I've grown has been pretty good, so I'm happy with that. I have 4 seeds, 2 of each from different strains from some of the mids from around here. I hope to get 2 females out of the 4 seeds.
GERMINATING:  
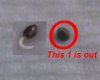
I put the seeds in a wet paper towel (with warm rain water and a few drops of seed starter) then put them in a clear cake dome in the dark for 24 to 48 hours as this part has worked very well for me in the past. When they crack and the tap root is about 3/8" long, they will go right into the potting soil. Make sure they don't dry up. Not to wet, not to dry, just moist. You just poke a small hole in the soil and put the seed with the tap root facing down into the hole and cover lightly. 2 seeds from the same strain have already popped tap roots, the other 2 haven't.
When germinating marijuana seeds:
Most seeds will germinate at 70-75 degrees F.
Nearly all seeds do best at about 78-80 degrees F.
Some seeds require up to 85 degrees F.
Never exceed 90 degrees F when germinating.
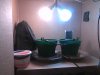
VEG BOX:
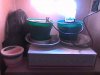
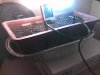
My new veg box is an extra lage U-Haul moving box which is 24" x 21" x 24", costs $4 and I put 2 - 23 watt bulbs in it, 1 - 6500k and 1 - 2700k. I may spend another $10 and get 2 more 6500ks and 2 more Y splitters for a total of 4 bulbs. I used 2 of the 80mm fans I had from the other box, and I will use a passive intake, but I do have the 10" fan just in case. The new spouts will only be in there for about 3 weeks, at which time I will top all 4 plants, give them a couple more days to recover and then move them into the flowering box.
POTS:
Right now, I will use the same 2 - 6" pots I started with from the last grow. I also have one 10" pot, and will need to get another to do 2 plants.
SOIL:
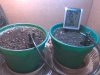
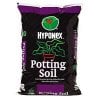
This is the potting soil I will use again, Scott's Hyponex potting soil, 99 cents at Walgreens. This is just plain black potting soil that has some perlite mixed in it. I will hopefully get 2 females out of 4 seeds, I will be using 2 of the 10" pots sitting in aluminum pie pans for catching drainage water. These will be plenty big enough for this grow, as the plants will grow no taller than 30", maybe 36" max. I will start them in the 6" pots at first.
FLOWER BOX:
I will use the same U-haul Grand Wardrobe Box. The size is 48" H-24" W-21" D. For a small grow, it seems to be the perfect size. I have 2 white shelfs from an old grow cabinet and they worked out great. I used 1 for a floor in the box and the other 1, I put on top of the box for all my supplies to sit on, the box is very sturdy. For the door, I just taped up the top of the box where it drops down in the front, then cut the door on the other side. Plus, this box comes with a metal bar to hang your light from all for $13. Also, being cardboard, it is very easy to cut out holes for fans and vents and such. I know it is a carbord grow room, but I have no concern about it being a fire hazard. Everything is wired right and hardly no water is involved, it is very safe if you just do it right.
LIGHTS: 
I made the my lights from a 3 bulb chrome light fixture, an extension cord, and 3-Y blub splitters for a total of 6 bulbs. I screwed the fixture from the inside to a piece of 1" x 2" x 18" wood, which aslo gave me a place to hook the chains to, works great.
5 - 23 watt 2700k and 1 - 23 watt 6500k bulbs for a total of 138 watts and 9600 lumens. I used 1 6500k bulb just mix in the light spectrum.
I will go with a 18/6 light schedule for the first 3 weeks in the veg box and then 12/12 in the flower box for the rest of the grow which should be about 9 weeks.
I plan on doing 24 hours of darkness at the time of switching to 12/12 and make sure its the same am hour that the light turns on at, so either do 24 or 36 hours. The theory is, it's suppose to put the plant into "super bloom" during the flowering period, we'll see.
FANS:
1 - 6" fan for air intake down on the lower right side and 1 - 80mm fan just above it, 4 - 80mm for exhaust on the side to remove heat from the lights, and 1 - 5" for exhaust at the lower left. I took an old computer power source to use as a DC convertor for running the 12v computer fans and the 2 - 6" DC fans, works great and was only $11 on ebay. And another 6" oscillating fan blowing up on the lights and across the plants, this has really helped with temps. 2 of the 80mm are in the veg box with a passive intake, maybe the 10" for intake if needed.
TEMPS:
I use the Acturite digital temp/hum gauge I got from Wal-Mart that was $8, it shows highs and lows for both temp and hum, and it works very well.
The lowest I got the temps in the last grow was 82/84 degrees with peaks to 86/88 with the lights on and about 75/79 degrees when dark.
HUMIDITY:
Humidity was running between 30% to 55% so I'm good with that.
SOIL PH METER:
HoldAll Moisture, Light and PH Meter
Scientifically accurate No batteries required Measures moisture, light and soil PH. Promotes healthy plants.
It was only $8 and it worked good for keeping track of my ph.
I checked the ph every couple days during the last grow. The ph stayed around 6.5 to 6.8 which is great for a soil grow. That was after watering with nutes.
WATER:
I will use the Florida rain water with a ph of 6.2 again as this worked out very well with the last grow. when it rains, I fill 2 - 3 1/2 gallon buckets I have on hand. They will stay outside and I will fill 1 gallon jugs to bring inside. I am using this because it is way better than the 8.0 tap water here.
NUTES:
These are nutes I will use, same as last time.
Jack's Classic® dry All Purpose 20-20-20 for the vegging stage
Total Nitrogen (N)....................................... 20% 2.1%
Nitrate Nitrogen 17.9%
Urea Nitrogen Available Phosphate (P2O5)....................... 20%
Soluble Potash (K2O)................................. 20%
Boron (B).................................................... 0.02%
Copper (Cu)................................................ 0.05% 0.05%
Chelated Copper (Cu) Iron (Fe)...................................................... 0.10% 0.10%
Chelated Iron (Fe) Manganese (Mn)......................................... 0.05% 0.05%
Chelated Manganese (Mn) Molybdenum (Mo)....................................... 0.0009%
Zinc (Zn)...................................................... 0.05% 0.05%
Chelated Zinc (Zn)
Jack's Classic® dry Blossom Booster 10-30-20 during the flowering stage
The 1-3-2 ratio is still the ratio that is preferred by professional growers when they want results. This formula also contains a higher level of magnesium, a vital secondary element, which helps keep leaves green.
Total Nitrogen (N)....................................... 10% 5%
Ammoniacal Nitrogen 5%
Nitrate Nitrogen Available Phosphate (P2O5)....................... 30%
Soluble Potash (K2O)................................. 20%
Magnesium (Mg)......................................... 0.5% 0.50%
Water Soluble Magnesium (Mg) Boron (B).................................................... 0.02%
Copper (Cu)................................................ 0.05% 0.05%
Chelated Copper (Cu) Iron (Fe)...................................................... 0.10% 0.10%
Chelated Iron (Fe) Manganese (Mn)......................................... 0.05% 0.05%
Chelated Manganese (Mn) Molybdenum (Mo)....................................... 0.0009%
Zinc (Zn)...................................................... 0.05% 0.05%
Chelated Zinc (Zn)
A 1-3-2 blend such as Peter's Pro Blossom Booster, 10-30-20, is one of the best flowering blends on the market because of several factors - it is higher in nitrate N and Mg. It is sold under the Jack's Classic label. An added benefit of Peters blends is their use of high quality, very pure salts that will eliminate root burn if used judiciously.
 
I will also mixed in these: GH Products floraGro® 2-1-6 and GH Products FloraBloom® 0-5-4
FLORA GRO®:
Stimulates structural and vegetative growth. Builds strong roots. Provides Nitrogen, Phosphorous, Potassium, and secondary minerals.
FLORA BLOOM®:
Stimulates flower and fruit development. Enhances flavor, aroma, and essential oils. Provides high Phosphorous, Potassium, Magnesium, and Sulfur.
 
I got these two on Ebay for $10 shipped, I think they really helped.
1 pound of High Phosphorus Bat Guano (NPK 0-7-0) and 1 pound of Worm Castings (NPK 1-0-0) $10.15 Shipped.
Worm Castings are an excellent seed starting amendment, soil amendment and are great as a maintenance tea. It can also be top dressed, mixed in with soil or made into a tea and watered in.
High P Bat Guano is an excellent flowering / fruiting phase fertilizer / soil amendment. It can be top dressed, mixed in with soil or made into a tea and watered in.
I will just use the rain water with no nutes for first 2 weeks, maybe a couple of light 1/4 strength waterings with veg mix during the 2nd week depending on growth. Then I will switch to 1/2 strength and then full strenght flowering mix for weeks 3 thru 7/8 and then flush/water with straight rain water for weeks 9/10/. I will water every day just like I did in the first grow, or depending on soil dryness.
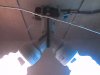
I came up with a cheap gravity fed watering system, I use a gallon jug with 2 tubes in the top. 1 for a vent and the other runs to the pots. To start it, you just blow in the vent tube and the water starts to run. Them I used a T to split it for 2 plants and installed an on/valve before the T. Once you get the flow going, you can the turn the valve off and on and the line stays pressurized, very simple system and very cheap to make. The 1 gallon jug will empty in less than an hour, so keep an eye on it if you don't want to use the whole gallon.
TOPPING:
I am going to cut the very top of each plant at about 18 days this time. This will give me 4 main colas on each plant.
By the time your plants are a about 6 inches high and the 4th or 5th set of leaves comes up you can cut the two leaves at the top, this will split the plant up in 4 branches, you can repeat this process a few times but give the plant time to grow and recover in between. This technique will increase your yield dramatically but cutting to much will slow the plant down very much since it needs energy to close it's wounds.
I will use this type of topping as it worked well with the last grow.
#1 Locate the very top of the new growth. #2 With a clean, sterilized scissors, Fold the fan leafs over and cut approximately 80% of the new growth off the plant. #3 This is what it should look like after the cut has been made. #4 View of the Cut section after 2 days growth, showing the 4 new growth shoots (branches).
CLONES:
I hope to get some clones this time. I will use a clear box that has holes it and is hinged. I will do 4 clones in it to have on hand for the following grow after harvest. You just take the cutting, dip it in clone powder, place it in pre-soaked 30mm Jiffy peat pellet, stick it inside the "clone box" and place them in the grow box. Wait for the roots to shoot out the bottom of the Jiffy peat pellet and then transfer to a 6" pot filled with fresh potting soil and place it in the veg grow box.
 
"I have had a lot of luck with cloning. I've tried many different approaches to it like Jiffy pellets and rockwool cubes. For me, I've found that they tend to grow algae faster than the plants take to root. Most recently, I've developed a new method (new to me) and it actually works great. I have 2-3 oz plastic cups and I fill them up with FoxFarm Lightwarrior soil, wet it down and kinda pack it in there. I take decent sized clones, 5-6 inches, dip them in rooting gel and stick them straight into the cups with the soil. I put them in a dome and mist 3x daily. My best clones ever came from this method. The soil is meant for seedlings so it is very mild but contains nutes so the plants do better. Happy growing!"
HARVEST AND CURING:
When I harvest, I will use the veg box to hang and dry in. Cut the buds off, anything over one and half inches long, and manicure them right then and there. Then, using cheap masking tape, I will make rows 3 or 4 inches apart, across the box and hang them from the tape. Then run an oscillating fan on low, blowing OVER but not on them, just to keep air moving. Do not allow the buds to touch each other. By drying just the buds alone, you can dry them in 3 to 5 days. The big buds are 5 days, the small buds in 3 days, till you can snap the stems. then put the small popcorn buds in shoe boxes, not piled up or touching each other, and stir them around daily too. What you want to do is dry the buds first, and then CURE them, by placing them in jars, and opening the jars daily for a few minutes, to smell them, for up to 30 days. If they smell funky, take them out of the jar and dry them again two more days, then back in the jars. You have to watch those big colas close to make sure you don't get mold.
Also, trim the leaves close to the buds, and the larger green fan leaves. Keep them separate in shoe boxes a fan blowing over them too. These will be used to make hash with using a hash press. The hash press is really a clay extruder that can be had for about $20 at Micheal's arts and crafts. I didn't do this my last grow, but would like to try it this time.
 
Well, there you have it, the plans for my 4th attempt at growing. This is my second attempt at growing in soil, I still have a brand new DWC 4 net pot hydro tub setup that goes right into the grow box with minimal changes, but that will still be another grow on down the road. I've have learn alot and had a lot of good advice from some great people and met alot of great people on the R.I.U. site. Thanks to all!! I will keep this thread updated every few days or as needed with pics and information of the grow's progress. Hope everyone comes along for the ride again.
BOUGHT:
NEW VEG BOX
U-HAUL X-LARGE BOX 4.00
SCALE 8.99
10" FAN 5.35
Hyponix potting soil 1.06
2 - BULBS, 2 - Y's, 1 - PLUG TO SOCKET ADAPTER, EXT CORD 11.00
29.40
FLOWERING BOX (I had all of this from the last grow, but just to show the amount I have spent)
 
LIGHT SETUP: BULBS,FIXTURE,SPLITTERS 37.00
THERMOMETER W/ HYGROMETER 7.00
U-HAUL GRAND WARDROBE BOX 13.00
MYLAR BLANKET THING 3.00
5" ROUND FAN 2.00
80mm DC FAN 2.50
3-80mm DC FANS 9.00
6" DC FAN 9.70
6" DC FAN 11.77
SOIL PH METER 8.12
USED 12 VOLT DC POWER SUPPLY 11.00
JIFFY-7 PEAT PELLETS 2.13
2-1/4" ON/OFF VALVES 2.00
114.72
THINGS I HAD:
TIMER 0.00
1 - 10" POT W/ PIE PAN 0.00
STRING FOR LST 0.00
2 - 6" POTS FOR SOIL AND PIE PANS 0.00
POWER STRIP 0.00
1/4" HOSE, T's 0.00
80mm DC FAN 0.00
NUTES 0.00
EXTENSION CORD 0.00
CHAIN 0.00
TACKS 0.00
DUCT TAPE 0.00
PH KIT 0.00
0.00
  
SEEDS:
I'm used bag seeds that I have again for this next grow, I wanna get one more grow in before I order some good seeds. The stuff I've grown has been pretty good, so I'm happy with that. I have 4 seeds, 2 of each from different strains from some of the mids from around here. I hope to get 2 females out of the 4 seeds.
GERMINATING:  
I put the seeds in a wet paper towel (with warm rain water and a few drops of seed starter) then put them in a clear cake dome in the dark for 24 to 48 hours as this part has worked very well for me in the past. When they crack and the tap root is about 3/8" long, they will go right into the potting soil. Make sure they don't dry up. Not to wet, not to dry, just moist. You just poke a small hole in the soil and put the seed with the tap root facing down into the hole and cover lightly. 2 seeds from the same strain have already popped tap roots, the other 2 haven't.
When germinating marijuana seeds:
Most seeds will germinate at 70-75 degrees F.
Nearly all seeds do best at about 78-80 degrees F.
Some seeds require up to 85 degrees F.
Never exceed 90 degrees F when germinating.
VEG BOX:
My new veg box is an extra lage U-Haul moving box which is 24" x 21" x 24", costs $4 and I put 2 - 23 watt bulbs in it, 1 - 6500k and 1 - 2700k. I may spend another $10 and get 2 more 6500ks and 2 more Y splitters for a total of 4 bulbs. I used 2 of the 80mm fans I had from the other box, and I will use a passive intake, but I do have the 10" fan just in case. The new spouts will only be in there for about 3 weeks, at which time I will top all 4 plants, give them a couple more days to recover and then move them into the flowering box.
POTS:
Right now, I will use the same 2 - 6" pots I started with from the last grow. I also have one 10" pot, and will need to get another to do 2 plants.
SOIL:
This is the potting soil I will use again, Scott's Hyponex potting soil, 99 cents at Walgreens. This is just plain black potting soil that has some perlite mixed in it. I will hopefully get 2 females out of 4 seeds, I will be using 2 of the 10" pots sitting in aluminum pie pans for catching drainage water. These will be plenty big enough for this grow, as the plants will grow no taller than 30", maybe 36" max. I will start them in the 6" pots at first.
FLOWER BOX:
I will use the same U-haul Grand Wardrobe Box. The size is 48" H-24" W-21" D. For a small grow, it seems to be the perfect size. I have 2 white shelfs from an old grow cabinet and they worked out great. I used 1 for a floor in the box and the other 1, I put on top of the box for all my supplies to sit on, the box is very sturdy. For the door, I just taped up the top of the box where it drops down in the front, then cut the door on the other side. Plus, this box comes with a metal bar to hang your light from all for $13. Also, being cardboard, it is very easy to cut out holes for fans and vents and such. I know it is a carbord grow room, but I have no concern about it being a fire hazard. Everything is wired right and hardly no water is involved, it is very safe if you just do it right.
LIGHTS: 
I made the my lights from a 3 bulb chrome light fixture, an extension cord, and 3-Y blub splitters for a total of 6 bulbs. I screwed the fixture from the inside to a piece of 1" x 2" x 18" wood, which aslo gave me a place to hook the chains to, works great.
5 - 23 watt 2700k and 1 - 23 watt 6500k bulbs for a total of 138 watts and 9600 lumens. I used 1 6500k bulb just mix in the light spectrum.
I will go with a 18/6 light schedule for the first 3 weeks in the veg box and then 12/12 in the flower box for the rest of the grow which should be about 9 weeks.
I plan on doing 24 hours of darkness at the time of switching to 12/12 and make sure its the same am hour that the light turns on at, so either do 24 or 36 hours. The theory is, it's suppose to put the plant into "super bloom" during the flowering period, we'll see.
FANS:
1 - 6" fan for air intake down on the lower right side and 1 - 80mm fan just above it, 4 - 80mm for exhaust on the side to remove heat from the lights, and 1 - 5" for exhaust at the lower left. I took an old computer power source to use as a DC convertor for running the 12v computer fans and the 2 - 6" DC fans, works great and was only $11 on ebay. And another 6" oscillating fan blowing up on the lights and across the plants, this has really helped with temps. 2 of the 80mm are in the veg box with a passive intake, maybe the 10" for intake if needed.
TEMPS:
I use the Acturite digital temp/hum gauge I got from Wal-Mart that was $8, it shows highs and lows for both temp and hum, and it works very well.
The lowest I got the temps in the last grow was 82/84 degrees with peaks to 86/88 with the lights on and about 75/79 degrees when dark.
HUMIDITY:
Humidity was running between 30% to 55% so I'm good with that.
SOIL PH METER:
HoldAll Moisture, Light and PH Meter
Scientifically accurate No batteries required Measures moisture, light and soil PH. Promotes healthy plants.
It was only $8 and it worked good for keeping track of my ph.
I checked the ph every couple days during the last grow. The ph stayed around 6.5 to 6.8 which is great for a soil grow. That was after watering with nutes.
WATER:
I will use the Florida rain water with a ph of 6.2 again as this worked out very well with the last grow. when it rains, I fill 2 - 3 1/2 gallon buckets I have on hand. They will stay outside and I will fill 1 gallon jugs to bring inside. I am using this because it is way better than the 8.0 tap water here.
NUTES:
These are nutes I will use, same as last time.
Jack's Classic® dry All Purpose 20-20-20 for the vegging stage
Total Nitrogen (N)....................................... 20% 2.1%
Nitrate Nitrogen 17.9%
Urea Nitrogen Available Phosphate (P2O5)....................... 20%
Soluble Potash (K2O)................................. 20%
Boron (B).................................................... 0.02%
Copper (Cu)................................................ 0.05% 0.05%
Chelated Copper (Cu) Iron (Fe)...................................................... 0.10% 0.10%
Chelated Iron (Fe) Manganese (Mn)......................................... 0.05% 0.05%
Chelated Manganese (Mn) Molybdenum (Mo)....................................... 0.0009%
Zinc (Zn)...................................................... 0.05% 0.05%
Chelated Zinc (Zn)
Jack's Classic® dry Blossom Booster 10-30-20 during the flowering stage
The 1-3-2 ratio is still the ratio that is preferred by professional growers when they want results. This formula also contains a higher level of magnesium, a vital secondary element, which helps keep leaves green.
Total Nitrogen (N)....................................... 10% 5%
Ammoniacal Nitrogen 5%
Nitrate Nitrogen Available Phosphate (P2O5)....................... 30%
Soluble Potash (K2O)................................. 20%
Magnesium (Mg)......................................... 0.5% 0.50%
Water Soluble Magnesium (Mg) Boron (B).................................................... 0.02%
Copper (Cu)................................................ 0.05% 0.05%
Chelated Copper (Cu) Iron (Fe)...................................................... 0.10% 0.10%
Chelated Iron (Fe) Manganese (Mn)......................................... 0.05% 0.05%
Chelated Manganese (Mn) Molybdenum (Mo)....................................... 0.0009%
Zinc (Zn)...................................................... 0.05% 0.05%
Chelated Zinc (Zn)
A 1-3-2 blend such as Peter's Pro Blossom Booster, 10-30-20, is one of the best flowering blends on the market because of several factors - it is higher in nitrate N and Mg. It is sold under the Jack's Classic label. An added benefit of Peters blends is their use of high quality, very pure salts that will eliminate root burn if used judiciously.
 
I will also mixed in these: GH Products floraGro® 2-1-6 and GH Products FloraBloom® 0-5-4
FLORA GRO®:
Stimulates structural and vegetative growth. Builds strong roots. Provides Nitrogen, Phosphorous, Potassium, and secondary minerals.
FLORA BLOOM®:
Stimulates flower and fruit development. Enhances flavor, aroma, and essential oils. Provides high Phosphorous, Potassium, Magnesium, and Sulfur.
 
I got these two on Ebay for $10 shipped, I think they really helped.
1 pound of High Phosphorus Bat Guano (NPK 0-7-0) and 1 pound of Worm Castings (NPK 1-0-0) $10.15 Shipped.
Worm Castings are an excellent seed starting amendment, soil amendment and are great as a maintenance tea. It can also be top dressed, mixed in with soil or made into a tea and watered in.
High P Bat Guano is an excellent flowering / fruiting phase fertilizer / soil amendment. It can be top dressed, mixed in with soil or made into a tea and watered in.
I will just use the rain water with no nutes for first 2 weeks, maybe a couple of light 1/4 strength waterings with veg mix during the 2nd week depending on growth. Then I will switch to 1/2 strength and then full strenght flowering mix for weeks 3 thru 7/8 and then flush/water with straight rain water for weeks 9/10/. I will water every day just like I did in the first grow, or depending on soil dryness.
I came up with a cheap gravity fed watering system, I use a gallon jug with 2 tubes in the top. 1 for a vent and the other runs to the pots. To start it, you just blow in the vent tube and the water starts to run. Them I used a T to split it for 2 plants and installed an on/valve before the T. Once you get the flow going, you can the turn the valve off and on and the line stays pressurized, very simple system and very cheap to make. The 1 gallon jug will empty in less than an hour, so keep an eye on it if you don't want to use the whole gallon.
TOPPING:
I am going to cut the very top of each plant at about 18 days this time. This will give me 4 main colas on each plant.
By the time your plants are a about 6 inches high and the 4th or 5th set of leaves comes up you can cut the two leaves at the top, this will split the plant up in 4 branches, you can repeat this process a few times but give the plant time to grow and recover in between. This technique will increase your yield dramatically but cutting to much will slow the plant down very much since it needs energy to close it's wounds.
I will use this type of topping as it worked well with the last grow.
#1 Locate the very top of the new growth. #2 With a clean, sterilized scissors, Fold the fan leafs over and cut approximately 80% of the new growth off the plant. #3 This is what it should look like after the cut has been made. #4 View of the Cut section after 2 days growth, showing the 4 new growth shoots (branches).
CLONES:
I hope to get some clones this time. I will use a clear box that has holes it and is hinged. I will do 4 clones in it to have on hand for the following grow after harvest. You just take the cutting, dip it in clone powder, place it in pre-soaked 30mm Jiffy peat pellet, stick it inside the "clone box" and place them in the grow box. Wait for the roots to shoot out the bottom of the Jiffy peat pellet and then transfer to a 6" pot filled with fresh potting soil and place it in the veg grow box.
 
"I have had a lot of luck with cloning. I've tried many different approaches to it like Jiffy pellets and rockwool cubes. For me, I've found that they tend to grow algae faster than the plants take to root. Most recently, I've developed a new method (new to me) and it actually works great. I have 2-3 oz plastic cups and I fill them up with FoxFarm Lightwarrior soil, wet it down and kinda pack it in there. I take decent sized clones, 5-6 inches, dip them in rooting gel and stick them straight into the cups with the soil. I put them in a dome and mist 3x daily. My best clones ever came from this method. The soil is meant for seedlings so it is very mild but contains nutes so the plants do better. Happy growing!"
HARVEST AND CURING:
When I harvest, I will use the veg box to hang and dry in. Cut the buds off, anything over one and half inches long, and manicure them right then and there. Then, using cheap masking tape, I will make rows 3 or 4 inches apart, across the box and hang them from the tape. Then run an oscillating fan on low, blowing OVER but not on them, just to keep air moving. Do not allow the buds to touch each other. By drying just the buds alone, you can dry them in 3 to 5 days. The big buds are 5 days, the small buds in 3 days, till you can snap the stems. then put the small popcorn buds in shoe boxes, not piled up or touching each other, and stir them around daily too. What you want to do is dry the buds first, and then CURE them, by placing them in jars, and opening the jars daily for a few minutes, to smell them, for up to 30 days. If they smell funky, take them out of the jar and dry them again two more days, then back in the jars. You have to watch those big colas close to make sure you don't get mold.
Also, trim the leaves close to the buds, and the larger green fan leaves. Keep them separate in shoe boxes a fan blowing over them too. These will be used to make hash with using a hash press. The hash press is really a clay extruder that can be had for about $20 at Micheal's arts and crafts. I didn't do this my last grow, but would like to try it this time.
 
Well, there you have it, the plans for my 4th attempt at growing. This is my second attempt at growing in soil, I still have a brand new DWC 4 net pot hydro tub setup that goes right into the grow box with minimal changes, but that will still be another grow on down the road. I've have learn alot and had a lot of good advice from some great people and met alot of great people on the R.I.U. site. Thanks to all!! I will keep this thread updated every few days or as needed with pics and information of the grow's progress. Hope everyone comes along for the ride again.
Attachments
-
 44.2 KB Views: 883
 -
 43.6 KB Views: 696
 -
 49.9 KB Views: 785
 -
 32.4 KB Views: 871
 -
 45.7 KB Views: 889