Anonymousm0nkey
Member
Background
I have 7 grows that I have completed, with 4 being extremely successful, 2 annihilated by spider mites weeks into flowering, and one that was half destroyed by mold/fungus. All of these, save for the last, were Deep Water Culture (DWC). I have used the Lucas formula (loved it) as well as Fox Farms nutrients. All of my grows were of Blue Dream which was incredibly resilient, easy to clone, and for the most part, aggressive in growth.
My last grow was a Recirculating DWC (RDWC) using ¾ inch tubing for the pump AND return lines. As you would expect, while it worked pretty well for the first few weeks (amazing, in fact!), eventually roots and debris clogged the lines and leaks began to form due to the cheap parts I used and little knowledge of how to build water tight containers/seals. The humidity went through the roof, some strange mold/fungus appeared on half the plants, and I had to trash more than half the crop. That was 6 years ago, almost 7.
I live in a medical/recreational legal state, and the spider mite grows and the fungus grow-ad the lost time, money, and energy spent on the process-made me retire my growing equipment.
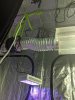
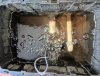
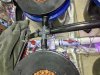
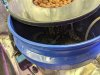
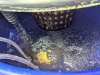
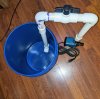
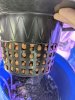
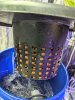
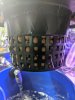
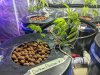
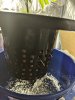
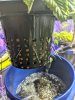
I created a "chassis" system using bulkheads with slip PVC to slip PVC ends. I can remove/add buckets to the system in between grows because the gasket nut is all that holds the bucket to the system, just like tires attached to a car.
I did discover that the bulkheads were not as easy to tighten with my wrench because the curve of the bucket, but because the buckets were spaced out enough and because they were mounted on the chassis, I was able to manipulate the buckets and twist them each tight so they did not leak. But DAMN did I need to apply a LOT of force to get those buckets tight enough to not leak. The system is hooked up to a Uniclife 550GPH in line pump.
A few more tweaks here and there, and I had myself a RDWC.
<img src="https://i.ibb.co/9ZDHyyz/Final-System-Hooked-Up.jpg" alt="Final-System-Hooked-Up" border="0">
After the system was built, I realized I needed upgrades for the NEXT chassis build.
I want to use square buckets (which I did buy….after the system was built) for my next grow as I think it will be easier to tighten the nut on those (and as a matter of fact, I already tested it and it is much easier).
I also want to replace the T PVC connector I have at the end of the gravity return line and swap that out with a cross connector, so I can add a valve at the end for easy draining.
Finally…..
DAY 1
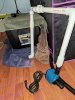
Finally! I had the tent set up, the equipment was installed, and my system was running. I use city tap water for my hydro grows and I let the system run all night as I slept both to test the system and to let any city water chemicals evaporate out. You better believe I was nervous that I was going to wake up to a 30 gallon lake in the next room over. So far though, so good!
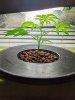
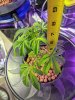
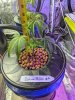
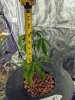
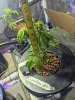
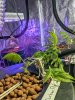
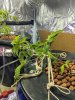
In my state, getting specific genetics/clones is as easy as walking a few blocks down the street to a local cannabis store. I drove, but I was able to buy 6 Durban Poison clones at 10 dollars each. I asked for Blue Dream, but out of the 25 or so strains (most of them I was unfamiliar with and all but 4 were Indica…I wanted Sativa). I had done some research before plant shopping, and Durban Poison was on my list of desired strains. It is of African origination (good because it gets HOT in my area during the summer) and a strong Sativa. It is also supposed to be lenient for newer growers which I still consider myself to be. If Durban Poison was not available, they had the strain Euphoria which I have heard great things about.
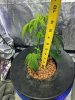
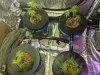
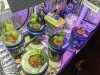
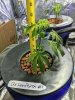
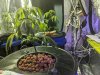
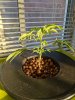
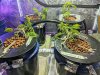
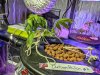
I have 4 plants in my system, while of the remaining 2, one is waiting for a small mother cab and LED system (going to test it out on my mother first) and the other is an “insurance policy” I keep around for a few weeks until the grow is going strong. I keep it sitting near a well-lit plant loving window just in case I need to take clones, toss it in for flower, whatever I want. I’ll keep both in their own DWC systems with one serving as my mother plant.
I am using the General Hydroponics Flora Grow, Bloom, Micro Combo Fertilizer hydroponics nutrients for this grow. I LOVE the Lucas formula, especially when a 12 dollar bag of powdered FloraMax will last me an entire grow and then some….but I thought, to give myself the BEST chance for this “redemption grow”, I will go with the more robust GH nutrients. That said, I am pretty liberal in interpreting the GH recommended nutrients, and add my own strength/mix for the most part, especially early on.
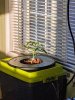
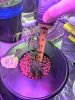
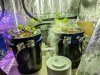
For this first week, I keep the PPM’s to around 400…..once those roots dunk down into the water the plants will let me know when they want more nutrients and that’s when I will start to slowly increase depending on what they do. For today, I added my nutrients, PH’d to 5.8, and the PPM came out to……420! This is a good sign!
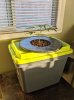
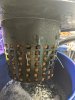
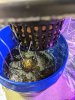
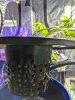
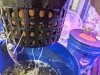
See the glug glug glug of the gravity return line and res: Reservoir
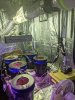
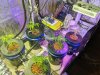
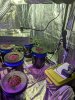
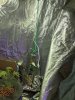
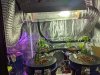
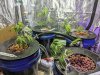
Inside the tent:
Rear Door 02
.
Rear Door 01
.
Main Door
I have 7 grows that I have completed, with 4 being extremely successful, 2 annihilated by spider mites weeks into flowering, and one that was half destroyed by mold/fungus. All of these, save for the last, were Deep Water Culture (DWC). I have used the Lucas formula (loved it) as well as Fox Farms nutrients. All of my grows were of Blue Dream which was incredibly resilient, easy to clone, and for the most part, aggressive in growth.
My last grow was a Recirculating DWC (RDWC) using ¾ inch tubing for the pump AND return lines. As you would expect, while it worked pretty well for the first few weeks (amazing, in fact!), eventually roots and debris clogged the lines and leaks began to form due to the cheap parts I used and little knowledge of how to build water tight containers/seals. The humidity went through the roof, some strange mold/fungus appeared on half the plants, and I had to trash more than half the crop. That was 6 years ago, almost 7.
I live in a medical/recreational legal state, and the spider mite grows and the fungus grow-ad the lost time, money, and energy spent on the process-made me retire my growing equipment.
I created a "chassis" system using bulkheads with slip PVC to slip PVC ends. I can remove/add buckets to the system in between grows because the gasket nut is all that holds the bucket to the system, just like tires attached to a car.
I did discover that the bulkheads were not as easy to tighten with my wrench because the curve of the bucket, but because the buckets were spaced out enough and because they were mounted on the chassis, I was able to manipulate the buckets and twist them each tight so they did not leak. But DAMN did I need to apply a LOT of force to get those buckets tight enough to not leak. The system is hooked up to a Uniclife 550GPH in line pump.
A few more tweaks here and there, and I had myself a RDWC.
<img src="https://i.ibb.co/9ZDHyyz/Final-System-Hooked-Up.jpg" alt="Final-System-Hooked-Up" border="0">
After the system was built, I realized I needed upgrades for the NEXT chassis build.
I want to use square buckets (which I did buy….after the system was built) for my next grow as I think it will be easier to tighten the nut on those (and as a matter of fact, I already tested it and it is much easier).
I also want to replace the T PVC connector I have at the end of the gravity return line and swap that out with a cross connector, so I can add a valve at the end for easy draining.
Finally…..
DAY 1
Finally! I had the tent set up, the equipment was installed, and my system was running. I use city tap water for my hydro grows and I let the system run all night as I slept both to test the system and to let any city water chemicals evaporate out. You better believe I was nervous that I was going to wake up to a 30 gallon lake in the next room over. So far though, so good!
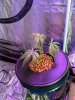
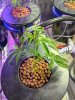
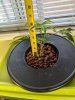
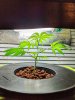
In my state, getting specific genetics/clones is as easy as walking a few blocks down the street to a local cannabis store. I drove, but I was able to buy 6 Durban Poison clones at 10 dollars each. I asked for Blue Dream, but out of the 25 or so strains (most of them I was unfamiliar with and all but 4 were Indica…I wanted Sativa). I had done some research before plant shopping, and Durban Poison was on my list of desired strains. It is of African origination (good because it gets HOT in my area during the summer) and a strong Sativa. It is also supposed to be lenient for newer growers which I still consider myself to be. If Durban Poison was not available, they had the strain Euphoria which I have heard great things about.
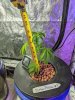
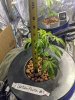
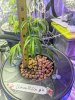
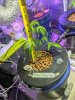
I have 4 plants in my system, while of the remaining 2, one is waiting for a small mother cab and LED system (going to test it out on my mother first) and the other is an “insurance policy” I keep around for a few weeks until the grow is going strong. I keep it sitting near a well-lit plant loving window just in case I need to take clones, toss it in for flower, whatever I want. I’ll keep both in their own DWC systems with one serving as my mother plant.
I am using the General Hydroponics Flora Grow, Bloom, Micro Combo Fertilizer hydroponics nutrients for this grow. I LOVE the Lucas formula, especially when a 12 dollar bag of powdered FloraMax will last me an entire grow and then some….but I thought, to give myself the BEST chance for this “redemption grow”, I will go with the more robust GH nutrients. That said, I am pretty liberal in interpreting the GH recommended nutrients, and add my own strength/mix for the most part, especially early on.
For this first week, I keep the PPM’s to around 400…..once those roots dunk down into the water the plants will let me know when they want more nutrients and that’s when I will start to slowly increase depending on what they do. For today, I added my nutrients, PH’d to 5.8, and the PPM came out to……420! This is a good sign!
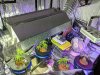
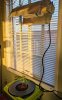
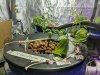
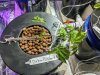
See the glug glug glug of the gravity return line and res: Reservoir
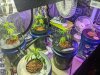
Inside the tent:
Rear Door 02
.
Rear Door 01
.
Main Door