"coil potting" is often used in pottery. it is the method of coiling round lengths of material in an upward spiral pattern to create a hollow vessel. it can be done with clay as well as glass. today we will be doing it with glass to create a section of tubing which can later be used for making numerous things.
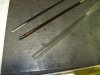
we start with a "blow tube", a solid stick of color and a solid stick of clear.
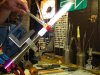
using the small flame on our torch we start wrapping the color around the end of the blow tube to create a small "bulb" of color.
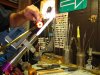
once the bulb is created we want to melt it all together evenly.
we can use the marver (graphite pad) on the torch at this point to work everything evenly.

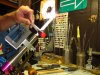
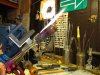
once the color is melted in evenly we can cover it in a layer of clear. wrapping on top in the same "coil pot' method. only this time we are laying it onto the color.
clear layer.
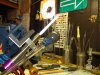
once the clear layer is applied we again melt it all in evenly using the marver and shaping it into a tube shape. from here we can stack on more sections, shape it into a spoon, puff it out into a jar, pull and twist it into a crazy straw, ... the possibilities are limitless.
it's pretty quick and pretty easy. when done with "striking colors" it can bring out amazing effects.

we start with a "blow tube", a solid stick of color and a solid stick of clear.
using the small flame on our torch we start wrapping the color around the end of the blow tube to create a small "bulb" of color.
once the bulb is created we want to melt it all together evenly.
we can use the marver (graphite pad) on the torch at this point to work everything evenly.
once the color is melted in evenly we can cover it in a layer of clear. wrapping on top in the same "coil pot' method. only this time we are laying it onto the color.
clear layer.
once the clear layer is applied we again melt it all in evenly using the marver and shaping it into a tube shape. from here we can stack on more sections, shape it into a spoon, puff it out into a jar, pull and twist it into a crazy straw, ... the possibilities are limitless.
it's pretty quick and pretty easy. when done with "striking colors" it can bring out amazing effects.