4th Grow Room Setup

Carthoris

Well-Known Member
Anyone who does DIY will change their setup often and occasionally do a major rebuild in between cycles. This is my 4th go at building what I want. At this point I have spent thousands of dollars and spent years learning and growing in this hobby. I am still a hobbyist. The joy of growing and building equipment is why I do this. As I start my 4th build, I would like input from those who understand the processes. I would also be more than happy to answer any questions about the setups that I have build, and the one I am building.

First, let me tell you about my past setups.

My first build was cfls and it was very very rigged together. I ended up with a decent harvest. I used miracle grow soil and ferts, along with perlite and potting soil. Honestly, it came out better than I ever imagined. It was very hodgepodge. Here is a link. All the pictures for the entire journal is at the bottom of the posting. I was too lazy to put them where they were supposed to go. It has pictures of the plants, the harvest, and the equipment. Memoriesssssss
https://www.rollitup.org/grow-journals/369377-my-first-grow.html

My second build was a little different. It was a closet, it had a air cooled 400w hps. Single exhaust and a can 33 filter. First with bubble buckets, then with totes. 4 plants in the closet. It came out very good and I was hitting right at 1 gram per watt by the 3rd grow. Ill see if I can find pictures of the setup if anyone is interested. I got a good ph meter by this time (SMS110 or 120) and I actually spent time emptying the res a few times. The first couple times I never even emptied the res from start to finish and still nearly got a gram a watt. I didn't keep a journal of this, but I did take pictures, and they are on this link: https://www.rollitup.org/general-marijuana-growing/338018-some-my-plants.html#post4258614 The dirt is the first grow, the closet with the hps is the 2nd one. As well as my cloning setup I believe.

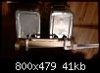
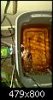
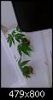
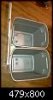
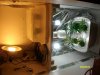
My third grow was a small area specifically built just for the grow and was all made custom with a RDWC setup. 4 plants, external res. 2 stanley blowers. One for the hood which exhausted into the attic. Have a can 33 filter, 600W HPS, good air pump, and a water pump to circulate the water. All run together with 1/2" pipe. I've run this for the last year, and I guess it will be for cloning and mothers now more or less with CFLs replacing the air cooled hood. I took good notes during the building process and here is the link for that: https://www.rollitup.org/grow-room-design-setup/364226-my-3rd-grow-room-setup.html#post4602145
 

Carthoris

Well-Known Member


I decided to use a 4x4 tent. At first I was going to build my own using black out cloth and 2x4's. I might of been able to customize it a little bit and it would of been usable. After I calculated the cost of the zippers, velcro, 2x4s, staples, nails, brackets, figuring the exhaust out, tape to tape all the seams and ect ect ect. I figured I might as well buy a cheap one on ebay. I started looking and I thought I was going to get one of the cheapo 100 dollar ebay ones. After some looking I went ahead and bought the Secret Jardin 4x4 DR120 tent. It seems like it meets my needs, exceeds them, and is the best you can buy. It cost me about $220. After considering it could actually be taken down and moved, it was an easy decision. It has not arrived yet, so here is a review from Greners.com until I get it to do my own!

http://www.youtube.com/watch?v=m3wyW_pmPJA&feature=player_embedded

The only issue I may encounter with the tent is that I have can 33 filters and I am attached to them. However, if needed, I will switch when it is changing time and just prop it up temporarily if needed.
 

Carthoris

Well-Known Member
Next is the hood. I am using a Euro Reflector from HTGsupply. The reflector works great. No issues with how it performs. However, I wish I would of invested the extra money into buying one that had a rubber seal and that was hinged. Cleaning the glass requires that I move the screws, and the metal bar, then slide the glass out, which can tilt and hit the bulb. Fortunately I lost the screws since they were teeny tiny and I put a mark on the bar so I knew how much water should be in my remote res and just put tape along the side of it. I will probably upgrade to a better hood eventually, but for the use and how well this one works for 85 bucks I don't have any real issues. I used a standard mogul socket and built a metal bracket to hold it in. I could use this hood indefinitely.


For hangers I am using eye hooks with the yoyo hangers from HTGsupply. They work OK, but I will probably spend the 30 dollars and get a better set soon. It is better than using chains and moving them constantly. Also, they sell these for 9 bucks at Wal-mart now on the As-Seen-On-TV section near the registers. They are probably as good of quality if not better.


Carthoris

Well-Known Member
At the moment however I am using a 600w HPS ballast. Magnetic. I used 10 gauge extension cords to wire the hood and everything. I made sure to make the powered end of the ballast female and the hood male so that there is no shocking hazard. I may get a 600w digital or a 1000w digital in the future if I buy a new hood since many times you can get a good discount if you buy them together. However, I am perfectly happy with my magnetic ballasts. I put the kill-a-watt on them and after some math the truth is the digital will never save you money. My magnetic ballasts don't make noise, and they don't get hot. However, if I got a great deal on a 1000w digital and I was upgrading anyway I would probably get it or possibly another 600 with a dual bulb hood and run both lights at once.

For a bulb I am using the HTG 600w bulb. It has done 2 grows and I will be swapping it out soon. I think it was 40 dollars with shipping and I have had no issue with it. I might go for a better bulb this time, dunno yet. Any advice?
 

Carthoris

Well-Known Member
Now for the part that is really what I enjoy. The RDWC setup. I am building it right now, and it might take me a week or so to put it together. Here is what I have got so far:

20 -1" Uniseals.
15' -1" pvc
10 -1" elbows pvc
9 -5 gallon buckets

First, I cut the holes for the Uniseals. 2 inches or so from the bottom. I actually used the bottom of the writing on the buckets so I wouldn't have to mark so many spots and all the buckets had the holes in the same place. More or less.

SANY2262.jpgSANY2264.jpgSANY2263.jpg
 

Carthoris

Well-Known Member
Then came the fun part! Uniseals. I put them into the holes. Wow, that was easy. Wait... I didn't insert the pipes yet.
SANY2270.jpgSANY2269.jpgSANY2271.jpg
I cut the pipe in 2-3 foot sections. Really all I was doing was putting it so I could connect fittings to each bucket, but it is easier to insert a 2 foot piece than a 1 foot piece. So I squirted windex on each pipe as per directions and I fought with the buckets. It gets easier after the first couple. I supported the bucket inside at first while I pushed. This took a lot of strength and I am not a small/weak person. After a bit I learned that if I slid another bucket inside of the one I was working on just to where the uniseal was it would support it perfectly. At this point they went in pretty well. Leverage is sometimes better than strength:) After I got the pipe into the seal an inch or so I would cut it off 3-6 inches out and move on to the next one. This is what I ended up with:

SANY2273.jpgSANY2272.jpg

A few things I've learned about Uniseals
If you don't lube the pipe, then it isnt going in - don't bother!
And
If you don't sand the edges of the pvc pipe then it will dig into the inside of the uniseal and leave marks. I doubt it will leak, BUT, my suggestion is to grind the ends of the PVC pipe to a point sort of, so it won't dig into the uniseals.
And
Don't worry that the pipe is moving in the seal, once the windex dries it will be solid.
And
Uniseals hold pressure and vacuum in fish tank pump setups. They are designed to hold about 40 psi. The psi of water is about .5 psi a foot in a barrel. What does this mean? The uniseal shouldn't leak unless you do it wrong. RDWC and DWC probably have less than 1 psi on them at any given time.
 

Carthoris

Well-Known Member
For any who are wondering : I tried to put two buckets together with a solid piece of pipe at the beginning, just to see if I could do it. Good luck, it might be possible, but it would be very hard. PVC connectors cost all of 50 cents for 1". I wouldn't bother.

Even if I could of put them together - how would I get them into a tent or grow area? My plant is to use 3 rows of 3. Connect the 3 buckets in each row together using PVC and then put a coupler at the end of the rows, so if I take it apart I only have to carry 3 buckets at a time. I left the handles on all of them, so I don't think it would be hard to carry them. Ill put them in place in the tent when it gets here to ensure fit. My goal is to get 3 buckets wide by 3 buckets long and still have room to put a tower fan in one of the corners.

Buckets are 1' diameter. So technically jammed side by side they are only 3' x 3'. I figure with the connectors and all I will be at 3 1/2 x 3 1/2. Another reason I haven't started connecting them is I am not sure where the input for the hydro would be exactly in the tent. The tent will be here in the next week. I will continue to post. Thanks for reading.

Carthoris
 

katfan

Member
For any who are wondering : I tried to put two buckets together with a solid piece of pipe at the beginning, just to see if I could do it. Good luck, it might be possible, but it would be very hard. PVC connectors cost all of 50 cents for 1". I wouldn't bother.

Even if I could of put them together - how would I get them into a tent or grow area? My plant is to use 3 rows of 3. Connect the 3 buckets in each row together using PVC and then put a coupler at the end of the rows, so if I take it apart I only have to carry 3 buckets at a time. I left the handles on all of them, so I don't think it would be hard to carry them. Ill put them in place in the tent when it gets here to ensure fit. My goal is to get 3 buckets wide by 3 buckets long and still have room to put a tower fan in one of the corners.

Buckets are 1' diameter. So technically jammed side by side they are only 3' x 3'. I figure with the connectors and all I will be at 3 1/2 x 3 1/2. Another reason I haven't started connecting them is I am not sure where the input for the hydro would be exactly in the tent. The tent will be here in the next week. I will continue to post. Thanks for reading.

Carthoris
I hope you don't mind if I ask but I'm interested in your setup. What are you using for the grow medium? Nutes? Are you vegging and flowering in the same 4'x4' tent. I have a similar tent but I'm on my first grow and it's totally organic nutes and soil. I am a tinkerer and I like the science challenge of growing so I am interested in possibly going hydroponic next grow or if I eventually upgrade. I would love to see pics. I will subscribe to this thread for sure!
 

Carthoris

Well-Known Member
I hope you don't mind if I ask but I'm interested in your setup. What are you using for the grow medium? Nutes? Are you vegging and flowering in the same 4'x4' tent. I have a similar tent but I'm on my first grow and it's totally organic nutes and soil. I am a tinkerer and I like the science challenge of growing so I am interested in possibly going hydroponic next grow or if I eventually upgrade. I would love to see pics. I will subscribe to this thread for sure!
I use General Hydroponic Flora series. The bloom and the micro. I use the Lucas formula which is 16 parts bloom, and 8 parts micro per gallon throughout the grow. With the lucas formula if you dump your res you don't even have to check your ppm or have a ppm meter since the fresh formula is always where it needs to be. With a 25 dollar PPM meter you can go the whole grow without dumping your nutes if you wanted.

That being said I got an 8 pack of General Hydroponic organic series for free, as well as their new Flora Duo 2 part. So I may actually give one of them a try on the next grow in the new setup.

For grow media I use 6" net pots with hydroton. Hydroton is cheap, reusable, and easy to use. I usually start plants from seed in a jiffy puck and then just wash it off the root system before putting it in the hydroton. Once the plants are big enough to take clones from I cut the clone and put it in a square of rock wool with rooting hormone. I do the seeds in jiffy pucks because seeds seem to do better in them than in rock wool.

Here are a few pictures of my old setup that I am currently using. The two totes together are my grow totes. They hold 2 plants in each. I put pictures of it top and bottom. The pipes run through the wall of the grow room and outside to my res. I can't get a picture of it all together since it is in 2 different rooms. The one that has the nutes in it is my external res. I have the building journal for it with all the pics posted up earlier in the thread (3rd grow room)

The clear tote is how I do clones. I've never waited more than 10 days for a clone and I've never had one die. All you need to clone is a clear container with a lid flipped upside down. Put a cup of water or fill the outside edge of the lid with water as long as it isn't touching the rock wool. I try to fan them once a day to change out the air. This keeps the humidity high enough so they don't wilt. Once you see roots, you are ready to rock.

IMAG0060.jpgIMAG0096.jpgIMAG0092.jpgIMAG0091.jpgIMAG0059.jpg

Here is a picture of the system with plants in it:
IMAG0087.jpg
 

Attachments

Carthoris

Well-Known Member
You might consider what organic means to you. Ive always considered the word 'organic' to be more of a selling point than any real product. At what point does a product move from organic to inorganic or inorganic to organic? If I grow a plant with inorganic fertilizers, and then use that plant to make fertilizers or feed that plant to a cow and use the manure - is that organic since it is fertilizer made from a plant and not rocks/minerals?

Consider this: When the Earth started there was no life at all. Eveything was inorganic. Nothing having ever lived. Everything in the world was produced from inorganic fertilizer essentially. Then once the first plants and animals died they became fertilizer for the new plants and animals.
 

Carthoris

Well-Known Member
I got my Secret Jardin DR120 tent, its a 4x4 tent. This is my first tent purchase so I don't have anything to base it against. I have seen other tents, but never owned them or assembled them. Here is my review of it.

Assembly

It took me all of 15 minutes to assemble the tent. The directions are basically 5-6 pictures without any real written directions. However, the tent is so simple to put together that I can't imagine not being able to do it. The hardest part was finding the zipper at the bottom of the tent. As I was assembling it I worried because its seemed flimsy. Once I stretched the tent over the frame it was fine. I noticed a lot of little things while assembling it that gave me the feeling that it was a well thought out product. I was happy with the assembly.

Construction/Materials

Obviously I have only had the tent 2 days, so I can't comment on longevity. I can, however, comment on the material used to make the tent. I have to say I was very surprised about how heavy the tent was, and how thick the material was. It reminds me of a canvas book bag or something along those lines. The corners were stitched up well. The zippers are heavy duty and all zip well. I get the feeling the zippers will last a long time. The reflective lining inside is very well done. I have to say I came away feeling like it was money well spent. I don't get the feeling I will be taping it together by the end of the first grow. The seams seem very sturdy. It is rated to hold 66 lbs from the top support railing. My can 33 filters weigh something like 25. My hood weighs about 25. I should be fine with weight. It seems pretty sturdy if you hang the lights/hood/filter how it was meant to be hung. A nice feature here might of been openings at the top that you could run support chains from the roof on eye hooks to help support the rods where you hang you equipment, that would be unnecessary though I reckon. Overall, I am very happy with the construction of the tent.

Functionality

There are many openings, and they are logically placed. Obviously the people who made this have used tents and wanted this to be an awesome one. The only thing that might of helped me personally would of been a second port for running my lines out for the remote res. The one for it seems to be a bit high. I could of had to put the lines that go to the system at the very top of the buckets. Definitely not a deal breaker, and I probably should of waited on drilling the last couple buckets til I had the tent anyway. There is a perfectly placed air cooled hood in and out, a perfect electrical wiring in. I'm not sure what use the two vented squares on the side of the tent would be unless I was using it as a drying tent or just for vegging. The two inputs seem decent enough. There are 3 doors. One large one that opens the entire front of the tent, and one on either side that allows you to get to your plants if needed. It seems well designed enough and up to the task.

Light leak

I don't see any real issues with light leaks. Get in your tent and have someone zip it up. You are in the dark. Much darker than needed, I am very happy with this also.

Overall Impression

The tent's 4x4 area will run whatever size light you want to run, and the many ports and options on the tent are going to work for me and I would guess 99.9% of people. Unless you are planning to do one grow and then stop, or have the ideal space already, this tent is going to be very cost effective. I think this tent will bring my grow to the next level in terms of quality, and ease. Being able to get to the sides of my grow will make supporting plants and trimming dead leaves and such much easier. I am very excited about this tent, and I don't regret my purchase at all.
 
Top