A Medicinal Refrigerator

Danielsgb

Well-Known Member
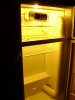
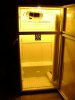
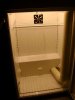
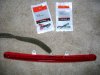
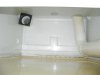
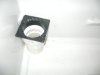
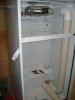
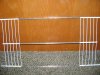
Here's some pics of where I'm starting this morning.
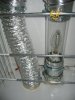
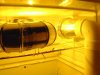
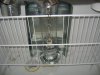
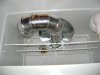
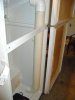
I decided to put the upper rack in to use as a support for the front end of the Cool Tube. I have to trim more of the middle out. I made a quick trial hanger piece. I realized the other tube is too close to my reflector hood so I have to adjust it.
So I'll have an update later today.
Daniels:leaf:
 

Attachments

gumball

Well-Known Member
Looks good so far. I wish I was able to use the 4" pvc, those smooth pipes are probably quiter than the duct work I got, even though I'm using 6" duct with 4.75" pc fans. Can't wait to see the finished product.
 

Danielsgb

Well-Known Member
Well I got a ways so far.
I cut more slots out of the upper rack then twisted off the metal pieces. I covered it in aluminum duck tape. You can run your hand over them without bleeding;-) I made a new support out of a yellow coat hanger. I modified the hood reflector support (it's in the 4th pic) to hold the rear, and I'm yet to do the front. There's some reflector trimming to figure out still. I bent the vent piece over the clamp, it looks better. 2nd pic. I added another coat hanger support:smile:
I started working on the Cool Tube fan mounting part. The dremel had a wheel and I was off smoothing it. I was finishing and the MJ DIY build Gods smiled upon me.:-P The door bell rang and UPS delivered my two fans. Gotta love Newegg. A 134 CFM comp fan for the Cool Tube exhaust. I'll get it in later. I'm thinking a normal 120mm 75CFM on the intake added later if needed.
I got the 4" hole fine tuned & it's fit tight. A pic shows the clearance on the front door. Think the 134 fan on the end will pull enough? I could add a fan right behind the filter on the top end.
Back again after I get some more done.:twisted:
Daniels
 

Attachments

gumball

Well-Known Member
i think i remember you saying something about ripping out the plastic, not sure. but you know with all that reflective looking white plastic in there lining the walls and ceiling, you may not even need a relflector hood for that light. just a thought!
 

jsgamber

Active Member
I don't know dude. But it looks like your on a mission...A mission from God!!!

Looking awesome. My Newegg package arrived at someone else's house but I got it yesterday. I'm telling you $9 for a 134cfm fan with great static pressure and is quiet (40db ok quiet for a fan that pushes that much air) is hard to pass up!!.

One thing you will find with the 4" PVC is it perfectly dampens the sound of the fans once everything is sealed up.

Anybody need a good humidifier for under $5? Come check out my DIY humidifier in my cabinet build.

peace
 

crunkyeah

Well-Known Member
One thing I've seen with fridge grows is terribly high temperatures. Now it looks like you've got the proper fans so it shouldn't be too much of a problem. But I want to pitch in that insulation keeps heat in. I don't know if you've already gutted it or not, since I haven't read the whole thread. I just wanna say that insulation keeps heat in a fridge just as well as it does for cold.

Just somethin to think about if those fans don't cool it like you want, just tryin to help ;)
 

Danielsgb

Well-Known Member
I don't know dude. But it looks like your on a mission...A mission from God!!!

peace
And on the Eighth Day he said "let there by Artificial Light to Grow Pepe"

I got it going.:clap: 
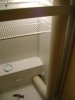
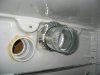
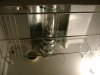
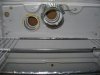
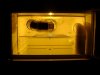
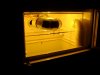
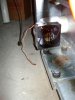
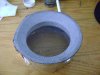
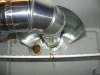
I got the exhaust tube trimmed on top, laid out some zip ties to hold it later. Then I wired the bulb, and gave it a try. :weed:

The socket is about 8" from the back. The top shelf the fatty fan is on is 17" from the bottom of the Cool Tube.
I started this thread eight days ago and can't believe I got this far already.
Daniels
 

Attachments

crunkyeah

Well-Known Member
I'm impressed it looks great!! Good work :) I always thought the idea of having a grow fridge was awesome. What are your temps in there with it all sealed up? And is it light proof?
 

gumball

Well-Known Member
man that is a clean setup. the adjustable rack is awesome, gives you very granular control over positioning. just attach you a plastic bin beneath it and you can water in place also, if need be.

i dont remember, but why is it that your intake is coming up from the bottom, all the way to the top?

you know, you could put a green light in the fixture builtin to the refrigerator. then during lights out you could open it up and have light without messing up the plant cycle. granted the rest of the room would have to be dark before you open it up.
 

Danielsgb

Well-Known Member
Somebody bought a terrarium for $45 on Craigslist this morning so I was off to Harbor Freight to get the other timer I needed. I went to Home Depot to return some things and get the rest of what I need. Here's a pic. I put the light on and both doors closed. NO fans in and it went from 55 to 89 in about an hour and a half. I'm off to some air flow work.
Daniels
 

Attachments

Danielsgb

Well-Known Member
Here's my progress.
I got both fans mounted. I ran it with only the Main Exhaust and the HPS and it went from 60 to 78 in an hour and a half. I connected the Cool Tube Intake tube and it sucks some serious air through. I quit for the night but tomorrow I'll try it with both fans. I have a 12V 1.25A power adapter. I can run both 12V .6A off that right? I have a 12V .5A that I used to test them separately.
I still have to do the Main Intake. I'm thinking a 4" hole straight down to the far left of the Main Exhaust (heading straight forward) I may need to add a fan and it would be pointing to add circulation too. I could add a piece of screen to the very bottom. It would be good to put some good caulking in the Main Exhaust cavity while it's laying down and I need to clean the bottom with bleach water. I'd rather do it now instead of before the grow.
I plan for 1 maybe 2 plants and if it's 2 I think both pots would fit. I'll mount the Power Strip securely in the morning and I want to work out the filter. I have something to try to figure out:-P
While ALL baked and following a pretty new Honda for way to far I noticed it had a LED third brake light that would be perfect for the door. I went to Radio Shack and got lights that I think might work. I was on my way to my last stop at the Rescue Mission to get the power adapter. I passed a salvage yard and thought "Fuck it,might as well check". The guy said to go look and I asked the price range he said $35-50. he told me an area to check out and I found one on a Hyundai Tiburon. I went back to see a price. He said $25 and gave me a screwdriver and a wire cutter. I had to cut the fiberglass apart to get to the screws. It would have been much easier with the right socket set. Oh, well. I won and took the tools back. He saw what I had and said $10. Gotta love that. Now I just have to figure out if I can use it. It's 12V 3.5W. I want it come on when it's dark time in there.
I also decided to change the hood reflector. I'll put a 1/3 skin from the front to above the socket right on the Pyrex.
How's it looking?
Daniels:weed:
 

Attachments

gumball

Well-Known Member
not sure of your electrical know how, pretty good form what I have seen so far. but 3.5watt/12volt=.29amp. hope that helps you out.
 

crunkyeah

Well-Known Member
Sounds great that it's all coming together man ;)

My only question is: What's the purpose of the LED strip during the night time? That would actually be stressful for your ladies if it wasn't running in the dark period. I'm a little confused by that.
 

Danielsgb

Well-Known Member
Sounds great that it's all coming together man ;)

My only question is: What's the purpose of the LED strip during the night time? That would actually be stressful for your ladies if it wasn't running in the dark period. I'm a little confused by that.
The LED will be for outside the door. I'll wire it to a photo cell. It's so my high ass doesn't open it when I shouldn't. (or my mom or sis) It's more of an added fun thing. I have a socket inside (right side in some pics) for a green CFL on a 30 min run-down timer. here's the green bulb http://www.amazon.com/gp/product/B000LWMSDY/ref=pd_lpo_k2_dp_sr_1?pf_rd_p=486539851&pf_rd_s=lpo-top-stripe-1&pf_rd_t=201&pf_rd_i=B000COZ91Y&pf_rd_m=ATVPDKIKX0DER&pf_rd_r=0FEDNDZ8A5YR09T7B7CJ
Daniels
 

soohighrightnow

Active Member
all i can say is wow!!!you built a high tech fridge man...good job hope all works great for ya!!! happy growing...when do you plant to start your plants in it???
 

Danielsgb

Well-Known Member
Here's today's progress.
I got the Main Intake tube in. I put a 3" PVC in with a window screen cover on the bottom end. On the top I put a piece so I can mount a 120mm fan to suck in. I figure the window screen will keep any bugs out.
I got both fans powered and I'm testing the temps now. Started at 67, now as I type 50 minutes later it's at 68.:clap:
I'll throw an update after I eat some dinner. At one and half hours 68.5 At two and half hours 68.5 still At 7 Hrs. 65
Daniels
 

Attachments

crunkyeah

Well-Known Member
I'm very impressed by your ability to keep the temps down in there! This is definitely a work of art! That lights out indicator idea is pretty cool, I might add.

When do you expect it will be occupied? ;)
 
Top