Agar methods

canndo

Well-Known Member
I know this is more of an esoteric point but I have another reason for posting this. Mr Duck is doing a very fine job with chemistry in another thread and he inspired me to contribute something more difinitive. Furthermore, I am trying to raise awareness of tissue culture and micropropagation and using agar and dishes is persuant to that goal.

Most are content with simply squirting a few ccs of a purplish liquid (well, as of late the liquid isn't as purple as I'd like) into a substrate and hoping for the best. There is however a more precise way. If there is any interest I will fill this out with pictures and descriptions of what is "the right way" to cultivate mushrooms.
 

clobbersaurus

Well-Known Member
Go for it, bruv. Even though I've been working with agar since my first bout of research with spores, there is always more to learn. I poured half a sleeve this afternoon, actually; just waiting on my spores from that dude whose names rhymes with "Mouthsters"... :lol: Then I will simultaneously do an iso (hopefully less than 10 transfers this time), and inoculate popcorn from the intermediary mass cultures.

Photo0441.jpg
 

sonar

Well-Known Member
I'd like to hear more on the subject. I've tried cloning tissue straight to LC twice now and my results have been mediocre at best.
 

clobbersaurus

Well-Known Member
I'd like to hear more on the subject. I've tried cloning tissue straight to LC twice now and my results have been mediocre at best.
I have yet to do a single tissue culture transfer to agar, it always takes at least one more transfer after the first to isolate from the contams (and I take my culture from the inside of the stem); I'm not up to date on the newest Tek's, but this may be why you're having problems.
 

canndo

Well-Known Member
The reasons for learning agar tissue culture techniques:

A single syringe is all you will ever need for that strain
You can isolate mycelium away from contamination
You can store individual expressions of different strains for years
You can clone your mushrooms
You can isolate the best performing expressions
You will be prepared for the micropopagation of marijuana and subsequently be able to create artificial seeds
You can create instant LC (liquid cultures)
You can do spot checks of the sterility of your environment
You can vary the agar nutrient mix in order to forestall senecence (genetic aging and consequent failure of mycelium)

Agar is the product of a particular sea weed. It has the property of gelling after it has been cooked and suspending or disolving nutrients.


Basic formulas (one liter of distilled or RO water)

PDY (Potato Extrose Yeast) Agar

Broth of 300 grams of sliced potatoes in 1 liter of water (one hour - filtered)
10 grams dextrose sugar
2 grams yeast
20 grams agar


MPG n(Malt Peptone Grain) agar
20 grams tan malt
5 grams ground rye (or any grain you intend to use as substrate or spawn)
5 grams peptone
2 grams yeast
20 grams agar

MEA (Malt Extact) Agar
10 grams tan malt
2 grams yeast
20 grams agar

Never use sugars that have been caramalized, the mushroom has trouble converting these, hence the tan agar rather than dark brewer's malt.

15 psi 30 to 40 minutes (be careful to leave plenty of head room, this stuff foams under pressure)
 

canndo

Well-Known Member
If you inend to use your agar for multiplication of mycelium, then you might consider putting a bit of what ever your final substrate is, into your mixture. Horse manure? place a gram or two dried and ground into your mixture, the same with straw or grain or worm castings. This tends to prepare your mycelium for what is to come, strengthening the mycelium's ability to bring the necessary enzymes to bear early and thus make the mycelium more capable of quickly exploiting it's nutrient source. If you are concerned about your bacteria load, you can introduce gentamyacin sulfate at ten miligrams per liter of water.
 

canndo

Well-Known Member
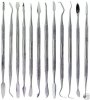
Now one of the most important things in working in agar is the right instruments. You will need a good pair of tweezers, a set of scalpels, disposable are ok but you want a triangular tip. You should certainly have a spore loop - it is a nichrome wire twisted on itself to make a tiny loop and the wire inserted into a handle. You can also get plastic, disposable "bac loops" if you don't intend to do lots of spore work - they are pretty damn cheap though. I also like a heavier scalpel that isn't so sharp but will easily cut agar - Look for wax carving tools or dental instruments. You will be scooping, slicing and picking bits of agar with mycelium attached.

Now you will also need some sort of device to sterilize your instruments ongoingly in your glove box, LAFH or just in a still room. Now you can use an alcohol lamp but I find them slow and cumbersom. I prefer a torch. The one I use is a micro nitrous/butane torch that gives me a 2500+ degree pencil tip flame. This ensures that I can heat the tip of my instrument to red hot in a second and the heat does not travel up the handle. However, you do not need this. Any torch will do nicely and in fact, you don't have to torch your instruments at all.

If you get a double set of all of your instruments you can use 91 percent isopropal or denatured alcohol and swap instruments. One instrument is immersed in the sterilizing agent while you work with the other - this works well but only if you have cleaned and autoclaved your instruments beforehand (wrap your instruments in aluminum foil and pressure cook them for 40 minutes).

Find yourself a half liter or liter glass container that has a smallish opening, about anything you can find will work, I use an erlenmyer 1 liter when working with 500 mil amounts.

finally, you are going to have to get yourself some petri dishes. I like disposable but glass would work better for you if you are uncertain of the conditions you are working with. You see, you will have to steriize your agar and then pour it individualy into your plastic dishes - this invites contamination as you pour. With glass, you can prefill your dishes and sterilize the agar and dish at the same time. Up to you. if you don't do a lot of work, plastic is better, if you want to save money, get glass but you will have to wash them. You will rarely need anything but 90 X 15 or 100 X 15 but the 150's are useful for multiple mating and the 50's are just cool.

Finally you might want to get yourself some micropore tape. It is used to seal the sides of the petri dishes against contamination while still allowing air into the dish. I use this stuff for micropropagation work but have never found it necessary for mushroom work. Because the micropropagation stuff uses sucrose, it invites mites and the micropore tape is somewhat of a barrier (not completely though - damn it).

It is surprising that if you do not expose your dishes to breeze, most spores or dust (most spores adhere to dust and dust motes rather than just floating around all by themselves) will not get under the dish. When that does happen though you will almost always see that the contamination remains very close to the edge of the dish - usually this means that you can quickly scoop it away before it begins to sporulate. This is the ONLY time you want to consider taking the contamination away from the plate - in all other situations you will be taking the myclium away instead - but more about that later.

Eventually, something may get into your dish. When this something gets in after your mycelium has reached the edge of the plate, the spore will not germinate - yet. It will rest upon the mat of myclium and wait until you transfer the mycelium to new substrate and then it will grow and you will never be able to stop it -

The way to guard against this is by using the micropore tape.


bac loop.jpg


wax carving tool.jpg
 

canndo

Well-Known Member
By the way, you can get most of the solutions pre-made, much easier - I find that Bob's corn steep agar is the finest by far.
 

canndo

Well-Known Member
Ok.

Mix your agar either using the formulas I posted (MEA is best for starting) in your glass container, stuff a wad of cotton in the top and cover the thing with aluminum foil. Put all your instruments in there as well - best to put them, wrapped in foil, in a jar, keep them dry.

pressure cook everything for 30 to 40 minutes. We are, in this instance using plastic dishes. After you finish cooking, let the cooker cool, but not too cool - I can't tell you how to do this, you are going to have to experience it. If the agar is too cool, it will solidify in the container and you can't pour it out. If you pour it too hot steam will condense on the top of your dish. If there is too much condensate, it will drop onto your agar and you risk contamination. Now arrange your dishes and carefully but quickly lift the lid of a dish while keeping it over the bottom dish and pour just enough to cover the bottom. Wait a moment so that last drip falls ,you don't want it to get anywhere but in the petri dish. If it does drip, not to worry, it will harden and be easy to wipe off with your sanitary quick wipes - you did remember to get those didn't you?

do this for every dish until either you run out of agar or the agar in the container finally coagulates. Don't stack the dishes, the agar is still molten and it will slosh around, you dn't want that. Also, if you stack the dishes your condensate will take longer to evaporate (yes you will get some). Let them cool for an hour or so. Then carefully stack them up. Now you have 10 or 20 finished dishes - it is always nice to have plenty of spares.

If you have glass dishes, simply mix up your agar, bring it to just short of a boil, until you see all of the agar disolve, then pour into each glass dish. Don't worry about sterility here because you are going to carefully put each dish in your pressure cooker and pressure cook it for 30 minutes. Then you will let your pressure cooker get cold. Carefully put the dishes into your work area and sit back.

The messy part is done.
 

DarthD3vl

Well-Known Member
Hey canndo, if you take this all the way to fruiting, i'll try and sticky it. ;)

might get it stickied even with out that, but it would be nice for people to have it in one place.
 

sonar

Well-Known Member
Can you talk a little about cloning mushrooms to agar. If I ever decide to work with agar, this would probably be the first thing I would attempt. I've successfully done it straight to LC twice now without any (apparent) contamination, but when I used the lc to do a test run with cakes, the results haven't been anything to write home about. Didn't really seem to be much like the original. Maybe I am choosing the wrong specimens? Both times I looked for a nice cluster and took a core sample from the biggest fruit from said cluster. Also took it well before the veil opened, so I don't think I got any rogue spores in the mix.

What are the pros/con to tissue clone over isolating strains from a drop or two of spore solution? Also, when isolation sub strains from a few drops of spores, what are you looking for in mycelium when making transfers? Is it more or less random, or are you looking for certain patterns in mycelium growth (speed, rhizomorph, etc) then fruit the single strains out and keep it if it performs well? This is unfamiliar water to me. To be honest, I'm not really sure what we are working toward when isolating sub-strains. What constitutes a "sub-strain" to being with? One single strand of mycelium?

One last thing, do you recommend using an agar selective to fungi? I guess that wouldn't help with mold spores, but at least keep certain bacteria at bay.

It's been over 10 years since I worked with agar in college. Even then it was only entry level biology class. I don't even remember what we were doing exactly, just that we were working with petri dishes and test tubes with agar.
 

canndo

Well-Known Member
I don't know if there is little interest or that people are just waiting for another installment, let me know if I should continue.
 

canndo

Well-Known Member
A simple test


Make yourself a dozen dishes. Put a dish in each room. In the room where you intend to do the majority of work place 3 dishes. Open the lid for one minute and mark that dish, open one for 5 minutes and mark that one and then open a dish for 20 minutes and mark that one. Keep close watch and you will know about how many points of contamination you are likely to receive per minute. You will also discover what sort of contams you are likely to encounter. Do the same in your glove box. Now take a q-tip and swab the inside and the outside of your hand or arm and streak that qtip across another agar plate - now you know what sort of nasties you and your body bring to the party. I usually just touch the agar with my fingers. Take a good shower and do the same exact thing.

I recommend you do this every month or so if you intend to keep a grow going, likely, if you were careful and didn't let your trich go, you will actually see pure white innoculation points - spores from your previous grows which will tend to crowd out other contams in your living or growing space. If you want to do things right, if you want to be aware, use agar.
 

canndo

Well-Known Member
Wow - is there a lot of stuff missing in this thread? I was certain I posted cloning instructions and a bunch of other things.
 

canndo

Well-Known Member
Workman's Psilocybe Cubensis Breeding Method


By multiple requests, the hybrization method. This is the highly simplified version with as few technical terms as I can muster. It still requires some agar work and only works within a single species. In this example we are crossing strains of Psilocybe cubensis

Classic mushroom breeding requires the isolation and germination of single spores of both parents and then letting the mycelium from both parents cross in a petri dish. This is a precise and controlled breeding method but it is tedious and time consuming. It requires the isolation of many single spores and many petri dishes in the hopes of a few viable crosses.


This simplified method still requires the isolation of at least one monokaryotic mycelium from a single spore. To get the single spore mycelium I just streak an agar petri dish with a small amount of spores (serial dilution as described in The Mushroom Cultivator (Stamets) also works). At the end of the streak there are usually just a few spores on the agar. As soon as the tiniest bit of germination is noticed, transfer the smallest bit of mycelium to a fresh plate. Select single isolated germination points far from any clusters. The mycelium from a single spore grows slow, isn't rhizomorphic and can't fruit. You can confirm that the mycelium is monokaryotic by looking at a bit of the mycelium under the microscope (monokaryotic mycelium lacks clamp connections), but its usually pretty obvious by the way the mycelium grows. If you don't have a microscope you can skip the confirmation step.


Now that you have your petri dish of monokaryotic mycelium, the hard part is over. The next step is to innoculate some spawn with this mycelium and let it grow to near completion. Once the spawn is fully run with mycelium but not completely white you can proceed to the next step. Don't expect the jar to colonize as fast as multispore or fruiting clones.


Once your monokaryotic jar is ready you can add parent #2 in the cross. The nearly colonized jar should be fairly contaminate resistant at this stage so you don't have to be exceptionally careful now. Open the spawn jar lid and scrape in some spores of parent #2 or make a fresh syringe and inject some spores. The syringe should be freshly made as spontaneous germination can deflower the spores within. Shake the jar and let incubate for at least a week or two.


What is Happening?

What we started with was a jar of monokaryotic mycelium but when we added the parent #2 spores, some of them germinated and fused with the monokaryotic mycelium which becomes a dikaryotic mycelium by nuclear migration. Essentially the entire monokaryotic culture becomes dikaryotic by replicating and moving nuclei in a sort of a chain reaction through the already existing mycelial network. Since there isn't any available uncolonized substrate left in the spawn, any spores of parent #2 that fuse with each other won't have enough resources to produce any mushrooms.


Fruit the spawn directly (don't add to bulk substrate) and all the mushrooms produced should be varietal hybrids. The beauty of this method is you (or a friend) only have to produce a single petri dish of monokaryotic mycelium to make as many crosses as you like. You will want to start with your best performer for parent #1 and then you can easily make crosses with any prints you have around for parent #2. Maintain the parent monokaryotic mycelium with periodic transfers to new plates. Its also a good idea to use a very distinct strain for parent #1 since many cubensis look similar and it may not be visually obvious if the cross worked. In my example I used the distinct Falbino strain as the monokaryotic parent #1. Its pretty obvious when the jar produces pigmented mushrooms that the cross was successful.


It is important to realize that the F1 mushrooms are 50% of each parent at this stage but the spores they produce are genetically recombined. This means the prints are not going to breed true and any prints you distribute at this stage won't often produce mushrooms that look like the F1 generation. Only clones of the F1 mushrooms will be the same. To stabilize a new strain you need to grow out the F1 prints to produce F2 prints with selection of the mushrooms that have the traits you want. You need to do this for 5 or 6 sequential generations with selection before the strain can be considered stable.
 
Top