Build your Own! - Ebb and Flow $100

olosto

New Member
Here is my wal-mart built ebb-and-flow setup. This is my first attempt so any positive input is good!


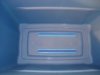
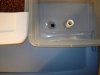
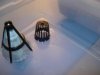
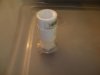
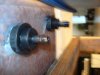
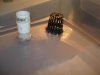
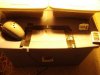
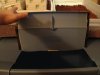
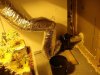
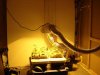
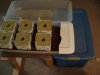
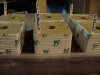
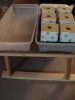
The first pic is what it looks like to give you an idea. My main reason for going to ebb and flow was that I was sick of 7-8 different res's to clean, ph, etc. This setup is shown as a 12 plant setup but 6 and 24 set-ups are built the same. Entire build should cost no more than $100-150 depending on what you have lying around.
 

Attachments

Furthur

Active Member
its hard to tell but it looks like the big rockwool cubes are sticking pretty far above the top of the flood tray. Are you going to be able to flood 2/3 of them that way? I don't know how tall your overflow is but you also gotta think that you can't flood the tray completely to the top anyways because of overflowing..

Then again, there's no plants in there yet so perhaps you just set it up quickly to take some example pictures and you'll have everything perfect when it's actually go time, if that be the case than please go ahead and disregard above comments.
 

olosto

New Member
Next, your going to need a few supplies. I am using the serilite brand from walmart for my res and trays. The trays are the clear 39l serilite. Ebb and flow fttings or some pvc fittings from the hardware store. The air stones and air pump are optional. The 400 gph pump is not.


First thing you want to do is to build a stand for your trays. They should be about 1/2 inch difference in height sloping towards the res. The shortest side should be the same height as the res. Because there are many ways to construct your stand, ill skip to the next step.

If your using air stones glue them into the res now leaving space for you pump to fin in. Set your trays on the stand and let them hang off the short end about 6 inches. Move you res into position and mark on the lid where your fill and drain holes are going to be. Drill holes in your lid giving yourself about and inch all around. I use a 2 inch hole saw for this.


2 39l serilite under bed bins
1 132l 35 gal tub with lid
ebb and flow fittings ( or make your own, see later)
2 air stones
1 dual air pump
1 400 gph pump
1 t fitting
tubing air and water line
 

Attachments

olosto

New Member
Next using a marker, draw a circle around your fitting and cut that circle out. When using the serilite trays, use a drill or dremel. Do not press hard or you will crack it. A glue gun my work to repair minor cracks. Make sure your holes line up and leave room for both of the trays to sit side by side.

The first picture is of the 1st tray I did with an actual drain kit. The other pics show using some pvc pipe fittings for flood and overflow drains. you can use netpots as screens as shown.
 

Attachments

olosto

New Member
More pics of the home made fill and drain. I go over everything with a hot glue gun.

Since there are two trays to fill and drain, make insert a "t" in your pump tubing and mock it up to size. Cut to proper size.
 

Attachments

olosto

New Member
Now cut an access in you lid and duct tape it. I made some flaps here to keep the light out. Also take this time to put a notch in the lid for the pump power cord. I took out one of the handles and routed my air lines thru the holes for that and to my air stones.
 

Attachments

olosto

New Member
its hard to tell but it looks like the big rockwool cubes are sticking pretty far above the top of the flood tray. Are you going to be able to flood 2/3 of them that way? I don't know how tall your overflow is but you also gotta think that you can't flood the tray completely to the top anyways because of overflowing..

Then again, there's no plants in there yet so perhaps you just set it up quickly to take some example pictures and you'll have everything perfect when it's actually go time, if that be the case than please go ahead and disregard above comments.
This is the part im having a har time with. I was told not to let the cubes get closer than 1/2 to the water line. Right now they are 1/4 to 1/2 inch away from the waterline when the trays are flooded. Hope this is correct!

Thank you!
 

themistocles

Well-Known Member
Anyone know the optimum water level in relation to the rockwool cubes?
I keep my rockwool cubes in the water only about 1/4 - 1/2 inch when the water pump is on. The cubes will suck water up through them. The key is in the timing: how long do the cubes take to absorb all the water and how long do the cubes take to dry out. Some testing should let you know and then you should be set.

The actual instructions that came with my cubes said to have the cube 1/2 inch above the water line but since I, like you, used clay pebbles and an ebb-n-flow system I don't think that would work.

Other than that great plan and nice build, hope all works outs.
 

themistocles

Well-Known Member
another thing I have found is covering the clear plastic try with something that impedes light is beneficial. Roots don't like light. The roots will eventually find there way to the side of the tray and when they encounter light is will slow root production.
 

olosto

New Member
another thing I have found is covering the clear plastic try with something that impedes light is beneficial. Roots don't like light. The roots will eventually find there way to the side of the tray and when they encounter light is will slow root production.
Great input, thanks!

I was actually concerned about this myself. I have some black duct tape that i will wrap around the trays (would have painted it but too late now). That should keep it darker.
 

Furthur

Active Member
if you still have the lids to the tray you can use your whole saw to make holes in it and place it over the tray, that's what I did.
 

themistocles

Well-Known Member
Great input, thanks!

I was actually concerned about this myself. I have some black duct tape that i will wrap around the trays (would have painted it but too late now). That should keep it darker.
Be careful with duct tape, I have heard of it molding. Never happened to me but has happened to friends, just saying be careful with whatever tape you use. Something about the actual adhesive used that causes mold to be able to grow not so much the actual tape.
 

olosto

New Member
NP, this was gen 1 and im on gen 3 already. Let me know if you have any questions the basic idea is the same, im just using larger tables. My latest one is a 15 plant setup in one large serilite under bed container. I also went to painting them black on the outside.. The 15 plant table took about 55 lbs of hydroton, lol
 

olosto

New Member
Oh and the last flood table with hydroton was just over 75 dollars for a 15 (6x6 rockwool cubes) plant setup, Thats pump, hydroton(40.00), containers, flood and drain pieces (6.95 hydro store ones), res.. Not bad!
 

Stonetech

Well-Known Member
I tried fooling around with those same sterilite containers before because I liked the dimensions but I eventually found the material they're made of too brittle and prone to cracking, breaking, leaking especially after being drilled through or otherwise modified. I'd keep an eye on that shit.
 
Top