Burned up a cob.Heatsink still good?

CoB_nUt

Well-Known Member
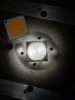
So, I'm replacing a burned/cracked cob.After removing the chip I see the heatsink is scorched. I tried cleaning it with Iso and steel wool.No dice.

Will this effect the new cob? Is the heatsink still Good?
Will those char marks affect the TIMs ability and heat transfer?
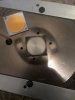
20190816_171948.jpg 20190816_171934.jpg
@Stephenj37826
@robincnn
@pulpoinspace
@Randomblame
@ChiefRunningPhist
@ anyone else who knows.

These are not HLG heatsinks nor cobs.
I @ you guys because I know you know your shit.
Sorry for any inconvenience.Thank you for the help.
 

Octastich

Active Member
sorry to ask a question instead of giving an a answer

why did that happen. is that due to some sort of thermal run away

that's the odds of something like that setting on fire. kind of looks like it was very close to setting something on fire
 

CoB_nUt

Well-Known Member
From the looks of it,the TIM pad wasn't fully covering the cob back,or it shrunk in spots.I'm uncertain but maybe it got too hot and scorched it.
As far as your thermal runway suggestion,I have no idea.I will say these are wired in series.I'm really not sure if they are subject to it or not.

Thank you for responding and the thread bump.
Hopefully others much smarter than I in this area will chime in.

I'd like to know if it's ok to put another cob on the heatsink in that condition.
 

CoB_nUt

Well-Known Member
I would just give it a polish with some steel wool and call it good.
I will give'er another go with the steel wool.

Make sure to clean the back of your chips and the heatsink with alcohol before applying the thermal compound and assembling.
I did, which led me to creating the thread. I wanted to make sure the sink was still good(as dumb as it sounds...I have no idea). I thought it's thermal management integrity wasn't compromised but wanted to make sure.
The marks concerned me also.
Thank you for stopping in Renfro.It is much appreciated.
 

Renfro

Well-Known Member
Back in the old days when we would overclock CPU's we would use a sheet of glass as a flat surface and take some really fine sandpaper (wet) and use that to sand the surface flat, you'd be surprised how many times you see high and low spots when you do that. I know that will clean it up.
 

ChiefRunningPhist

Well-Known Member
I don't use COBs, but I think you'll be good. Id second @Renfro . Doesn't have to be pretty haha, but also understand where you're coming from wanting to make sure. Don't want to come home to a crispy house lol

You just want to make sure you're bonding with the metal. Close and no gaps. Use some sort of thermal paste.

Thermal runway won't happen if using a CC and wired in series. If you're using a CV then ya, even in series you can get thermal runway. If you have a CV+CC use your Io POT or dimmer leads to manage power instead of the Vo pot.


Tuning Driver:
Driver unplugged. Turn Io POT all way down (lefty loosey, counter clockwise). Turn Vo POT all way up (righty tighty, clockwise). Then plug driver in. Then slowly turn Io POT up to desired level (righty tighty). Once level is reached, switch over to the Vo POT and fluctuate Vo POT down and up till you find the spot that it starts to effect light brightness. Then just turn the Vo POT a cunt hair past that point so that your lights aren't being effected, do that if for some reason your Io POT became faulty, then your Vo POT is still limiting the power supplied. It's a little safety net that you can't see (because turned up just past the threshold) but is better than not having.
 
Last edited:

CoB_nUt

Well-Known Member
I don't use COBs, but I think you'll be good. Id second @Renfro . Doesn't have to be pretty haha, but also understand where you're coming from wanting to make sure. Don't want to come home to a crispy house lol

You just want to make sure you're bonding with the metal. Close and no gaps. Use some sort of thermal paste.

Thermal runway won't happen if using a CC and wired in series. If you're using a CV then ya, even in series you can get thermal runway. If you have a CV+CC use your Io POT or dimmer leads to manage power instead of the Vo pot.


Tuning Driver:
Driver unplugged. Turn Io POT all way down (lefty loose, counter clockwise). Turn Vo POT all way up (righty tighty, clockwise). Then plug driver in. Then slowly turn Io POT up to desired level (righty tighty). Once level is reached, switch over to the Vo POT and fluctuate Vo POT down and up till you find the spot that it starts to effect light brightness. Then just turn the Vo POT a cunt hair past that point so that your lights aren't being effected, do that if for some reason your Io POT became faulty, then your Vo POT is still limiting the power supplied. It's a little safety net that you can't see (because turned up just past the threshold) but is better than not having.
Hi Chief, Thank you for stopping in. They are being pushed by a CC driver. The MW 185-1400.

Thank you for the tip on the CC+CV drivers.
I have some Elite 96's being pushed by some 240-54As. Always good to have a safety net .I'll do it before lights on.
 
Last edited:

nevergoodenuf

Well-Known Member
Were you using paste or pads? I have tested pads and found them to perform horribly. A few times they worked OK, but I will only use paste now. Both thermal imaging and Tc testing showed me that the paste (arctic silver) out performed the pads. I had a CLU058 averaged Tj 245*c @ 320 watts with the pad and Tj 107*c with paste . The COB is domed but still works.
 

Renfro

Well-Known Member
Were you using paste or pads? I have tested pads and found them to perform horribly. A few times they worked OK, but I will only use paste now. Both thermal imaging and Tc testing showed me that the paste (arctic silver) out performed the pads. I had a CLU058 averaged Tj 245*c @ 320 watts with the pad and Tj 107*c with paste . The COB is domed but still works.
I agree. IMO the pads are only good for low wattage uses, so if you are gonna drive your cob hard at all you will want the paste.
 

GBAUTO

Well-Known Member
I will give'er another go with the steel wool.


I did, which led me to creating the thread. I wanted to make sure the sink was still good(as dumb as it sounds...I have no idea). I thought it's thermal management integrity wasn't compromised but wanted to make sure.
The marks concerned me also.
Thank you for stopping in Renfro.It is much appreciated.
This is just my laymen, grease monkey insight...
I think that the original TIM had a hard time making a thermal bridge around its perimeter. Clean the surface well and try again.
 

Dougnsalem

Well-Known Member
Back in the old days when we would overclock CPU's we would use a sheet of glass as a flat surface and take some really fine sandpaper (wet) and use that to sand the surface flat, you'd be surprised how many times you see high and low spots when you do that. I know that will clean it up.
.....but I will only use paste now. Both thermal imaging and Tc testing showed me that the paste (arctic silver) out performed the pads. I had a CLU058 averaged Tj 245*c @ 320 watts with the pad and Tj 107*c with paste.....
I know very little about COBs. However, I have worked a ton with heatsinks. Great info from these guys. Just IMHO, but I'd hit the area with some 320 or 400 wet sandpaper, using a perfectly flat block and doing it in a X pattern. Try to get rid of all of the discoloration. Then like mentioned above- Use Arctic Silver paste. It's the best. Shoot, if you have the time, I'd do all the others too while it's down....
 
Top