Great thread, I'm growing Afghani#1 just for making hash, thank you for this information, hope to god these babies I have are females and I can get some crop either from the DWC or coco, I'm a newbie for indoor, so I pray I will get a crop, but with tons of support I have gotten, this board rules, I think ill end up with something! Thanks for the infomercial!
Ran ice water for a few days to make tutorials for our blog @ Www.coloradobudblog.com Here's a sample of Blue Mountain Kush I grated! More pics to come!
Written by Chewberto420 Today we are offering a 12 Step Tutorial on Making Ice Water Extracted Hash (IWE).
Most of These techniques are derived from information collected from a number of Extraordinary Hash Makers, Mainly Nikka T and Matt Rize. This information is available on the internet for free, and I have to extend Thanks and gratitude to these gentlemen for that.
Now Let us Begin!
This is the Safest method for extracting the Trichomes from Cannabis Flowers and leaves. Trichomes are tiny resin glands that form upon the leaves, stems, and calyxes of the Cannabis Plant. These "Trichomes" contain a variety of Cannabinoids ( THC, CBD, CBN, ETC.), and terpenes that are trapped within the head of the resin gland. The Trichome is the part of the Cannabis plant that provides all of the Flavor, medicinal benefits, and psychoactive effects to the user. The rest of the Cannabis plant is made up of Lipids (Waxes, Fats, sterols), which offer no benefit to the user from consuming, and are a burden on your respiratory system. Our goal is to remove all of those by-products and concentrate all of the cannabinoids into the purest Hash possible. The level of each particular Cannabinoid within the Trichome, is totally dependent upon the Marijuana Strain.
We take steps to ensure cleanliness and quality throughout the entire extraction process. Sanitization of all utensils in the Hash making process is imperative to maintaining a quality end product, I Use the highest percentage isopropyl alcohol to do this! Rinse everything clean after using Alcohol.Now that you have all of your Tools sanitized, Lets get to work!Always remember when doing an IWE, The colder everything is ( Ambient room temperature, water, ice, and cannabis) the easier it is for the Trichomes to detach and fall into the water mix. If you can work in a room below 32 Degrees fahrenheit, This would be ideal.
Items you will need:
1. Cannabis Sugar leaves and flowers
( Today We are working with mainly sugar leaves from the strain Pineapple Express, and the product was freshly frozen upon harvest.)
2. Cold Reverse Osmosis Water3. Spray bottle filled with Ice cold Reverse Osmosis water
4. Reverse Osmosis Ice Cubes
5. Five Gallon Buckets
6. A Set Bubble Bags with 220-25 micron filtration, and a 220 micron Work Bag
7. 25 micron Pressing Screen
8. A large Silver or Wooden Spoon, or an Automatic Washing Machine
9. A smaller spoon with an edge
10. Unbleached/Unchlorinated Paper towels.
11.Parchment paper (preferably unbleached).
12. Teflon Baking sheet
13. Microplane device
12. Airtight Glass Jars
13. Nitrile disposable Gloves
14. Razor Blade
15. Hard plastic Card
16. 91% Isopropyl Alcohol. ( Preferably in a spray bottle.)
The amount of Bags used in the extraction process is dependent upon your own personal preference. Some bags offer more terpenes and melting properties, which are more desirable for Dabbing, smoking, and for vaporizing. Some Bags may be more suited for Infused Products. A useful study was published in the July 2011 issue of Kush Magazine. This study was done with Steep Hill Laboratories facilities, and Matt Rize working with The strain Jack Herer. This study provided the various THC percentages from each bag in the Ice Water Extraction Process.Below are those results. The starting Material " Jack Herer" contained 9.61 % THC The 190-160 Micron bag contained 29.86% THC The 120 Micron bag contained 35.8 % THC The 90 Micron bag contained 39.46 % THC The 73 Micron bag contained 45.7 % THC The 45 Micron bag contained 48.94 % THC The 25 Micron Bag contained 49.34 % THC The waste material beyond that contained 4.29 % THC This study shows that the 25 sand 45 Micron Bags hold the highest percentage of THC. Hash Master Matt Rize recommends using these bags for Infused products. So these are things to keep in mind when making your Hash.
Now lets get to Work!
Step One.
Start by putting your clean Bags into a Five gallon bucket, this will have drain holes in the bottom, 1/2 inch, to a one inch in diameter for an easy drain. If you are running a small amount of water, you may be able to disregard the holes and drain directly into the bottom. You will want with the lowestmicron ( 25u) bag first, ascending up in order to the highest micron(220u) bag, and set it aside. ( Note: You are going to want to sink the bag pretty deep inside the bucket to get a nice wide draining surface.)
Step Two.
Cover the bottom of your Five Gallon bucket, or Automatic Washing machine with Reverse Osmosis Ice Cubes, and float them in a little bit of cold R.O water. (Note: Ice cube trays that create 2-3 inch round, or spherical cubes in diameter, will keep the water mix at lower temperatures for longer and are less abrasive than square edged cubes. This can reduce Chlorophyll leaching into the water mix.)
Step Three.
Fill up your 220 Micron Work bag no more than half full with fresh frozen cannabis, and tie the zipper to the fasteners on the bag, to avoid any plant matter from escaping into our mix. The 220 micron bag will filter out all the large plant particles and undesirables.(Note: Sometimes I will add a few ice cubes into the 220 Work bag to loosen up the cannabis and keep it cold.)
Step Four.
Place the 220 Micron work bag on top of the Ice water, and cover with more Ice. Then pour Cold R.O Water ,and ice into the 5 Gallon Bucket or washing machine on top of the Work bag, until you are no more than 2/3 full, or at the Medium water line on your machine. After you've done that, you should let it all sit for a few minutes if it is fresh frozen, to saturate the material before agitation. You may want to wait about 15 minutes if the material is dry. ( Note: Filling A Washing machine too high will likely result in water leakage.)
Step Five.
If you have an automatic washing machine, turn it on for an 8-15 minute cycle. If you have a Silver or wooden spoon, gently start stirring the work Bag around in the Ice water mix, anywhere from 5-15 minutes.(Note: Be careful not to over agitate, doing so causes excess chlorophyl to leach out into the water, resulting in an inferior quality product.)
Step Six.
Grab your bucket that is layered with bags, and pour the Ice water/Hash mixture into the bucket, allowing gravity to help drain the water through the bags, and filter out the trichomes according to micron size. The first, and top bag in which you will pour into, will be a 220 micron bag, which is the same as the Work bag. Using the 220 bag may seem rather redundant to use, but for added piece of mind, we will recommend adding this to the bag collection. This is just in case something made its way out of the workbag.
Step Seven.
Lift up on the first bag "220" , while doing so, spray the side walls of the bag with the spray bottle filled with Ice cold R.O water, to wash down any existingtrichomes that may be attached to the bag, Wash them through to the next size micron bag.Pull the Bag out completely, and disregard the material that is left behind. This is garbage.
Step Eight.
Now you want to start to pull the 190 micron bag down, and around the five gallon bucket. While you are doing this, remember to spray down the side walls with the Ice cold water pushing all of the trichomes into the center of the bag for an easy removal. The bottom of the bag will start to stretch tight, allowing excess water to drain off, and away from the trichome pile that you've collected at the center of the bag.( Note: some Hash makers will remove the entire bag first, and then stretch it across a plate to scrape the patty, but this method is how i prefer to do it.)
Step Nine.
Get your 25 Micron pressing screen, teflon baking sheet, unbleached paper towels, and your small spoon with fine edge. First, You are going to create a bed of paper towels that is at least a 1/4 inch thick on top of the baking sheet, this will be switchedoutperiodically as the water from the Hash drains, and gets soaked up by the paper towels. Next, you will place the 25 micron pressing screen on top of the paper towel bed. Finally, get your spoon and scrape up your trichome Hash patty that you collected at the center of the Bag , trying to lift the entire patty up in one scoop, and place it onto the 25 Micron pressing screen, trying to form a 1/4 thick Hash patty for drying, without disturbing the trichome mass too much. You will repeat this process with the 160 MicronBag, and each bag after that. Make your way down to the bottom 25 Micron Bag, labeling each pile and keeping it on the 25 Micron Pressing screen. ( Note: Make sure you label your piles accurately by micron for jarring, and don't forget to check the paper towels periodically during the first night of the drying process for changing out.)
The Drying process
This is the next step to creating fine Ice water extracted hash. In this tutorial we worked in a garage that was about 40 degrees Fahrenheit, with approximately 30% humidity while doing the extraction process, and the drying process. The goal is to keep it cold and dry to allow the patty to evaporate, and leach out a majority of the retained water with the ambient relative humidity, and temperature in the drying area. Anywhere from 30-50% humidity, and 30-68 degrees Fahrenheit will be ok for drying. We would prefer the lower side of those numbers, but we do understand there are seasons, also, different parts of the country can affect these drying conditions. Creating the atmosphere in which is best suited for drying can be tricky, but we must do our best to recreate these conditions.
Step Ten.
After we have collected the various micron Hash patties and placed them on the 25 Micron pressing screen, we will cover it with an additional pressing screen, parchment paper, paper towels, or anything that is breathable that will keep airborne contaminants off of your Hash. We leave the Hash Patty intact for approximatly 24 hours depending upon our Drying conditions. If the Relative Humidity is very low, and it is warm, it can be checked in 12 hours for the next step. ( Note: We don't want to pull it too early, because it will be too mushy to break up. We also don't want to wait too long because, we don't want it to turn to dust because it has been over dried.)
The Microplane process.
The Microplane is a device that offers a technique that stemmed from the Culinary Arts to shave, grate, mince and zest various food items like citrus peels, carrots, garlic, ETC. We have translated this process into grating Hash for the final drying phase.Step Eleven.Grab your Hash patties and your Microplane device, and grate the Hash Patties individually onto the Teflon baking Sheet that has been lined with parchment paper. Make sure to keep them separated into piles by micron, and label them. We will do this with each Micron patty. Next,spread the finely grated Hash out for a larger surface area to expedite the drying process. Cover the baking sheet with something breathable to avoid any airborne contaminants, and place your Grated Hash back into your Drying room for an additional few days. This may take more or less time, depending on the amount of Hash you have, Ambient Temperatures, and Relative Humidity. I like to check on the grated Hash every 12 hours or so, to move the piles around with a credit card to ensure an even dry.( Note: The Hash may be sticky when you apply heat from your hands and working with it, so in this tutorial I used a little piece of parchment paper to grab the patty and microplane. Some people may freeze the patty for a minute before working it, but this works too. I will also use a razor blade for the smaller pieces that broke off the patty, I will place the smaller pieces on top of the microplane device and smear the Razor blade across the top of the pieces to grate them so i don't shave my finger tips.)
Step Twelve. The Reward
After the grated Hash piles have been dried out properly, we now take our Labeled airtight jars and place the Hash into them for curing and storage. Keep the jars in a dark and cool area for curing and storage. If the Hash has been dried properly, you can leave the lid on it and smoke after a day or two. If there is too much moisture in the Hash, it may need some more Air into the jar, or spread it back out, depending on how much moisture is retained within the product.Some people like to cure out the Hash for a long period of time.However, it will start to degrade and convert into CBN after approximately six months, or sooner if kept in a warm environment. This Ice Water Extraction process allows us to consume the Hash much sooner than traditional methods, so after a few days in the jar, its good to go. Enjoy!
Most pictures in this tutorial were taken by "BrokenLungz", with the exception of a few from "Chewberto420".
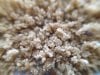
Here is the 45 Micron Pineapple Express fully dried
Here is the 73 Micron Pineapple Express fully dried
.
Here is the 90 Micron Pineapple Express fully dried.
I made a Full Melt IWE Hash tutorial with pics for www.coloradobudblog.com check it out
[video=youtube_share;K8cOAKwzdCA]http://youtu.be/K8cOAKwzdCA[/video]