Hadez411
Well-Known Member
So I've been reading up on heat pipes, which seem fairly simple to make and are well explained in this video.
I noticed that baseboard heaters have a 3/4" copper tube with aluminum fins already on it and people are regularly throwing them out. You just need to buy some copper fittings, try your hand at soldering or ask a friend, and with barely any money you'll have a water vapor heat pipe cooler like they're all shifting over to in the CPU market. A low tech one, but I'm sure you could make up for that with the size of it, given that your materials are fairly cheap and the heat pipe distributes heat very quickly and evenly. Even for a new 8 ft baseboard heater at Home Depot it's only about 10$/FT and I doubt you'd need more than a foot per COB. That comes in at a lot less than the 30$-110$ heat sinks for the 60W and up cobs.
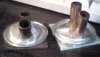
Below is a photo of an electric baseboard element. From my past experience messing with them, the fins aren't welded or bonded and once you start pulling them apart they tend to fall apart and it can become a mess. So I intend to solder them to the copper pipe wherever I can to increase their thermal transfer efficiency and keep them from going all over the place. However it might be handy when soldering the other parts to completely remove the fins as they will be counter productive to your soldering efforts.

Below is an example of a heat pipe heat sink for cobs, 150$ on digikey.ca. Computer ones look sort of similar, bunch of skinny copper pipes that feed up and are covered in thin heatsink fins with and without a fan.

What I'm imagining would be similar, enjoy my MS Paint skills.
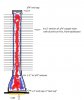
Apparently the heat pipes work best at a slight angle (for the condenstate to return) so maybe you'd have to put in a 45 degree elbow if you have your lights pointed directly downwards. Same goes for if you're side lighting and your lights are sideways, the steam and condensate don't transfer heat as well without a wick.
I feel like these coolers would work best if you have a steady low level breeze in your grow area that can gently circulate air through them. However, putting up to 1 foot of aluminum fins on a heat pipe should make for some very significant cooling. Fanning could become unnecessary if you can include a 45 degree elbow, angling the tube to convect air up between the fins and improve the condensate return. I'm going to have to do a bunch of testing this week and find out. I'm using a vero 29 D at 60W
I noticed that baseboard heaters have a 3/4" copper tube with aluminum fins already on it and people are regularly throwing them out. You just need to buy some copper fittings, try your hand at soldering or ask a friend, and with barely any money you'll have a water vapor heat pipe cooler like they're all shifting over to in the CPU market. A low tech one, but I'm sure you could make up for that with the size of it, given that your materials are fairly cheap and the heat pipe distributes heat very quickly and evenly. Even for a new 8 ft baseboard heater at Home Depot it's only about 10$/FT and I doubt you'd need more than a foot per COB. That comes in at a lot less than the 30$-110$ heat sinks for the 60W and up cobs.
Below is a photo of an electric baseboard element. From my past experience messing with them, the fins aren't welded or bonded and once you start pulling them apart they tend to fall apart and it can become a mess. So I intend to solder them to the copper pipe wherever I can to increase their thermal transfer efficiency and keep them from going all over the place. However it might be handy when soldering the other parts to completely remove the fins as they will be counter productive to your soldering efforts.
Below is an example of a heat pipe heat sink for cobs, 150$ on digikey.ca. Computer ones look sort of similar, bunch of skinny copper pipes that feed up and are covered in thin heatsink fins with and without a fan.
What I'm imagining would be similar, enjoy my MS Paint skills.
Apparently the heat pipes work best at a slight angle (for the condenstate to return) so maybe you'd have to put in a 45 degree elbow if you have your lights pointed directly downwards. Same goes for if you're side lighting and your lights are sideways, the steam and condensate don't transfer heat as well without a wick.
I feel like these coolers would work best if you have a steady low level breeze in your grow area that can gently circulate air through them. However, putting up to 1 foot of aluminum fins on a heat pipe should make for some very significant cooling. Fanning could become unnecessary if you can include a 45 degree elbow, angling the tube to convect air up between the fins and improve the condensate return. I'm going to have to do a bunch of testing this week and find out. I'm using a vero 29 D at 60W
Last edited: