KaliKitsune
Well-Known Member
I've just had the bubble bucket craze hit me upside the head, so I figured I'd make an oddball bubbler out of an old Bali Shag tin.
I'll put the steps I followed down, and the pics to accompany in order in the attachments.
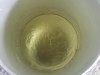
1. Clean out Bali Shag container and waterproof the bottom part with epoxy.
2. Drill a hole large enough to run air line, about an inch down from the top of the can. (No photo)
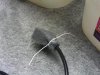
3. Install an airstone or make your own (I did this just by sticking air tube into a slit I made in a block of foam, then epoxy around to seal it together.)
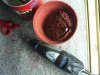
4. Make a net pot by cutting slits in a 4" pot. (I use a dremel with a drilling bit as a piercer and router.)
5. Run airtube through the hole, put airstone in place at bottom.
6. Set net pot on top.
VOILA!
I'll put the steps I followed down, and the pics to accompany in order in the attachments.
1. Clean out Bali Shag container and waterproof the bottom part with epoxy.
2. Drill a hole large enough to run air line, about an inch down from the top of the can. (No photo)
3. Install an airstone or make your own (I did this just by sticking air tube into a slit I made in a block of foam, then epoxy around to seal it together.)
4. Make a net pot by cutting slits in a 4" pot. (I use a dremel with a drilling bit as a piercer and router.)
5. Run airtube through the hole, put airstone in place at bottom.
6. Set net pot on top.
VOILA!
Attachments
-
 33 KB Views: 47
 -
 55.1 KB Views: 41
 -
 58.2 KB Views: 41
 -
 44.4 KB Views: 55
 -
 62.4 KB Views: 45