bangbangsmoke
Member
Hey there all! Was putting together a fixture to hang my new 300 Watt Citizen CLU048 (6) Cob's and i thought id break it down into a little guide because I made a point to have it be adaptable depending on the set up of plants beneath which might make it more useful to more people! Relatively standard build, but with some stuff i hadn't seen yet in my looking around!
***This build is for 6 pre built lights and a 42 in. x 48 in. space but can be easily adapted***
Kit Includes:
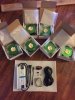
6 pcs Citizen CLU048 1212 Gen 6 COB LEDs
6 pcs Ideal 50-2204CT COB Holder
6 pcs Ideal 50-2100AN Ledil ANGELINA Reflector Adapter
6 pcs Ideal F13838 Ledil ANGELINA 90 Degree Reflector
6 pcs Cooliance Black Anodized Aluminum Passive Pin Cushion Heatsinks
Pre-wired Potentiometer dimmable to 10%
Meanwell HLG-320H-C1400B dimmable power supply
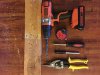
Tools I Used:
Drill
3/8 drill bit
Measuring Tape
Tin snips
Sharpie
#15 * tipped bit
Handle for #15 bit
Piece of wood to drill into (i have no work space)
What you need to buy to build the structure:
x2 3 foot long, 5/16 inch diameter metal rods
x12 5/16 inch nuts
x2 10 foot long roof lining tin (or whatever metal this is, I'm sorry for the ignorance, those yellow snips cut through it no problem)
x4 eye hooks or something to hang your light fixture from once completed
x4 clips to hang it with! (not in photo)
You can use whatever diameter rod + nuts you want, i picked 5/16 because you need to drill a larger hole to fit the rod through, and 3/8 is easy enough to drill, while 5/16 still felt sturdy enough for the rod and the weight it'd be carrying.
I first was going to buy long aluminum elbows thats were a little more aesthetic and thicker, but they ran $18 for 8 ft and what i found in the Home Depot roofing section was 9 feet and ~$6 a piece.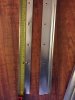
1. Cut x2 3.5 foot lengths for as many rows of lights as you would like, for me that was 2 rows, plus an extra if i get more lights, so al together x6 3.5 foot lengths.
2. Measure out the holes you will drill. I went for a ½ inch from the edge and had to space 3 inches in between holes to fit the lights!
3. I attached a photo of the end measurement, copy the inverse on the flip side, and make another 1.5 inches on either side of the halfway point.
4. Drill out all the holes with a like a 3/16th bit or a little bigger to have some give when lining things up (not too much bigger)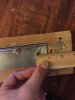
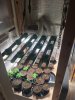
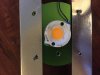
As i was doing rows of 3, I placed in the beginning and ending lights first, then tried to fit the middle one after. Both times i messed up somehow and had to adjust the holes, it was no big deal just estimated with a sharpie, gave it a shot and did it again if it was still not right. Final product should leave you with as many rows as you needed (i wouldn't do more than 5) with the lights placed at distances you best see fit, in ordered spectrums as you like, looking something like the 3rd photo below!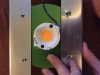

Next you gotta (if you have 2 rows like me):
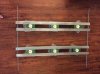
1. Take x2 nuts and work them all way to 4.5 inches from either side of center, on each of the rods! They're gonna hold your row in place on the inside
2. Slide each row of lights on
3. Take x2 more nuts for each rod and fit to the outside of the rows to keep them in place there!
4. Work two more nuts onto each of the ends of each of the rods so you can safely hang from clips without fear of slipping off!
Should look like below if you went for my layout! (i dont have the x4 end nuts nor do i have x4 clips to hang with yet sorry its not in photo)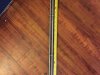
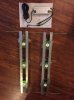
After that you just wire the system together! It ultra easy, don't overcomplicate it like i did the first time i put together one of their DIY's! Color coded means c o l o r c o d e d and nothing more complicated lol. Unfortunately in this photo it is a tiny bit more complicated, because i have x4 3500k and x2 3000k (flowering set here) and i needed to change up the numbered placement to make the wires work well. Anyway, from what i understand what is important is the negative and positive terminals, a wire is a wire (within limits), so just make sure the red goes into a positive terminal and the black comes out a negative, and there is no faltering from that pattern in the middle!
Once its all finished up it should look like the photo below!!
The point of this design is to allow you to have various differently styled pieces (brands of COB, spectrums, etc.) built into 'rows' that you could then assemble onto light weight rods and then adjust with very little work to create an overall dynamic, light weight, ultra low cost DIY fixture build!
Let me know if you enjoyed! Brand new here so its nice to be able to share something! Got a grow journal i just started as well so feel free to check that out")
Good day and great smoke you wild ones !!
***This build is for 6 pre built lights and a 42 in. x 48 in. space but can be easily adapted***
Kit Includes:
6 pcs Citizen CLU048 1212 Gen 6 COB LEDs
6 pcs Ideal 50-2204CT COB Holder
6 pcs Ideal 50-2100AN Ledil ANGELINA Reflector Adapter
6 pcs Ideal F13838 Ledil ANGELINA 90 Degree Reflector
6 pcs Cooliance Black Anodized Aluminum Passive Pin Cushion Heatsinks
Pre-wired Potentiometer dimmable to 10%
Meanwell HLG-320H-C1400B dimmable power supply
Tools I Used:
Drill
3/8 drill bit
Measuring Tape
Tin snips
Sharpie
#15 * tipped bit
Handle for #15 bit
Piece of wood to drill into (i have no work space)
What you need to buy to build the structure:
x2 3 foot long, 5/16 inch diameter metal rods
x12 5/16 inch nuts
x2 10 foot long roof lining tin (or whatever metal this is, I'm sorry for the ignorance, those yellow snips cut through it no problem)
x4 eye hooks or something to hang your light fixture from once completed
x4 clips to hang it with! (not in photo)
You can use whatever diameter rod + nuts you want, i picked 5/16 because you need to drill a larger hole to fit the rod through, and 3/8 is easy enough to drill, while 5/16 still felt sturdy enough for the rod and the weight it'd be carrying.
I first was going to buy long aluminum elbows thats were a little more aesthetic and thicker, but they ran $18 for 8 ft and what i found in the Home Depot roofing section was 9 feet and ~$6 a piece.
1. Cut x2 3.5 foot lengths for as many rows of lights as you would like, for me that was 2 rows, plus an extra if i get more lights, so al together x6 3.5 foot lengths.
2. Measure out the holes you will drill. I went for a ½ inch from the edge and had to space 3 inches in between holes to fit the lights!
3. I attached a photo of the end measurement, copy the inverse on the flip side, and make another 1.5 inches on either side of the halfway point.
4. Drill out all the holes with a like a 3/16th bit or a little bigger to have some give when lining things up (not too much bigger)
As i was doing rows of 3, I placed in the beginning and ending lights first, then tried to fit the middle one after. Both times i messed up somehow and had to adjust the holes, it was no big deal just estimated with a sharpie, gave it a shot and did it again if it was still not right. Final product should leave you with as many rows as you needed (i wouldn't do more than 5) with the lights placed at distances you best see fit, in ordered spectrums as you like, looking something like the 3rd photo below!
Next you gotta (if you have 2 rows like me):
1. Take x2 nuts and work them all way to 4.5 inches from either side of center, on each of the rods! They're gonna hold your row in place on the inside
2. Slide each row of lights on
3. Take x2 more nuts for each rod and fit to the outside of the rows to keep them in place there!
4. Work two more nuts onto each of the ends of each of the rods so you can safely hang from clips without fear of slipping off!
Should look like below if you went for my layout! (i dont have the x4 end nuts nor do i have x4 clips to hang with yet sorry its not in photo)
After that you just wire the system together! It ultra easy, don't overcomplicate it like i did the first time i put together one of their DIY's! Color coded means c o l o r c o d e d and nothing more complicated lol. Unfortunately in this photo it is a tiny bit more complicated, because i have x4 3500k and x2 3000k (flowering set here) and i needed to change up the numbered placement to make the wires work well. Anyway, from what i understand what is important is the negative and positive terminals, a wire is a wire (within limits), so just make sure the red goes into a positive terminal and the black comes out a negative, and there is no faltering from that pattern in the middle!
Once its all finished up it should look like the photo below!!
The point of this design is to allow you to have various differently styled pieces (brands of COB, spectrums, etc.) built into 'rows' that you could then assemble onto light weight rods and then adjust with very little work to create an overall dynamic, light weight, ultra low cost DIY fixture build!
Let me know if you enjoyed! Brand new here so its nice to be able to share something! Got a grow journal i just started as well so feel free to check that out
Good day and great smoke you wild ones !!