First Stealth Grow Cabinet Build Log

First off I would like to say that i do not intend to grow cannabis in this cabinet, I just thought I'd post this to spread some ideas and to see what people think.

To start with i ordered a 42 inch Realspace metal storage cabinet.

These can be found at office supply stores like office depot.

This is the stock photo from the website:

577145_sk_lg[1].jpg

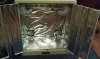
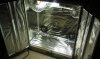
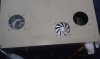
After assembling the cabinet I measured and cut two 6 inch holes in the back panel where the heat from the grow light could be ported.

The holes can be cut using a dremel with the cutout wheel bit.

After drilling the holes I attached two 6" duct flanges that I got from either Home Depot or Lowes to the cabinet.

Here is a picture of the cabinet up to that point:

IMAG0815.jpg

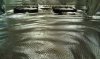
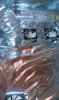
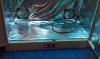
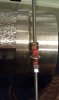
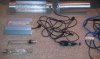
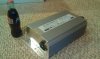
Next I ordered a 600 watt cooltube reflector along with a 600w hm/hps ballast and the appropriate bulbs all from ebay.

Here is a picture of those items along with my dremel:

IMAG0816.jpg

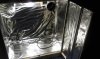
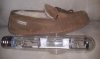
Here is a picture of just the hm bulb with a size reference:

IMAG0817.jpg

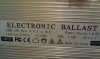
Also one of the ballast:

IMAG0818.jpg

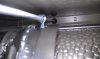
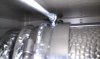
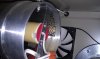
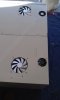
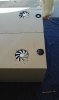
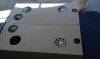
Next I installed 6 fans in the back panel after cutting their appropriately sized holes.

I installed four 140mm NZXT fans for the main compartment which are pictured in the stock photos below:

6209580a[1].jpg 6209580b[1].jpg 6209580c[1].jpg 6209580d[1].jpg 6209580e[1].jpg

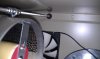
I also installed two 80mm fans on the back panel to cool the small compartment right below the base of the storage area on the inside of the cabinet.

These fans are pictured below:

4722199a[1].jpg 4722199b[1].jpg 4722199c[1].jpg

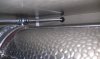
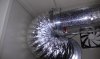
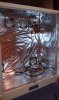
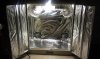
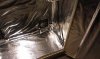
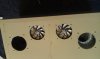
Here is a picture showing a technique that helped me cut the holes easier:

IMAG0820.jpg

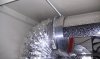
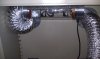
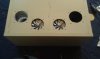
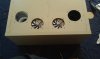
Here are some pictures of the fans after installation:

IMAG0819.jpg IMAG0821.jpg IMAG0822.jpg IMAG0823.jpg IMAG0825.jpg IMAG0826.jpg IMAG0827.jpg

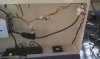
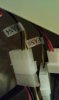
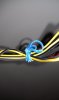
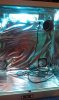
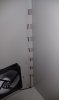
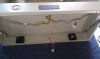
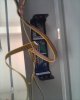
The fan's wires ported perfectly in the case down to the compartment below where most of the electronics would be held.

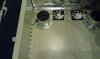
Here is a picture of the way the wires were run:

IMAG0833.jpg IMAG0832.jpg

To get the wires from the top two fans to reach the lower compartment I bought 2 one foot extension cables from Fry's.

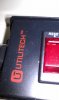
Next I installed the fan controller which really is optional but I thought would be pretty cool.

The fan controller I chose was the Aerocool F6XT which I also got from Fry's.

Here are some stock photos of it:

6433122a[1].jpg 6433122b[1].jpg 6433122c[1].jpg 6433122d[1].jpg 6433122e[1].jpg

Here are some photos of the installation of it:

IMAG0835.jpg IMAG0836.jpg IMAG0837.jpg

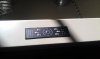
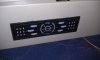
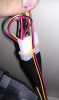
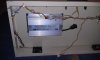
Here are some pictures of the wires being run to the controller:

IMAG0838.jpg IMAG0839.jpg IMAG0842.jpg

The controller works great and the leds can be turned off for people looking for stealth.

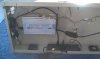
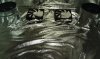
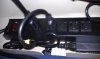
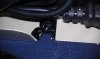
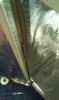
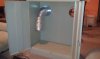
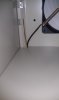
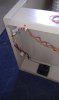
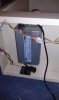
The next step I took was installing the ballast.

I installed the ballast near the exhaust fan of the electronics compartment to carry the heat away.

At first I installed it vertically but realized it would be better placed horizontally.

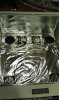
Here are some photos:

IMAG0843.jpg IMAG0844.jpg

This is as far as I've gotten so far but I will continue to post pictures as i progress through the next week.

Tell me what you guys think and id be happy to answer any questions people have.

Thanks for reading!
 
So the next step I took in building this cab was installing the power supply for the fans and the fan controller.

The power supply I bought online and consisted of just a 12v dc inverter and a molex connector.

Here is a photo of the power supply:

4pinmolexpowersupply_small[1].jpg

Shortly after getting it I realized the pinout for the molex connector was wrong so I switched the 12v and the 6v pin.

I also installed a surge protector that all of my powered parts of the box would hub at:

Here is what it looks like:

IMAG0852.jpg IMAG0853.jpg

It also took me a while to think of a way to mount the cooltube reflector to the box without drilling holes in the top or side (ugly and ruins stealth)

I ended up making two tension rods out of some 1/4" all thread bar and it works perfectly.

This is what the tension rods look like:

IMAG0857.jpg IMAG0858.jpg IMAG0859.jpg IMAG0860.jpg IMAG0862.jpg

Now the light sits pretty stiffly with only the intake side of the ducting connected as I'm still waiting on the fan in the mail.

This is what the light looks like thus far:

IMAG0855.jpg IMAG0856.jpg IMAG0861.jpg

If anyone has any questions about how I did something of any suggestions or anything at all feel free to reply as noone has yet.

I will continue to post with my progress.
 

tpsmc

Well-Known Member
nice build looks tight +rep

One thing though you will want to have a fan blowing on the plants and you may want to raise and lower your light as the plants grow.
 

  • One thing though you will want to have a fan blowing on the plants and you may want to raise and lower your light as the plants grow.​


Thanks man and I figured i would just raise and lower the plants themselves instead of the lights because I don't want to mess with the yoyos. And do you think the air circulating from the bottom to the top wouldent be enough air on the plants?
 

maineyankee

Active Member
Looks super DVD. You certainly have things pretty laid out, with a few tweeks here and there as we all do. I have to commend you on the "neatness' of your work, as i take it you take a lot of pride in your work. I have to say also that I agree not to go with the yo-yo light deal. The only thing that I can dream of is hearing a crash in the middle of the night when they let go (and I have heard that they do). Outside of that, looks pretty good IMO.
The MaineYankee :-) + rep for Craftmanship
 
Thanks to everyone for the rep and comments I really appreciate them.

I just wanted to post the rest of my build for people to see and tell me what they think now that it is done.

Here is a picture of how I mounted the tear-resistant mylar which is also diffusion mylar.

I used double sided mounting scotch mounting tape:

IMAG0863.jpg IMAG0864.jpg

Here are the rest of the pictures of the mylar being mounted:

IMAG0853.jpg IMAG0865.jpg IMAG0866.jpg IMAG0867.jpg IMAG0868.jpg

Here are some spare pictures just showing some methods of which I did things:

IMAG0869.jpg IMAG0870.jpg IMAG0871.jpg IMAG0872.jpg IMAG0873.jpg IMAG0874.jpg IMAG0875.jpg

Here are some photos of the finished product:

IMAG0876.jpg IMAG0877.jpg IMAG0878.jpg IMAG0879.jpg IMAG0882.jpg IMAG0884.jpg

I tested the temperature a half foot away from the tube with a 160 CFM fan cooling the tube and got the following results:

IMAG0883.jpg

The fan was vibrating the cabinet and making noise so I took the bars that it was mounted with and wrapped rubberbands around where the loop hung on the bar:

IMAG0885.jpgIMAG0886.jpg

This solution worked pretty well.

As far as light proofing I just took the rest of the double sided mounting tape and cut it length wise in half and used as you would light proofing:

IMAG0889.jpg

I dont need to worry about light traps for the fans yet but if anyone would like id be glad to post my plans. I feel theyre pretty solid.

Here are some final pictures of the cabinet in the location I will be test growing:

IMAG0888.jpg IMAG0893.jpg IMAG0894.jpg IMAG0895.jpg IMAG0896.jpg

Thanks for reading and as always I'd be happy to answer any questions or get any comments.
 
Solid build BRO!

Great Idea, what was the overall cost of this build?

Would you mind if I showcase this on my Blog for others to use as reference for their Grow Boxes? You can PM if you like or share here; whichever is more comfortable for you.
 
I wouldent mine at all man that would be great PM me a link to it id love to check out your blog.

I cant say exactly but I would say the total cost is somewhere between $400 and $500 dollars.

The two most expensive buys were the cabinet ($150) and the lighting setup (around $200)

The other costs I can remember are:

Inline duct fan: $30

Computer fans: $60

Fan controller: $25

Duct flanges: $20

Duct: $20

Mylar: $40 (for 65"X25')

Surge protector: $20

Digital timer: $15
 

karr

Well-Known Member
Looks great for sure.

Might want to find a screen to put in there, definently going to want scrog in there. Check my journal for a similar setup.
 

maineyankee

Active Member
So the next step I took in building this cab was installing the power supply for the fans and the fan controller.

The power supply I bought online and consisted of just a 12v dc inverter and a molex connector.

Here is a photo of the power supply:


View attachment 1968121

Shortly after getting it I realized the pinout for the molex connector was wrong so I switched the 12v and the 6v pin.

I also installed a surge protector that all of my powered parts of the box would hub at:

Here is what it looks like:

View attachment 1968125 View attachment 1968126

It also took me a while to think of a way to mount the cooltube reflector to the box without drilling holes in the top or side (ugly and ruins stealth)

I ended up making two tension rods out of some 1/4" all thread bar and it works perfectly.

This is what the tension rods look like:

View attachment 1968128 View attachment 1968129 View attachment 1968130 View attachment 1968131 View attachment 1968133

Now the light sits pretty stiffly with only the intake side of the ducting connected as I'm still waiting on the fan in the mail.

This is what the light looks like thus far:

View attachment 1968144 View attachment 1968145 View attachment 1968146

If anyone has any questions about how I did something of any suggestions or anything at all feel free to reply as noone has yet.

I will continue to post with my progress.
Love the work and fine detail. Clean and Crisp for sure. Question. I had seen and heard that one needs to keep all ducting as straight and short as possible, with hardly any twists or bends .. at least keep it down to a slight bend and not a 90 degree. It appears that some of your intersections are major and not that of a gradual nature. Any thoughts as to air flow being restricted somewhat by these actions?
 
Love the work and fine detail. Clean and Crisp for sure. Question. I had seen and heard that one needs to keep all ducting as straight and short as possible, with hardly any twists or bends .. at least keep it down to a slight bend and not a 90 degree. It appears that some of your intersections are major and not that of a gradual nature. Any thoughts as to air flow being restricted somewhat by these actions?
Yes you should try to keep the bends to a minimum however my reason for the bends in this situation was so that the large 6" holes could be cut out of the back instead of the sides.

If you wanted to cut the holes in the sides the air would probably flow alot more efficiently however the in my case the fan still provides ample airflow to the bulb as shown by the temperature reading.
 

maineyankee

Active Member
As long as you are happy, I am happy :-) I have to really admire your work. Have you thought about patenting this design and going with it? I am totally subbed to this thread, and just cannot wait to see more of your Journey. Great work :-)

Bob ~ The MaineYankee :-)
 
Thanks man I really appreciate your comments. I really enjoy the engineering side of these projects. Ill be posting a design for my light traps soon. What I really dont like about all the designs that I have seen so far are the material. A lot of people I see are using foam poster board but to me that just seems really unsteady.

And to answer your question to this point I haven't really thought about patenting it because 1) a lot of work must go into looking to see that the idea isn't already patented and 2) I would rather just spread my ideas to everyone on the internet so they can use them
 

maineyankee

Active Member
You my friend, are truly outstanding. I really like the last part of your post, "I would rather just spread my ideas to everyone on the internet, so that they can use them". I wish more people were like you. Great work DVD !! In all aspects :-)

The MaineYankee :-)
 

zerowzz

Member
No carbon filter? What's the point of stealth if there's smell? :) Or are you taking care of it in other ways?
I made 2 light traps with some hot glue and cardboard and they work great, doesn't have to be fancy to work without problems. :)
 
No carbon filter? What's the point of stealth if there's smell? :) Or are you taking care of it in other ways?
I made 2 light traps with some hot glue and cardboard and they work great, doesn't have to be fancy to work without problems. :)
This cabinet is really a work in progress so I was planning on troubleshooting a few things and adding a few things. Carbon filter is definitly on the list though and odor is definitly not something I have overlooked in future additions.

And you are correct there is absolutley nothign wrong with the simplest solutions (assuming youre refering to my most recent post on the sheet metal light traps) I just aim to spread ideas to people becuase every project calls for its own solution. Who knows who it could be useful to. For me its simply that I like uniformity and the sheetmetal combines better with this steal cabinet.

If you havent seen the post on the sheet metal light traps here a link, just an idea:

https://www.rollitup.org/stealth-micro-cab-growing/502019-how-high-quality-sheet-metal.html
 

ch1ppz86

Active Member
If you are looking to make it strictly a mother cabinet (what i would do) then you wouldn't really need a air filter...
 
Top