Or_Gro
Well-Known Member
Now Germans...I like helpin a good man out....even if he’s aussie...kiwis, too...
RB...
Last edited:
Now Germans...I like helpin a good man out....even if he’s aussie...kiwis, too...
I reckon with a bit of board jiggling - maybe move them into the corners an inch or so - then 600W @ 18" is where it's at for an even 1000 PPFD canopy.Here’s something to tide y’all over until we get the fancy-schmancy, super-duper, cad-cam mapping from @TEKNIK ...
Layout (door opens at side closest to you):
View attachment 4326413
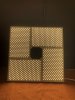
PPFD Maps, using Apogee mq-500, shown in ppfd divided by 1000, for ease of presentation. Wattage is per pair.
View attachment 4326415
View attachment 4326416
View attachment 4326417
Kickass!
Better order soon...
My pleasure...I reckon with a bit of board jiggling - maybe move them into the corners an inch or so - then 600W @ 18" is where it's at for an even 1000 PPFD canopy.
Nice work, bro!
Yep, but then i wouldn’t be able to lay down 1050ppfd from 37 feet above the tops....Damn OG you the man.
I can run my 8 boards at 2ft so I have room to mess around on canopy and go from 1050w on 6 x QB96s to 700w on 8 x HL panels.
Or I can run 12" at 500w - unfucken believable thats a 30-50% power saving!! if I read this correctly?
So OG you could have got away with half size drivers and no sinks for your application correct?
For us mere mortals, what would you estimate the layout and wattage for 4 boards to cover a 4x4 1000 ppfd?Here’s something to tide y’all over until we get the fancy-schmancy, super-duper, cad-cam mapping from @TEKNIK ...
Layout (door opens at side closest to you):
View attachment 4326413
PPFD Maps, using Apogee mq-500, shown in ppfd divided by 1000, for ease of presentation. Wattage is per pair.
View attachment 4326415
View attachment 4326416
View attachment 4326417
Kickass!
Better order soon...
This is all theory, I have yet to see a side by side demonstrating FR does anything;Those tcp nums are colortemp (top one is HL). Pretty fuggin close dude!!!
Stick 3-6 fr diodes/pair of bds in the grow for initiator effect, and run em lightson plus 5 to 15 mins, and you leapfrog hlg completly!
I’ll take comparative pic of HL vs HL + extra fr.
Add fr to v2, for lightson part, maybe?
View attachment 4325947
Have you had a chance to run far reds during lights on or eod treatment? Im really curious on this matter. I will likely blow some coin to find out myself. If you ran during lights on, how many watts of far red per sq ft?This is all theory, I have yet to see a side by side demonstrating FR does anything;
You have to hang out on the Far Red Thread more. THEN you'll become a believer!This is all theory, I have yet to see a side by side demonstrating FR does anything;
Apologies to whoever's photo this is - theses aren't our boards - but for a 4x4 the best layout for four boards would be a double L (or "windmill" layout I think @Rocket Soul described it as). But you would need heatsinks, as you would be running each board at around 175+W.For us mere mortals, what would you estimate the layout and wattage for 4 boards to cover a 4x4 1000 ppfd?
Hi mate, send me a PM. As I explained, we're not a business, we're just a bunch of growers who made a run of boards for ourselves and have some left over that we're selling to recoup costs. If we ever go into the LED board manufacturing business, then of course things will be a lot more formal.how much would it cost for someone in USA to buy this board or is there something similar that I can build and DiY??? PLC still not in stock & cutter.com are saying product is in stock but taking forever for people to recieve already paid for products.. not interested in those websites..
Your a good egg mate. Your help to this aussie was invaluable with setting up my 1st grow in over 20yrs.I like helpin a good man out....even if he’s aussie...kiwis, too...
This is an amazing thread! Please allow these lights to be built in the states so I can by 4.Apologies to whoever's photo this is - theses aren't our boards - but for a 4x4 the best layout for four boards would be a double L (or "windmill" layout I think @Rocket Soul described it as). But you would need heatsinks, as you would be running each board at around 175+W.
View attachment 4326791
As I said, not our boards, but if you arranged them the same way you would end up with a 620mm square, or roughly 25" x 25". You could make it slightly bigger if you wanted more even coverage around the edges and in the corners.
4'x4' is 16 sq/ft - almost double a 3'x3' at 9sq/ft - so similar numbers would apply. That is, double the area, double the number of boards, run them at about the same wattage.
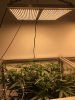
For the 3'x3' below we measured 950 PPFD bleeding out to 650 PPFD near the edges at 18" running 345W total (170+W per board). Measurements were taken with only one light on - so no overlapping light from the next station - and obviously, apart from the white wall behind, there were no reflective surfaces around the grow.
In a 3'x3' tent with reflective walls, coverage would be a lot more even. Same obviously goes for four boards in a 4'x4' tent - you'd be looking at around 700W+ (175W x 4) at 18", which is a little bit higher than @Or_Gro's figures, but you need to compensate for slightly less efficiency, but more importantly, the less even coverage of four boards vs eight.
View attachment 4326795
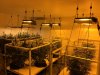
These types of commercial room grows are what High Lights were designed for. In fact, it was this room in particular the boards were modelled on, as the grower wanted to replace all his 600W HPS lamps with LEDs. This is an older photo, but you can see some LED panels on the far left - those are HLG QB324 V1s. They are paired up and driven by 480W drivers (at 400W to the boards, 425W at the wall).
View attachment 4326798
The owner was so happy with the QB324s (22-24oz yield for each 3'x3' station) that we decided to replace all his 600W lamps with LEDs. Problem was, the QB324s soon sold out. We liked the V1, because it used a mix of 6V Nichia CRI80 and CRI90 3000K LEDs. These could be driven harder than other QBs using 3V LEDs, plus the extra red of the CRI90 reduced flowering times by almost a week on an eight-week strain.
So, the original QB324 was the inspiration behind the High Light. When we couldn't get QB324 V1s any more, we decided to design and build our own boards.
There were a few things we wanted to change, the first being the LED layout and size of the board. A bigger board and even spaced LEDs meant better light coverage and heat dissipation. A 2:1 ratio (415x 205mm; 30x15 LEDs), meant we could pair them to form a perfect square to hang over a 2'x2' or 3'x3'.
We were impressed by the colour rendition of the high CRI QB324 panels and decided that, even though they weren't the most efficient panels on the market, the quality of light seemed to make up for this - especially the extra red. We also liked the way the LEDs were blended to fill in gaps in each spectrum.
There were a few things we thought we could improve on. The first was the mounting holes - on the QB324s, they are very near the copper trace and if you use washers, they eat through the solder mask and can short out the boards (which is what happened to one of the QB324 V1 boards above). The second was we wanted to use 2mm PCBs instead of 1.6mm to make the boards stronger and aid in heat ducting. The third was we didn't like the way the LEDs were all in rows next to each other. Finally, we wanted a board that could truly reach the maximum rated current of each LED and not overheat (with the help of a matching heatsink) - whilst still being able to be driven hard without a heatsink.
So as you can see, we didn't reinvent the wheel, we just put better spokes and tyres on it.

Is that Wappa that is pulling 22 ozs per 3x3? I can get 18 out of a 3x3 but that is with cramming 24 plants in there. To do it with 2 plants is pretty appealing. How long is the veg?Apologies to whoever's photo this is - theses aren't our boards - but for a 4x4 the best layout for four boards would be a double L (or "windmill" layout I think @Rocket Soul described it as). But you would need heatsinks, as you would be running each board at around 175+W.
View attachment 4326791
As I said, not our boards, but if you arranged them the same way you would end up with a 620mm square, or roughly 25" x 25". You could make it slightly bigger if you wanted more even coverage around the edges and in the corners.
4'x4' is 16 sq/ft - almost double a 3'x3' at 9sq/ft - so similar numbers would apply. That is, double the area, double the number of boards, run them at about the same wattage.
For the 3'x3' below we measured 950 PPFD bleeding out to 650 PPFD near the edges at 18" running 345W total (170+W per board). Measurements were taken with only one light on - so no overlapping light from the next station - and obviously, apart from the white wall behind, there were no reflective surfaces around the grow.
In a 3'x3' tent with reflective walls, coverage would be a lot more even. Same obviously goes for four boards in a 4'x4' tent - you'd be looking at around 700W+ (175W x 4) at 18", which is a little bit higher than @Or_Gro's figures, but you need to compensate for slightly less efficiency, but more importantly, the less even coverage of four boards vs eight.
View attachment 4326795
These types of commercial room grows are what High Lights were designed for. In fact, it was this room in particular the boards were modelled on, as the grower wanted to replace all his 600W HPS lamps with LEDs. This is an older photo, but you can see some LED panels on the far left - those are HLG QB324 V1s. They are paired up and driven by 480W drivers (at 400W to the boards, 425W at the wall).
View attachment 4326798
The owner was so happy with the QB324s (22-24oz yield for each 3'x3' station) that we decided to replace all his 600W lamps with LEDs. Problem was, the QB324s soon sold out. We liked the V1, because it used a mix of 6V Nichia CRI80 and CRI90 3000K LEDs. These could be driven harder than other QBs using 3V LEDs, plus the extra red of the CRI90 reduced flowering times by almost a week on an eight-week strain.
So, the original QB324 was the inspiration behind the High Light. When we couldn't get QB324 V1s any more, we decided to design and build our own boards.
There were a few things we wanted to change, the first being the LED layout and size of the board. A bigger board and even spaced LEDs meant better light coverage and heat dissipation. A 2:1 ratio (415x 205mm; 30x15 LEDs), meant we could pair them to form a perfect square to hang over a 2'x2' or 3'x3'.
We were impressed by the colour rendition of the high CRI QB324 panels and decided that, even though they weren't the most efficient panels on the market, the quality of light seemed to make up for this - especially the extra red. We also liked the way the LEDs were blended to fill in gaps in each spectrum.
There were a few things we thought we could improve on. The first was the mounting holes - on the QB324s, they are very near the copper trace and if you use washers, they eat through the solder mask and can short out the boards (which is what happened to one of the QB324 V1 boards above). The second was we wanted to use 2mm PCBs instead of 1.6mm to make the boards stronger and aid in heat ducting. The third was we didn't like the way the LEDs were all in rows next to each other. Finally, we wanted a board that could truly reach the maximum rated current of each LED and not overheat (with the help of a matching heatsink) - whilst still being able to be driven hard without a heatsink.
So as you can see, we didn't reinvent the wheel, we just put better spokes and tyres on it.
Then do one!This is all theory, I have yet to see a side by side demonstrating FR does anything;
Far red thread...Have you had a chance to run far reds during lights on or eod treatment? Im really curious on this matter. I will likely blow some coin to find out myself. If you ran during lights on, how many watts of far red per sq ft?
Thanks man.Your a good egg mate. Your help to this aussie was invaluable with setting up my 1st grow in over 20yrs.