How to build an aero setup

FilthyFletch

Mr I Can Do That For Half
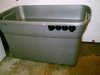
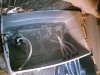
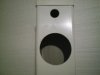
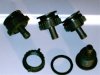
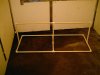
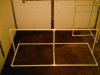
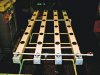
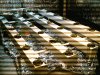
Ok boyz and girlz.I have had lots of requests and have been on so bs about getting it out there but I am starting this link to give a how to build the aeroponic system I have been using.This particular setup is a 28 plant setup which is about 5 feet wide and 7 feet long.You can learn the basics and then modify the size of it to whatever you need. I have begun making these custom sized for sale per request.The basic concept is a design that for an equal 28-32 site setup would cost around $800-900 dollars .I being a DIY guy said no no no to this and began my adventure of figuring the system out and finding parts to create my own.The one I will show you how to build cost me about $185 with the pump and res.Try not to get to far ahead of my postings as this may take me a few days to get completed as I get distracted and if Im smokin I may fall asleep.I will try to include as much info and pictures as I can.If you need a question go ahead and clearly post it in here so others can read it and get the same answer they need.Ok here we got the basic set up will look like these 2 pictures.1 before plants 1 with new clones.
 

Attachments

FilthyFletch

Mr I Can Do That For Half
After this tutorial you can basically make adjustments or modifications to suit your needs but this will be for the original model I built.Here are the basic items you will need to purchase and if possible the store I found them at:

4 pvc fence posts appox 8 feet long ( Home Depot, Lowes,Menards)
8 pvc fence post caps tight fit ( Home Dept, Menards)
26 360 degree mister heads (altgardens.com)
5 10 foot 1/2 inch pvc pipes (Home Depot, Lowes, Menards, plumbing supply)
5 10 foot 1 inch or bigger pvc pipes ( Home depot, lowes Menards)
5 10 foot rools of 1/2 inch outside diameter 3/8 in inside diameter hose
4 1/2 inch pvc end caps ( Home Depot, Lowes, Menards)
6 1/2 inch pvc 90 degree elbows
12 1inch pvc 90 degree elbows
2 1/2 inch standard pvc T fittings
1 1/2 inch pvc T fitting with threaded leg( the single bottom has threads)
1 1/2 inch threaded hose barb with 1/2 inch hose barb nipple
12 1 inch pvc T fittings
1 bottle pvc cement (Menards, Home Depot same as pvc parts)
1 50 gal rubbermaid tub ( can be smaller no less then 30 gallon) Home depot
28 3 inch net pots
1 800 gallon per hour pump submersible (ebay,online,pond store)or bigger
1 either filter bag or inline filter that fits pump (altgardens.com)
5 optional sink sprayer hose plastic inserts(not needed but nice)Home depot
4 low profile drains with 1/2 inch hose barbs (wormsway.com, altgarden.com)

This is your basic parts list for constructing the setup.After getting everything the build is made up of basically 4 parts you build.These stages are the res for water and nutes,the water mainfold to distribute the water, the grow chambers and last the stands for the system.I will do each part indiviually to keep it easy.Basic tools will be needed drill bit size will vary depending on things like where you get the drains or hose size or exact brand of net pots so its best to get parts first before going off drilling.You will need the basics:
1 drill
set of drill bits
3 inch hole saw for drill
caulk gun
pliers
tape measure
marker sharpie is good
1 tube water resistant caulk.make sure its not water washable
razor blade
hack saw or similar to cut pvc

next...........
 

FilthyFletch

Mr I Can Do That For Half
Lets start with the res tank first being the quickest.First think of your grow area and where the res will be.Will it be on the left the right, and end or outside the room.After that you know to keep the hose holes toward the system and not the opposit side as the hoses will come from the setup into the res and the pump hose will go right to the setup.
Take the rubbermaid res tub you have decided on.You will be drilling a total of 6 holes in the tub.I reccomend on the long sides of the tube whichever end will be closes to the drain side of the setup.I use a spade bit just slightly bigger them my drain hose so either a 5/8 or slightly larger spade bit works nice.I drill 4 holes in a horizontal line as high up on the res as I can around 2 -3 inches from the tub lip.If you decide to use the sink sprayer hose inserts use them to give enough space bewteen to they dont over lap.These have a lip you insert the threaded end in the hole and on the inside of the tub you tighten down the plastic nut.Makes a nice clean entrance for the hose and stops the hose from getting pinched.You will then go to the opposite end of the same side and drill 1 more hole same size for the pump hose to come from the submersible pump to the water manifold.See included picture.I also like to then drill a 1 inch hole on the side of the res as high as you can to pass the pump power cord through this way you can put the res lid on and stop splashes or evaporation also quiets the pump and drain sounds.Here is a few pics of the res setup
 

Attachments

FilthyFletch

Mr I Can Do That For Half
Now for the second section of the system we will build the actual grow chambers where the actual plant will grow.This is pretty simple and straight forward to do.You will need the 4 pvc fence post, the 8 post end caps,a 1/2 drill bit, drill,the 4 drains.I find it easy if you have a snap line around to measure the posts exact width and snap a center line all the way down the post for center reference to keep holes in a nice line so the mister lines stay in center position.I lay my posts out so I can work on them.I use my sharpie marker to mark my hole centers.You will use your tape measure to pull your measurements from the same end of each post very important as all drains will need to be on the same end of each post.I mark out my first measurement that will be the 3 inch holes for my net pots.I use a 3 inch hole saw that fits in my drill like a drill bit ans cuts a 3 inch hole.You will measure from the end of the post without the caps on yet and make marks at the following points dead center of each post: 1 1/4 in,4 3/4",15 3/4",26 3/4",37 3/4",48 3/4",59 3/4", and 71 5/8".Now pay close attention the very first hole at the 1 1/4" mark you will drill with the 5/8 inch spade bit only through the top dont go through both sides.Good. The rest of the marked spots you will drill out using the 3 inch hole saw bit cutting the 3 inch hole for each net pot into the top of the post do not go through both sides so be easy.Each post will now have 7 3" holes for the plant net pots and 1 5/8" hole for the water manifold inlet pipe all in a single row.Reference below pictures
 

Attachments

FilthyFletch

Mr I Can Do That For Half
Now that you have the holes on top drilled we will need to flip each post all the way over so the bottoms are no up and all the frilled holes are facing downward.On the end where you drilled the 5/8 hole you will mease from that end into the center of the post 1 1/2 inches and make a mark.Do this on all 4 posts.These will be where your chamber drain plugs will get placed.My drains have a 3/4 thread with the 1/2 inch hose barbs so I used a 3/4 inch spade drill bit to drill these 4 holes 1 in each post wiggling it a little to make it a hair larger as you will be inserting the drain plug thread into this hole then using the plastic nut on the inside of each chamber to screw down over the threads making a tight drain.You will get 2 rubber washers with the drain put 1 washer over the thread before inserting it in the hole then the other over the thread once its inserted in the chamber samwhiching the pvc post between each washer then tighten down the nut good and tight.I like to add a little bead of caulk around the outside edge of the drain for little extra assurance against leaks.Below are a few pics of the drain plugs and them inserted in the chambers...
 

Attachments

FilthyFletch

Mr I Can Do That For Half
Now you have the chambers ready for the main water distribution manifold and mister lines.Keep the 8 pvc end caps close by we will use them but its easier to keep them off to install the mister lines at this point.Trapper the picture above show the low profile drain plugs.They come in different size hose barbs (barbs except hose size ie 1/2 barb 1/2" hose).Next ww will move into building the 2 needed stands to hold the system as it makes it easier to have them when installing the mister lines and manifold.
 

FilthyFletch

Mr I Can Do That For Half
The next step here will be building the 2 stands the grow chambers will sit on.Basically its 2 stands made from the 1 inch or bigger pvc pipes.1 inch is smallest to use as these planst get heavy when loaded with buds.I pulled over 90 oz of wet bud off first harvest of plants and another 15 ozs after letting the little lower stuff go for another 3 weeks after main harvest.You ll use the 1 inch pvc pipe, hacksaw, 1 inch T fittings, 1 inch 90 degress elbows and pvc glue on this one.Get your marker and tape measure ready heres a quick look at what your making here
 

Attachments

FilthyFletch

Mr I Can Do That For Half
Ok Im gonna end this nights session on building this aeroponic setup as I need to take the dogs for last nightly walk and stretch myself.I will continue later tonight with these stands and the actual part everyone wants to see the mister lines and manifold.Leave any questions about the steps so far and Ill try to help.Dont ask about the other unposted parts yet let me post then ask on those.Hope this interests somebody as its alot of typing lol.Good grows
 

estario

Active Member
I am currently collecting materials and I have already made the PVC stands. I am waiting for the rest of this ingenious setup you have made. Telling us how to do build this aero garden is very generous of you and I can't tell you how thankful I am. Keep up the good work.
 

Killerbees

Active Member
i think people really like your setups cause part of you really does a good job of walking through the steps. you try not to get lazy and you really put it all together.
good work filthy
hey and that hooker looks familiar... ;)
 

Lord Dangly Bits

Well-Known Member
Fletch, you did not tell them how to make the stand... LIKE One end has to be 1/4" per horizontal feet shorter then the other to drain correctly.

I have a set up just like that one but smaller. How often do the sprayers run? And for how long?
 

FilthyFletch

Mr I Can Do That For Half
Yeah I havent finished this thread and the stands would be towards the end of the how to.I got busy and side tracked.I run my misters 24 hours aday non stop.If you stop them your more open to nute clogs caused by drying in the mister heads. You turn it on and she doesnt turn off til you harvest.
 

Killerbees

Active Member
was at lowes the other day and i noticed that there are 4 3/4 x 4 3/4 96 inch long pvc fencing. thats a bit more volume and slightly bigger netted pots... mabye the 3 3/4... anyway my question is based on your grow, and the same spacing of your grow... what would you anticipate the difference in outcome to be... the 4 3/4 fence posts cost the same as the 4x4 ones...

will this also help in preventing clogging in the later stages.
the bigger the better <-- thats my capitalist mind working... i guess the only negative thing would be the ammount of water needed to pump through the posts... which with 5 of them at 8 feet long could be 15 gallons at a time.

i dont want you to stop the tutorial which it seems over 600 people have viewed but i think that the size question would be cool... assuming people have to make choices durring a diy process...
 

PlatinumKasse

Well-Known Member
Seriously. This is the most anticipated post on the planet. If it takes getting a 1,000 views to get it done... so be it.
 
Top