CHAPTER 2
MAKING THE BALLAST REMOTE
Of course you can use the light as is, if you have the ceiling height. but I need to deal with heat, so here is how to make the ballast remote. Some fixtures are very easy to remove the socket just by removing 2 screws.


The GENLYTE is a little more complicated, but can easily be done.
Material needed
1- 5 gallon bucket
1- 4” square electrical box
1- 4” square blank cover
1- green ground screw
2- cable ties or tie wraps
1- romex connector
1- 6 inch piece of solid ground wire
Length of 12 AWG. SJO cord (used to go from ballast to socket. Try and keep the length as short as you can)
1- wire nut ( not shown in pic )

Tools needed
Drill
¼” Drill bit
Marker
Needle nose or long nose pliers
Hammer ( I use my lineman pliers )
Utility knife
Wire strippers
Flat blade screwdriver
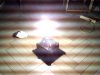
Start out by placing a 5 gallon bucket right side up on a hard level surface. Place the GENLYTE fixture upside down inside the bucket with the socket facing up. This will keep the light secure while working on it.

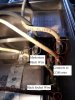
In order to remove the socket, first you need to remove the cover the socket is mounted to. Under this cover is where the ballast components are located. Once the light has been powered up, care must be taken when working with the wires for the capacitor due that it can retain a charge. We will be ok with the wires that we need to work with. The screws securing the socket are on the back side of the plate. The transformer inside the ballast is not mounted . It is secured by the plate that will be removed to get to the screws for the socket. Remove the 4 screws holding the socket plate. Lift up the socket and the plate. Do not shift the light around because we do not want the transformer to move. The components inside are from left to right are: the capacitor, transformer, and the ignitor. Notice how the wires route in the channels near the side so they don’t get pinched with the cover.

Take note of the wires you will be unhooking. For the GENLYTE fixture.
From the fixture--------------- From the socket
Com. & X2 ----------------------- WHITE
X1 & RED--------------------------BLACK
Unhook the black wire that goes to the socket and replace the wire nut on the 2 wires for the light.
Unhook the white wire that goes to the socket and replace the wire nut on the 2 wires for the light.
Unscrew the 2 screws holding the socket to the plate. Replace these screws into the socket because you will need these later to mount the socket.

Using a screwdriver and hammer knock out the hole in the plate. Use the needle nose pliers to ream the hole of any sharp edges. I use this hole instead of the center hole, because I don’t like the wires to be between the transformer and the cover plate.


You will need to slide the ignitor over to one side to make the wires long enough to exit the light. Now you want to group the 2 sets of wires that connect to the socket and route them neatly so they will go through the new hole that was made in the socket plate. Install a cable around these wires so that it will be inside the light just below the cover you have removed. Now thread these wires through the new hole and replace the cover. Ensure cover sits properly and its not pinching the wires underneath. Replace the 4 screws for the cover.


These 2 screws are what is used for the refractor. Remove these 2 screws and set aside. you cant see the screw im pointing to but its there.

Measure the distance between the 2 screws. Take the 4” square box and knock out the hole in the back of the box as shown. You will need to drill out the 4” box so that you can mount it the light. When drilling use light pressure on the drill because of the new holes will be next to the preformed holes ( knockouts ) already in the box. The box will not be positioned in the center of the light, but rather off to the side so the wires will enter inside the box. Use the screws you removed and mount the box to the light. And install another cable tie around the wires close to the box. The cable ties will prevent the wires from being pull out or lost up inside the light.


Now take out 1 of the small knockouts and install the romex connector. Take the length of wire being used for the socket and strip the end like you did to change the plug except strip off about 6 inches of outer covering. Put the wires inside the 4” box and tighten the connector just untill its snug and will prevent the cable from pulling out. CAUTION over tightening of the connector will cause the wire to short out.
install the solid ground wire to the ground screw of the box. solid wire stays under the screw better than stranded wire or use a crimp connector.
connect the green wire to the ground wire with a wire nut.
connect the white wire to the com and x2.
connect the black wire to x1 and red.
install the 4" blank cover and hang your remote ballast.


Try and keep the cord from the ballast to the bulb as short as you can to reduce the voltage drop and the light will run more efficient. But you want it long enough so you can adjust the height of the bulb.
I use a ground wire because I intend on grounding any metal parts of the reflector and socket hanger. I advise the use of a ground wire for personal safety.
i will be working on different ways to hang the socket with different reflectors and or cooltubes. so stay tuned for chapter 3
 67.5 KB Views: 58