cupofnestor
Member
INTRO
Hi all. I'm a relatively inexperienced grower, but I'm a big LED nerd so when I discovered the COB CXB3690 threads here, I got really excited. I had been growing with hardware store CFLs, and was looking for a way to up my photons cheaply. I had been wanting to build a 10w array for years to replace my ridiculous CFL setup, boy am I glad I waited until I discovered this LED family.
GOAL
As of 12/15 I live in a legal state. As such, my grow does not need to be ephemeral and secretive any longer. I will now attempt to grow 12mo/year. Energy is not getting any cheaper and 50% of growing your own is frugality, ain't it?
BUILD
(Now) standard stuff, really -
Many thanks to Supra, GrowMau5, and Greengenes, among the many others on the LED thread who have offered so much to this DIY community!
GROW
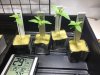
As of my last grow, I'm giving up on DWC and going with Coco and Aurora Soul. I've got 4ea 1gal pots fermenting a mix of coco, perlite, mykos, blood meal, LAB meal, oat flour, molasses, azomite and cal/mag.
4ea ten-day-olds in rockwool waiting to be transplanted this weekend.
Wish me luck and please feel free to tell me what I'm doing wrong.
Hi all. I'm a relatively inexperienced grower, but I'm a big LED nerd so when I discovered the COB CXB3690 threads here, I got really excited. I had been growing with hardware store CFLs, and was looking for a way to up my photons cheaply. I had been wanting to build a 10w array for years to replace my ridiculous CFL setup, boy am I glad I waited until I discovered this LED family.
GOAL
As of 12/15 I live in a legal state. As such, my grow does not need to be ephemeral and secretive any longer. I will now attempt to grow 12mo/year. Energy is not getting any cheaper and 50% of growing your own is frugality, ain't it?
BUILD
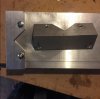
(Now) standard stuff, really -
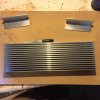
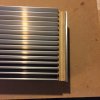
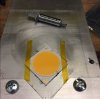
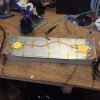
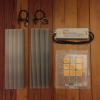
- 2ea 15" 4.6" serrated heatsinks from HsUSA
- 2ea (8 pictured) CXB3590 CD Bin in 3500k from Cutter
- 1ea HLG-185H-C1400B
- Various connectors/hardware and silicon insulated 16awg
Many thanks to Supra, GrowMau5, and Greengenes, among the many others on the LED thread who have offered so much to this DIY community!
GROW
As of my last grow, I'm giving up on DWC and going with Coco and Aurora Soul. I've got 4ea 1gal pots fermenting a mix of coco, perlite, mykos, blood meal, LAB meal, oat flour, molasses, azomite and cal/mag.
4ea ten-day-olds in rockwool waiting to be transplanted this weekend.
Wish me luck and please feel free to tell me what I'm doing wrong.
 The addiction begins...