Second grow, budget grow - from zero to 420

lmn8r

Well-Known Member
After a 14 year hiatus, I am back. I patiently waited decades, and my state has finally legalized recreational use, so I thought it was time to start back up with a new grow!

My first grow back in 2009 was a failure. You can find it here: https://www.rollitup.org/t/first-grow-budget-grow-box-grow-log-from-zero-to-420.174937/. I learned a lot, what works and what does not work. I still have a lot to learn, and would consider myself a newbie.

My goal for this second grow is to produce a successful product, hopefully by next June. I’ll be growing indoors throughout the winter. I am looking to keep costs low. The purpose of this grow journal is to track my progress. I’m looking for constructive feedback and/or good vibes. I’m hoping to update this weekly.

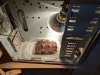
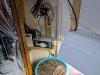
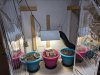
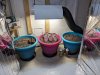
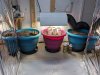
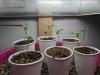
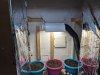
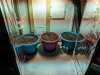
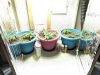
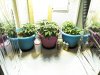
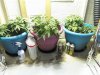
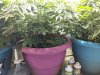
Enclosure: 2x5 ft utility closet. 10 sq ft. growing area.
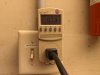
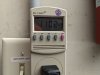
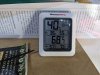
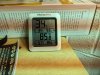
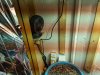
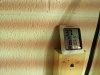
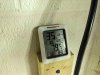
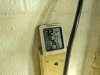
Ventilation: Air-cooled enclosed hood, 6 in inline cooling fan, 8 in circulation fan, no odor control.
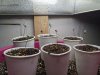
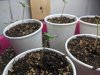
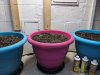
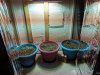
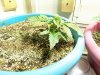
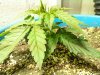
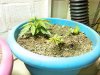
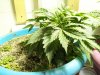
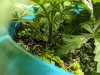
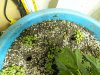
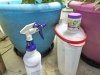
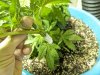
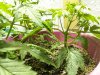
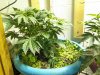
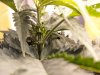
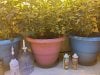
Grow Medium: Yard dirt soil with perlite in 15-gallon pots. Watering with tap water. Fox Farm nutrients.
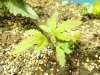
Strain: Scream Cream by Fatcat Labs. Photoperiod.
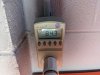
Light: 70w Incandescent for germination, 105w CFL for seedlings, 1000w MH for veg, 940w HPS for flowering.
Growing Method: Indoor. SoG, Topping.
 

lmn8r

Well-Known Member
Here is my budget and supplies breakdown. Supplies marked with zero cost are things I already own.

Seeds

North Atlantic seed mix $70
Herbies seed mix $55

Growing Medium

Miracle Gro Indoor Potting Mix, 18qt $15
Perlite, 15qt $25
Fox Farm Liquid nutrient trio $33
Rooting Hormone, 4oz $9
Plastic plant water catch tray, 4-pack $17
Yard dirt $ 0
Plastic planting pots, 15 gallon $0

Cooling

ThermoPro digital thermometer $11
Fan motor controller $0
8" circulating fan $0
VivoSun 6" Inline Fan 240CFM $30
8ft Aluminium Ducting, 6" Diameter $16

Electrical

15A 120v mechanical electric timer $0
25ft extension cord, 15A $0
Power strip $0
Medium socket industrial light fixture $0
6ft extension cord, 13A $7
Female plug adapter $0
Male plug adapter $6

Lighting

70w Incandescent flood light $0
105w CFL, medium base 5000k $0
Mogul to Medium socket converter $8
Air cooled reflector hood, Mogul socket $42
Mylar reflective film $6
Metal Halide & HPS bulbs, for M47 ballast 1000w $81
M47 Metal Halide magnetic ballast, 1000w $0


Total 431

Electricity here is relatively cheap, I pay a $0.12 / kwh flat rate residential.
 

lmn8r

Well-Known Member
My state recently legalized for rec use a few days ago. I was so excited about legalization, I immediately went to germinate some of the seeds I bought using the paper towel method. I was able to germinate all six seeds, and tossed them in some reused egg carton. I didn't have my grow area setup yet, so I thought it would be okay.

Nope....

I've been working some really long shirts lately and haven't been able to tend to them. Turned out I likely fried my first batch seeds with too much heat. None of them sprouted.
 

Attachments

Phytoplankton

Well-Known Member
Sounds decent, I’d skip the 70w incandescent light it’ll make the seedling stretch. Also, I’m assuming the cfl is a grow light. Only other things are I’d spend a little and get some better potting mix, and get some nutes, something easy, Dr. Earth or Geoflora.
 

lmn8r

Well-Known Member
Part of the reason, aside from cost, that I went with HID lighting is years ago a member of this community gifted me the ballast I'm using. These used to be expensive back in the day, so I've held on to it all these years with the hope I'd get to finally use it for a grow. Being that it is a 20 year old piece of equipment, I needed to clean it up, wire it, and test it. I had some free time so i did so over the weekend.

Both bulbs worked, the MH bulb pulls 1102 watts, and the HPS bulb pulls 973 at full power. I'm surprised the oil-filled capacitor is still good, but I guess although it is old, it doesn't have that many hours on it.
 

Attachments

lmn8r

Well-Known Member
Here is the grow area. On the outside, an inconspicuous utility closet next to basement storage. I spent some more time over the weekend running the wiring, cooling setup, hanging the light fixture, and mixing the soil. I'm still waiting on a few pieces of equipment to arrive to put on the finishing touches. Overall time to do everything was about five hours. Those pots being so large ended up being quite heavy, around 100lbs each.

In the meantime, since I messed up on the first batch of seeds, I likely won't get anything from those. I went ahead and germinated some more seeds for 24 hours using the paper tower method. After 24 hours germination, I planted the seeds directly in some small paper cups with potting soil. I have these running under the 105w CFL right now.
 

Attachments

lmn8r

Well-Known Member
Here are the batch of seeds I germinated. All six sprouted into seedlings. Modern genetics are impressive.

I ended up moving the light closer to the plants, since the CFL puts out very little heat. These seedlings sprouted a little taller then I remember. Temps are still a little on the cold side, averages 68F during the day time. As an experiment I tried turning the exhaust fan off, but there was no no change.

I planted the seeds into wet soil, and I haven't really watered them since last week but I plan on checking and watering them again soon. The temperature has been low enough where not a ton of moisture has evaporated. I plan on watering the soil in the main pots to compact it a little bit, and also have it release some humidity.
 

Attachments

greenmobster440

Well-Known Member
Ya got a start going. It's been about that long since I cracked an indoor bean as well. I'm in Ohio as well and cranking up the green machine once again.

Even with the basics I know from experience I find myself making simple mistakes. It happens and ya move on..lol.

Nail down the basics for environment, light, medium, and nutrients and your halfway there. We never stop learning in the hobby and this forum is loaded with the info you need.

Best of luck on your grow. It will be fun to watch your progress.
 

lmn8r

Well-Known Member
It's officially been two weeks since I started the grow. Of the six seedlings, five are doing well and making progress. The sixth decided to grow weird. It's still alive, but struggling. I've continued to experience low temperatures inside the grow closet. I've noticed a little bit of moss and some fungus gnats decided to show up. I don't think the paper cups were adequately draining, plus the cold temps means water is not evaporating as it should. I made the decision to go ahead and plant the seedlings in their final containers.

This turned out to be the right decision, the roots were already hitting the bottom. I am always surprised how quickly roots develop. Out of curiosity, and for science, I decided to test the "105 watt" CFL I was using. Turns out, it only pulls about 84 watts, so it wasn't putting out enough light.
 

Attachments

lmn8r

Well-Known Member
Here is an overview of the plants of the grow. Since I only have three containers that fit inside the closet, the plants have roommates. So far the leaves look healthy, I'm hoping for minimal stress migrating to their new homes.
 

Attachments

lmn8r

Well-Known Member
The door to heaven!

With the seedlings planted, I moved the light up much higher, about 3ft above the plants.. I switched out the bulb, now I'm now running the 1000 watt metal halide. The temperature has moved up to into the mid 80s. I also tested the lux using an app on my phone. The leaves are getting about the same amount of light intensity as wintertime direct sunlight, about 44,000. I'm definitely going to have to increase the watering schedule. Once the plants have established themselves, I plan on mixing in nutrients.

I'm going to have to do some trial and error with the temperature range. If it gets too hot, I have a few things I can do to improve conditions. I can move the ballast outside of the grow room. I can can drill an intake hole to help improve airflow, which I may end up doing anyways. I can also increase the fan speed, it's currently only running at 50% performance. Also, when I switch to flowering stage, I will move to the HPS bulb, which draws less overall wattage. Knowing the mistakes I made on my first grow, I have some time during the vegetative stage to figure this out.
 

Attachments

lmn8r

Well-Known Member
I have been monitoring temps closely, and have made some changes since I switched to the 1000w metal halide bulb. Under the previous setup, I had the ballast on a shelf on the left side of the closet, with the thermometer sitting next to it. The thermometer was directly under the light source, and the bulb puts out a lot of infrared. With this setup I observed temps getting up to 95F! I don’t think this was a representation of air temperature, but I still needed to make some changes to bring the temps down.

I ended up moving the electrical system to the right side of the closet. This allowed me to move the ballast outside of the closet, because it generates 100 watts of heat by itself. I removed the shelf on the left side, and installed a quick platform for the 8 inch circulation fan. This will prevent hotspots from forming. Next, I drilled a 6 inch intake port to suck in cool air from the floor. This, combined with running the exhaust fan at full speed improved airflow considerably. Finally, I moved the thermometer out of direct light and reset the memory, so that it measures air temperature from its new location.

After the new changes, I waited a day to observe temps. The new design has made a big impact. Air temperature outside the closet is 68F. Inside during operation, temps climb to about 81F. A perfectly acceptable gradient. I think I’m dialed in now.
 

Attachments

lmn8r

Well-Known Member
Plants are now three weeks old. All five are growing well, showing multiple levels of leaves. The sixth runt is still alive, and is growing slowly. The plants have all obviously taken to their new pots with root growth. Earlier this week, I fed them their first nutrients. I'm using the run of the mill Fox Farm weekly feeding guide for vegetative stage, 6-4-4. They take about two gallons of water spread amongst all three pots. I'm watering them every 2-3 days, depending on soil dryness.

Temps inside the closet are pretty consistently 83F with the light on. I ended up splurging on a watering can. This will help me feed the nutrients without splashing all over the place. Should arrive next week. I tried adjusting the brightness setting on my camera for these photos to make them look a little better. The grow light is absurdly bright, and the camera has a tough time. With the soil being yard dirt, a few random bugs have been hanging out, but they don't seem to be hurting the plants.
 

Attachments

lmn8r

Well-Known Member
Plants are now a month old. Earlier this week I let the pots get extra dry, and the leaves started drooping a little bit. I didn't capture a photo, but it allowed for me to visually gauge when the plants are thirsty. They have had their second watering with nutrients. The canopy is really expanding with side growth. I don't know much about the strain, but it appears to be a Sativa/Indica mix, lots of low bushiness which I am pleased to see. Only one plant, in the center rear, has obviously more height above the others. There isn't hardly any stretch at all, which tells me the plants are getting sufficient light. The runt is still hanging it, it's behind but still growing so I am going to let it live and continue. It's been a little colder here, so temps inside the grow closet have stayed in the high 70s. Leaf colour during the veg. cycle is perfectly green, no signs of deficiencies or stress. Overall, so far so good.
 

Attachments

lmn8r

Well-Known Member
Now that the plants are a month old, the time has come-topping day! Always a stressful time.

I topped & cloned the three plants in the center growing pot. All three have strong stems, multiple side stems with new growth, and have begun to fill the canopy of their pot. They are being planted in neighboring pots where there is extra space, and will continue to live there.

I am using regular steel scissors to make the cuts, which I have cleaned and sterilized beforehand. I am using off the shelf rooting hormone, nothing special. Since I’m planting directly in the soil with the other plants, I bought a spray bottle so I can mist the clones regularly to keep them from drying out until they have a chance to grow their own roots. I made angled cuts on the clones and dipped them in a healthy amount of rooting formula.

I may turn off the circulation fan and cut down the airflow for a few days to increase the humidity level so the clones have a chance. Ideally I would have a separate cloning chamber, but I don’t. Hopefully this works!
 

Attachments

lmn8r

Well-Known Member
Plants are now five weeks old. It’s been a week since I topped and cloned the middle plants. The middle plants had a few days where they looked stressed, then their side shoots continued to grow quite tall and are now covering the canopy in the middle. They are now looking healthy.

From my uninformed perspective, the clones do not look to be doing well. They’re still alive, but look very weak and wilty and are not growing meaningfully above ground. I trimmed all the major leaves shortly after I took last week’s photos, and have been misting them and watering them extra. For the first few days, I reduced airflow to allow for humidity to build up a little bit, but it didn’t seem to make a difference. I’m unsure if they are growing a root system, I’d have to dig them up in order to tell. I rotated the pots around after a few days to allow the leaves on all sides of the main plants to expand, and to give the clones some light. At this point, the clones may only have a week or so left to do something, otherwise I’ll assume they failed to root.

The runt, on the right side photo, has woken up. It initially grew with a weird curvy main stem, but that has straightened out quite a bit and it has a similar size as the other plants, behind by maybe a week of foliage. The other two healthy plants on the left and right pots have not been topped. They are starting to show the tiniest initial pre-flowers poking out, suggesting sexual maturity. I am leaning towards not topping the plants on the ends, that way I can compare the performance since this is my first time using that method.

My initial plan for the grow was to utilize the Scrog method. The strain (scream cream) thus far has proven to be quite bushy. The plants are filling out the canopy nicely, but aren’t that tall. I will probably wait another week to install the screen and start training the plants to fill the remaining light gaps.
 

Attachments

lmn8r

Well-Known Member
I have made a few purchases since last week, buying a spray bottle for misting, and nice watering jug to make it easy to mix nutrients, and reduce spilling when I water. I am still watering twice a week, one of the times with 6-4-4 nutrients. I may increase this frequency as the plants get bigger, we’ll see. Here is an updated tally of costs for the grow, including electricity spent thus far.

Seeds

North Atlantic seed mix 70
Herbies seed mix 55

Growing Medium

Miracle Gro Indoor Potting Mix, 18qt 15
Perlite, 15qt 25
Fox Farm Liquid nutrient trio 33
Rooting Hormone, 4oz 9
Plastic plant water catch tray, 4-pack 17
Yard dirt 0
Plastic planting pots, 15 gallon 0
Pruning scissors 0
Spray bottle 3
One gallon watering jug 22

Cooling

ThermoPro digital thermometer 11
Fan motor controller 0
8" circulating fan 0
VivoSun 6" Inline Fan 240CFM 30
8ft Aluminium Ducting, 6" Diameter 16

Electrical

15A 120v mechanical electric timer 0
25ft extension cord, 15A 0
Power strip 0
Medium socket industrial light fixture 0
6ft extension cord, 13A 7
Female plug adapter 0
Male plug adapter 6

Lighting

70w Incandescent flood light 0
105w CFL, medium base 5000k 0
Mogul to Medium socket converter 8
Air cooled reflector hood, Mogul socket 42
Mylar reflective film 6
Metal Halide & HPS bulbs, for M47 ballast 1000w 81
M47 Metal Halide magnetic ballast, 1000w 0

Electricity Usage

Seedlings, start to week 2 3
Veg, week 2 to week 5 50


Total $509
 

lmn8r

Well-Known Member
The plants are now six weeks old. The canopy has reached a height of 18" above the soil. Temps, watering, and nutrient schedule remain the same as before. Two of the plants on the left and right pots which I did not top are showing obvious preflowers, indicating sexual maturity. The three plants in that I topped in the middle pot, as well as the runt on the right, do not yet have preflowers. I have been doing some ongoing minor pruning of leaves near the base that were obviously not getting any light or love from the plant.

I noticed the plants growth now seems to be constrained by the watering schedule. To me, this is suggesting they have probably maxed out their root depth. When the top of the soil gets the slightest bit dry, the plants are showing the first signs that they are thirsty. I tried installing a screen using some leftover chicken wire I had, but the openings were too small. The canopy is all pretty much the same height, and what little space is left has been filled up leaves on all sides. Considering the small space, I will likely skip the screen-of-green method for this grow. I ended up ordering a 4"x4" mesh to fit this space that I will still use to prop up stems during the flowering step when they get heavy.

I'm still running the 1000w metal halide lamp with the 18x6 veg. light cycle, and the plants love it. I've got it dialed in and the plants require very little maintenance, just regular watering. Considering the height of the canopy at this point as well as the pace of growth over the past week, I will probably make the switch to the flowering stage at the beginning of February. This would put the plants at eight weeks old to be ready for the flip. I had originally hoped to do a longer vegetative stage, but I learned during my first grow that I need a lot of vertical space for flowering. I want to leave myself plenty of margin of error for flowering.
 

Attachments

lmn8r

Well-Known Member
Plants are now seven weeks old. I made the decision to go ahead and switch to flowering early, rather than wait until February. They're already over 2ft tall, and the canopy is completely full. The plants are growing a few inches per week now, and I need to conserve vertical space for flowering.

As you can see by the yellowish/orange colour, I switched to running the 940 watt Plantmax HPS bulb on a 12/12 light cycle. I'm watering the plants with two gallons, three times a week. Temps have stayed in the low 70s, and humidity is up a little bit with the increased watering cycle. The 4'x2' trellis net I ordered finally arrived. I plan on installing it once I determine the sex of all six plants.

The clones I planted (taken from the three tops of the middle plants) never took hold and I went ahead and yanked them all. They all showed zero signs of root growth. I either improperly cloned them, or the cloning hormone I have is bad, or some combination of the two. I'm not sweating it too much, because there isn't really enough space in the canopy for them anyways.

It's hard to tell from the photos, but some of the leaves had a little bit of burnt tips. I'm going to take a short break with the nutrients and give them plain water for a little bit. Once they adjust to the new light cycle, I'll be feeding them the Fox Farm recommended dose of "bloom" nutrients.

The next important thing I'll be watching for is plant sex. Thus far, it looks like the plants on the left and right pots (untopped) are female. They're showing pistil growth. The three plants in the middle pot, which have been topped, it's not completely clear yet. I think one of them might be a male. They're also taller then the rest, which could be a hint they're male? The runt, that shares the right pot, shows no signs either way. I've been doing light trimming of lower leaves that look obviously less nourished and are covered up by the canopy. I haven't been super aggressive with pruning because frankly, I don't know what I'm doing and I'd rather play it safe.
 

Attachments

Top