WeedIsForMe
Active Member

CAMERA TUTORIAL
Okay so I haven't been part of this community for very long but I have learned so much and taken so much information and know how from this site. I don't have much knowledge about Marijuana that the rest of you don't already know but as a photographer and graphic designer I can shed some light about cameras and editing procedures for posting top notch pictures for a top notch grow journal.
--------------------------------------------
So the first point is all about your camera. As a semi-professional photographer one of the things I hear the most is that it's not the camera that makes the shot it's the person taking the shot. Nine times out of ten this is spot on. But we need to look at more than just the composition and artistic edge on a photo. Our grow journals should be presented with more of an archival quality to them. The point of a grow journal is the document what our plants are doing, what could go wrong, what will go wrong, and what did go wrong. There are some smart guys and girls on this forum who can help you diagnose a problem and find the solution but they can't come over to your grow room and examine your plants. They make their diagnosis from your pictures. So some of the things that we need to worry about, for the sake of a proper diagnosis include:
1. Color
2. White Balance
3. Quality
4. Clarity
5. Lighting
:::::::::::::::::::::::::::::::::::::::::::::
The most important thing to remember about color settings, whether they be on the camera or in post production programs such as image ready or photoshop, is that we want to keep them as close to what our eye sees as possible. Ussually a vivid color setting will saturate your basics (RGB) a little too much. Since we will be taking pictures of plants that are generally going to be GREEN, YELLOW, PURPLE, with hits of RED and ORANGE, I like to keep my camera settings on standard color settings so that no color is over saturated. Look at the examples below to get an idea of how COLOR can make a difference not only in diagnosing a plant problem, but also in the way it displays your plant growth. 1.COLOR
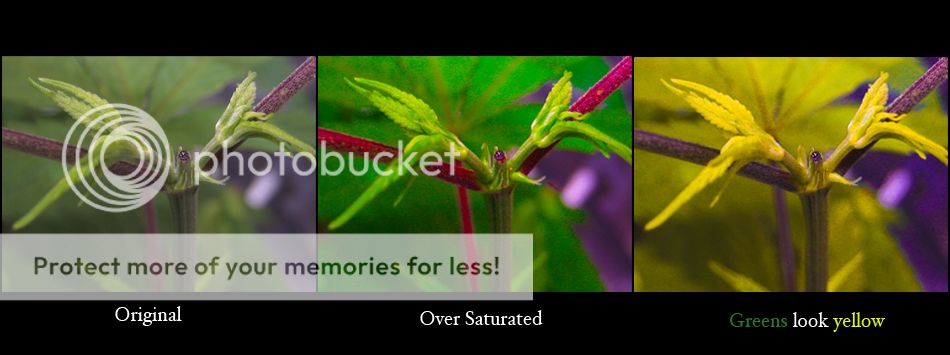
So theres a good example of how color settings can hinder the help you get because different colors determine different problems...
1.WHITE BALANCE
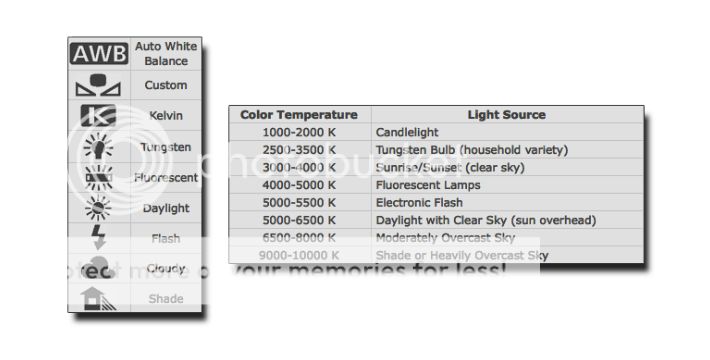
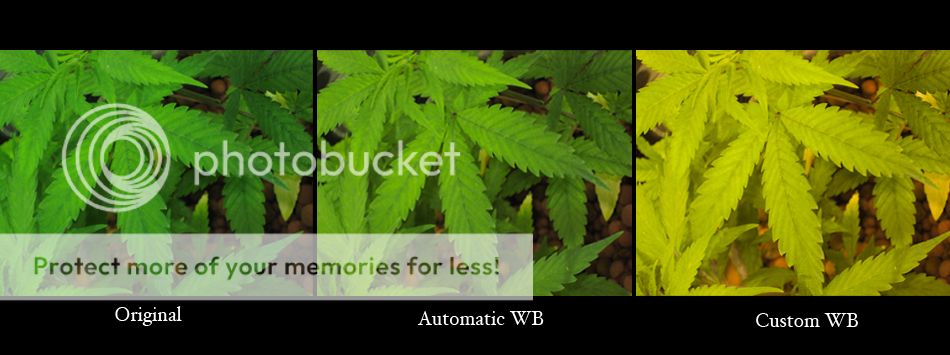
The white balance on your camera determines the temperture at which WHITE is WHITE. For example if you sample your white balance from a gray sheet of paper then the camera is going to adjust the tones to where all your grays will be identified as white. Just about every camera you will buy has a white balance setting/customization. I never recommend using the automatic setting. The best way to balance your levels is with a simple white sheet of paper. Simply go to the custom white balance setting in your camera. Ussualy it will have you point the camera at what you want to be white and then have you push select or menu to set the value. Then take your piece of white paper and hold it next to your plant. Point the camera at the paper and hit select,menu, or whatever button it tells you to press to set the WB. The reason we hold it next to the subject is so that we get the most acurate source of light. here are some White Balance adjustments and how they can change your image...
--------------------------------------------
1.WHITE BALANCE
The white balance on your camera determines the temperture at which WHITE is WHITE. For example if you sample your white balance from a gray sheet of paper then the camera is going to adjust the tones to where all your grays will be identified as white. Just about every camera you will buy has a white balance setting/customization. I never recommend using the automatic setting. The best way to balance your levels is with a simple white sheet of paper. Simply go to the custom white balance setting in your camera. Ussualy it will have you point the camera at what you want to be white and then have you push select or menu to set the value. Then take your piece of white paper and hold it next to your plant. Point the camera at the paper and hit select,menu, or whatever button it tells you to press to set the WB. The reason we hold it next to the subject is so that we get the most acurate source of light. here are some White Balance adjustments and how they can change your image...
The AUTO white balance setting can work pretty well, however it can be unreliable as it evaluates the available light and adjusts for the best picture and not always the most accurate.
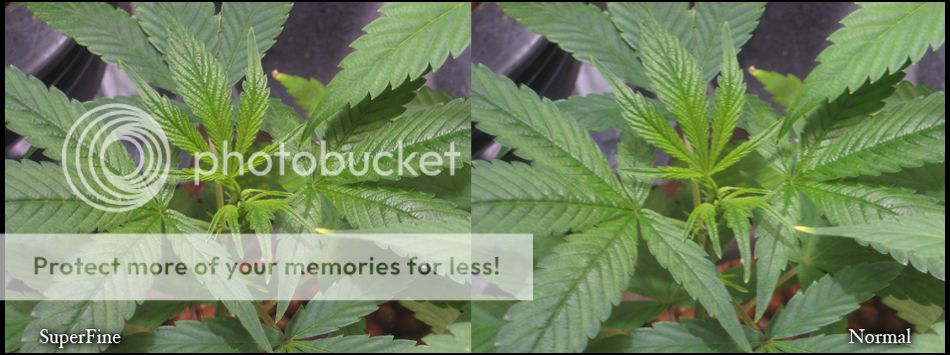
The quality of your image is also very important and there are many variables that can change the quality of the image for better or for worse. First you have your Camera quality which can be determined by Megapixels, Image size, and How fine the pixels render. Most cameras give you options on picture quality however some more user friendly cameras do not. Remember the better the quality the higher the resolution which in turn means the larger the file size. When taking picture of your plants I will recommend using the largest file size and the most clear processing which is usually called 'SuperFine' in your camera settings. Next, after you pictures are taken and are uploaded onto your computer, you need to resize to post. Make sure you keep the aspect ratio the same to avoid distortion and stretching. Never make an image larger than it was taken. Nine times out of ten this will cause the picture to become unclear. I recommend resizing so that the longest side is between 650-850 pixels. Don't worry about megapixels. Most cameras these days are 4+ MP. Anything about 2 is going to work just fine. Here is an example of 2 pictures taken on Normal and Superfine...
--------------------------------------------
3.QUALITY
The quality of your image is also very important and there are many variables that can change the quality of the image for better or for worse. First you have your Camera quality which can be determined by Megapixels, Image size, and How fine the pixels render. Most cameras give you options on picture quality however some more user friendly cameras do not. Remember the better the quality the higher the resolution which in turn means the larger the file size. When taking picture of your plants I will recommend using the largest file size and the most clear processing which is usually called 'SuperFine' in your camera settings. Next, after you pictures are taken and are uploaded onto your computer, you need to resize to post. Make sure you keep the aspect ratio the same to avoid distortion and stretching. Never make an image larger than it was taken. Nine times out of ten this will cause the picture to become unclear. I recommend resizing so that the longest side is between 650-850 pixels. Don't worry about megapixels. Most cameras these days are 4+ MP. Anything about 2 is going to work just fine. Here is an example of 2 pictures taken on Normal and Superfine...
Notice the difference in the images. This can be especially important when taking closeups to help determine the sex of the plant.
4.CLARITY
How clear are your pictures? Camera aside everyone should be able to focus a camera especially since the majority of you are using an auto focus setting. On most cameras to set the focus you simply press half way down on the shutter and it will focus, apply a little more pressure and the shutter snaps capturing your image. I cannot tell you how many out of focus shots I've seen and more often than not they are closeups...some cameras will not be able to focus if you hold the camera 1 inch away from the subject. However, some cameras will have what we call a macro setting. What this setting does is it manipulates the glass in the lens making the user able to focus on subjects at a very close distance. If you have an SLR or DSLR I would recommend getting a pretty good macro lens to help in taking pictures of your trics. The camera I have been using for this how-to is a Canon PowerShot SD750. This camera has 2 different Macro settings. One is what is called a digital macro and the other is a standard macro setting. The standard macro setting focus' using only the lens' optics. Whereas the Digital Macro will digitally focus which allows you to be closer to the subject. The clarity of the images is all on the operator. Just remember the more clear and accurate the pictures are the more likely someone will be able to help you out.
5.LIGHTING
Finally we go over the lighting. As growers we have the advantage of being under some pretty heavy lights. When it comes to shooting under your MH/HPS/FL lights you really don't need a flash. Using a flash under this type of light is going to give you shadows and mess with your colors. New cameras will see that there is pleanty of light and wont fire the flash unless you manually set it to fire. Chances are the flash light is a different temperature than your grow lights so you'll notice a color change and some harsh shadows in your pictures. Another important point is using a flash during the night hours when your lights are off...This is a NO NO! The temperature and intensity of a flash bulb is enough to shock your plant. If you must take a picture during the evening I suggest using a green flourescent bulb and a low shutter speed. This will keep any light from harming your grow, but will give enough light so that a slow shutter speed or high ISO will be able to expose a pretty good shot. For those of you who have no idea what I'm talking about ISO is the digital film speed. On a 35mm camera you can used different speed films. The higher the speed of the film the more silver it contains which makes it more light sensative making a higher film speed better for lower light situations. ISO is just the digital version. The higher the ISO the more light sensative the digital sensor becomes. Also using a slower shutter speed makes it so that the shutter stays open longer allowing more light to pass through the lens. Don't use a flash during the flowering stages on off time.
So I think that's it. If you have any questions in regards to photography or photo editing feel free to ask.
Happy Posting
P.S. I know I forgot something, but I'm way too wasted to think so I'll update as I remember.
--------------------------------------------
4.CLARITY
How clear are your pictures? Camera aside everyone should be able to focus a camera especially since the majority of you are using an auto focus setting. On most cameras to set the focus you simply press half way down on the shutter and it will focus, apply a little more pressure and the shutter snaps capturing your image. I cannot tell you how many out of focus shots I've seen and more often than not they are closeups...some cameras will not be able to focus if you hold the camera 1 inch away from the subject. However, some cameras will have what we call a macro setting. What this setting does is it manipulates the glass in the lens making the user able to focus on subjects at a very close distance. If you have an SLR or DSLR I would recommend getting a pretty good macro lens to help in taking pictures of your trics. The camera I have been using for this how-to is a Canon PowerShot SD750. This camera has 2 different Macro settings. One is what is called a digital macro and the other is a standard macro setting. The standard macro setting focus' using only the lens' optics. Whereas the Digital Macro will digitally focus which allows you to be closer to the subject. The clarity of the images is all on the operator. Just remember the more clear and accurate the pictures are the more likely someone will be able to help you out.
--------------------------------------------
5.LIGHTING
Finally we go over the lighting. As growers we have the advantage of being under some pretty heavy lights. When it comes to shooting under your MH/HPS/FL lights you really don't need a flash. Using a flash under this type of light is going to give you shadows and mess with your colors. New cameras will see that there is pleanty of light and wont fire the flash unless you manually set it to fire. Chances are the flash light is a different temperature than your grow lights so you'll notice a color change and some harsh shadows in your pictures. Another important point is using a flash during the night hours when your lights are off...This is a NO NO! The temperature and intensity of a flash bulb is enough to shock your plant. If you must take a picture during the evening I suggest using a green flourescent bulb and a low shutter speed. This will keep any light from harming your grow, but will give enough light so that a slow shutter speed or high ISO will be able to expose a pretty good shot. For those of you who have no idea what I'm talking about ISO is the digital film speed. On a 35mm camera you can used different speed films. The higher the speed of the film the more silver it contains which makes it more light sensative making a higher film speed better for lower light situations. ISO is just the digital version. The higher the ISO the more light sensative the digital sensor becomes. Also using a slower shutter speed makes it so that the shutter stays open longer allowing more light to pass through the lens. Don't use a flash during the flowering stages on off time.
-=-=-=-=-=-=-=-=-=-=-=-=-=-=-=-
So I think that's it. If you have any questions in regards to photography or photo editing feel free to ask.
Happy Posting
P.S. I know I forgot something, but I'm way too wasted to think so I'll update as I remember.