satica
Well-Known Member
If you are using DWC/Drip/Fogger or any of these combinations in your grow system, then this report may save you time and money.
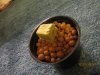
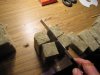
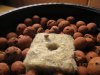
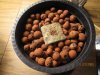
Conventionally, I used to use 1.5'' rockwool cubes in the middle of the Hydroton pebbles in 5 inch pots in my hydroponics system(Photo 1 and 2).
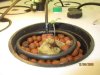
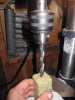
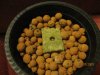
I use 5 inches pots and a Top dripping tube circles the rockwool but do NOT touch it.
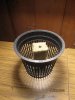
There are 5 holes beneath every circle to distribute a fine, even dripping all around the rockwool for subsequent abundant root formation in all around the pots. (Photo 3)
These 1.5 inches rockwool cubes have been designed to be transfer to another bigger rockwool cube and not designed for this specific but fairly common way.
The downside of this method is because of the short (1.5 inches) height of these rockwools seedling are prone to external damage especially during the pot transports. Fragile roots can be damaged between the pebbles .In the other hand, it is like the hydroton pebbles force the rockwools out of the pots.
The main branch of these seedlings comes out of the rockwool too early simply because they are not deep enough. In reality when you see the seedling are coming out of 1.5 inches cubes(usually around day 2 to 4 of planting the seeds) their root is already out of the cube and very prone to any physical damages. It can be one of the reasons that our previously healthy plant begins to show the signs of weakness because of undetected root damage in first few days of their life.
Another problem is more about the depth and shape of the holes in these 1.5 inches rock wools. For my purpose these holes look small and I do not have enough control of the depth I want to plant my seeds .Using these pre.
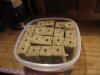
For addressing these two common problems I use a method for making my own rockwool cubes with the hole that is made by me and therefore gives me full control of the depth and height of the cubes.(Photo 4)
Preferably, You need a big slab of rockwool (Photo 5) but you can use 4 inches slabs either.
You need to cut the slabs to make new slabs of 2 by 2 by 3.5 inches .Using a sharp serrated knife with thin blades does the job. The trick is using horizontal movement rather than pushing through the slabs. Otherwise you can squeeze the Rockwool and damage it.(photo 6).
Now you need to make a hole in the center of the slab.this part is very tricky, I use a table drill which gives me the full control of the depth of the hole(photo 7) but if you have a hand drill then move the rockwool toward and not the drill.The depth and the width of the hole should be1/3 of inch( 8 millimeters) so use an eight mm drill bit and mark the first 1/3 of the bit by a permanent marker then you have a guide and will not make the hole deeper than 1/3 of inch.
I must say here, these numbers are not from bible but I strictly use them and since then have had a better result both in germination rate and overall result.the size of the seeds is the deciding factor here, and if your seeds are small (like nirvana White Widow for instance) then you can make the holes smaller and shallower like 6 mm.
I use the same size of hole for almost all the seeds as small as White widow and as big as Satori and Hashberry(Mandala seeds company).
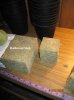
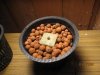
Next steps are easy .just place the slab in the middle of the pot(Photo 8 ) and as you keep it with one finger in place fill the pot with hydroton pebbles to the level of the slab(photo 9).
Now put the dry seed( DO NOT PRESOAK THE SEEDS IN WATER OR TISSUE) in the middle of the hole and cover the seed by a small fluff of coco fibers(Photos 10,11,12).Do not press the coco fibers just enough to cover the hole and cover the seed. Adjust PH between 5.8 to 6( 6 is the PH suggested for coco fibers) and 5.6 for rockwool so 5.8 to 6 seems perfect.
Now water the rockwool for the first time by your hand until it is completely soaked in water ( if you presoak rockwool slabs then you can do all the steps with a wet rockwool).
I water them once a day until they come out of the rockwool (or lets say coco fibers) then you can attach to your schedule of feeding.
I must say since using this method the result has been much reliable than using conventional slabs especially no case of non popped seeds. (Photo 13)
Good luck
Conventionally, I used to use 1.5'' rockwool cubes in the middle of the Hydroton pebbles in 5 inch pots in my hydroponics system(Photo 1 and 2).
I use 5 inches pots and a Top dripping tube circles the rockwool but do NOT touch it.
There are 5 holes beneath every circle to distribute a fine, even dripping all around the rockwool for subsequent abundant root formation in all around the pots. (Photo 3)
These 1.5 inches rockwool cubes have been designed to be transfer to another bigger rockwool cube and not designed for this specific but fairly common way.
The downside of this method is because of the short (1.5 inches) height of these rockwools seedling are prone to external damage especially during the pot transports. Fragile roots can be damaged between the pebbles .In the other hand, it is like the hydroton pebbles force the rockwools out of the pots.
The main branch of these seedlings comes out of the rockwool too early simply because they are not deep enough. In reality when you see the seedling are coming out of 1.5 inches cubes(usually around day 2 to 4 of planting the seeds) their root is already out of the cube and very prone to any physical damages. It can be one of the reasons that our previously healthy plant begins to show the signs of weakness because of undetected root damage in first few days of their life.
Another problem is more about the depth and shape of the holes in these 1.5 inches rock wools. For my purpose these holes look small and I do not have enough control of the depth I want to plant my seeds .Using these pre.
For addressing these two common problems I use a method for making my own rockwool cubes with the hole that is made by me and therefore gives me full control of the depth and height of the cubes.(Photo 4)
Preferably, You need a big slab of rockwool (Photo 5) but you can use 4 inches slabs either.
You need to cut the slabs to make new slabs of 2 by 2 by 3.5 inches .Using a sharp serrated knife with thin blades does the job. The trick is using horizontal movement rather than pushing through the slabs. Otherwise you can squeeze the Rockwool and damage it.(photo 6).
Now you need to make a hole in the center of the slab.this part is very tricky, I use a table drill which gives me the full control of the depth of the hole(photo 7) but if you have a hand drill then move the rockwool toward and not the drill.The depth and the width of the hole should be1/3 of inch( 8 millimeters) so use an eight mm drill bit and mark the first 1/3 of the bit by a permanent marker then you have a guide and will not make the hole deeper than 1/3 of inch.
I must say here, these numbers are not from bible but I strictly use them and since then have had a better result both in germination rate and overall result.the size of the seeds is the deciding factor here, and if your seeds are small (like nirvana White Widow for instance) then you can make the holes smaller and shallower like 6 mm.
I use the same size of hole for almost all the seeds as small as White widow and as big as Satori and Hashberry(Mandala seeds company).
Next steps are easy .just place the slab in the middle of the pot(Photo 8 ) and as you keep it with one finger in place fill the pot with hydroton pebbles to the level of the slab(photo 9).
Now put the dry seed( DO NOT PRESOAK THE SEEDS IN WATER OR TISSUE) in the middle of the hole and cover the seed by a small fluff of coco fibers(Photos 10,11,12).Do not press the coco fibers just enough to cover the hole and cover the seed. Adjust PH between 5.8 to 6( 6 is the PH suggested for coco fibers) and 5.6 for rockwool so 5.8 to 6 seems perfect.
Now water the rockwool for the first time by your hand until it is completely soaked in water ( if you presoak rockwool slabs then you can do all the steps with a wet rockwool).
I water them once a day until they come out of the rockwool (or lets say coco fibers) then you can attach to your schedule of feeding.
I must say since using this method the result has been much reliable than using conventional slabs especially no case of non popped seeds. (Photo 13)
Good luck
Attachments
-
 34.1 KB Views: 23
 -
 63.6 KB Views: 19
 -
 53.4 KB Views: 23
 -
 49.9 KB Views: 17
 -
 107.1 KB Views: 18
 -
 56.2 KB Views: 17
 -
 60.7 KB Views: 19
 -
 57.5 KB Views: 18
 -
 50.7 KB Views: 17
 -
 60.5 KB Views: 18
 -
 60.2 KB Views: 18
 -
 67.5 KB Views: 16
 -
 68.7 KB Views: 17