I would first like to say that it is not me that invented or coined the phrase or technique, nor will I trying to pretend I know what I am doing lol. I do not know the origins other technique and will not try and take any credit for what I have learned, and what information I present. For more detailed read on this technique please refer to THIS thread.
Now on to where I am at right now. My camera arrived late so unfortunately I have no documentation of the build process. On the other hand I am sure anyone can find a DIY grow box tutorial somewhere online . The interesting stuff is what I am in the process of doing and learning right now. So if you buckle up and sit back we can all learn together.
The acronym "TAG" is nothing special... it stands for "TRUE AERO GROWING". This method of aeroponics is no different than any other "true" aeroponic sytems. The difference in this technique though is that we will want to optimize and try and perfect the aeroponic root zone environment or TAE ("TRUE AERO ENVIRONMENT"). There are many off the shelf aero systems, but perform in more of an NFT type of way. By this I mean that these system actually coat the root zone with a film of water. TAG on the other hand does coat but instead "mists" the root zone. TAG does not saturate the root zone like those off the self systems. Now that you have a familiarity with TAG I will move onto my setup. If you are interested in trying out TAG for yourself I am sorry but as of right now I cannot help you. We much do out research together and help out one another as we learn. Please check out the link and that site as well... lots of info to be learned in that thread.

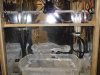
Ok so here is my system as it stand right now in my garage. As you can see there is still lots of work to be done here. I am still waiting on my CMH HID light, and ballast to arrive, and I also just bought the CAP timer that I will need for my irrigation cycles. As for right now I have my plumbing, and drainage in place work as intended.

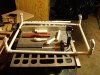
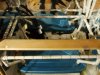
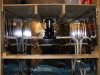
Here you can see the pump and the plumbing lines from the res to the root chamber.

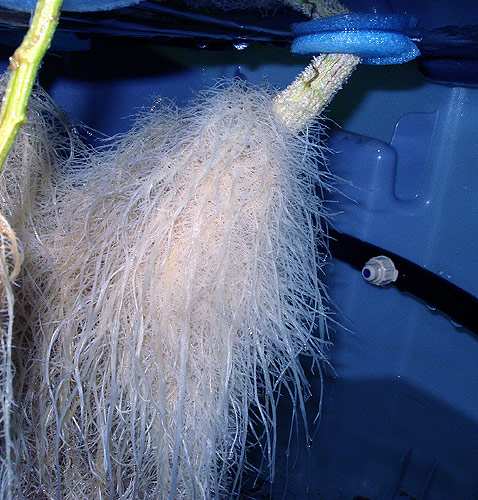
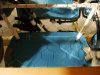
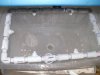
Here is a picture of the misting system within the root chamber. Believe it or not these misters are on full blast, so you see what I mean by a very fine "mist", my camera is 8.3Mp and the mist is still to fine for it to see. You can also see how I configured the drainage back to the res. I just simply cut a hole in the bottom of the root chamber, and the lid of the res. I placed a piece of 2 1/4" PVC pipe in the hole and siliconed it very cleanly. I also siliconed the other side of the tote (that sits on the lid), and both sides of the lid.

You can see the part of the PVC drain as it comes into the res. lid. I was actually very happy with how well it worked out in terms of neatness, clean looking and functionality.
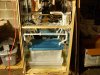
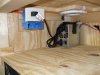
The grow box is powered by it's own power outlet that simple plugs into the wall. From withing the box I will be placing two power strips that will have all the timers and whatnot. I still need to do some drilling for the wires to run, and I was also thinking about running the wires through PVC pipe to make it look all neat and clean. In this picture you can see the outlet box and the pump power supply unit.

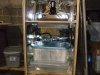
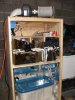
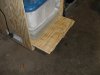
My exhaust hole is right above the PSU and pulls from a heater grate that I installed at the bottom left side of the box. I used a heater grate so that I can shut the grate closed when the lights go out. You can also see that I made it so that the floor can roll in and out. This make res changing a lot easier on the back, that is if I ever come into the situation that I need to lift it out.

I wanted to make sure that I could remove my light and the shelf with ease as well. I did this so that maintianence would be easier if another situation should ever arrive. I installed a dimmer switch on the Votex fan but now I get a humming noise if it not on full blast. I am hoping that I can figure out how to get around having to hear that buzzing sound with out having to go and buy the votex fan controller.

Well I believe that is all I have for you all right now but I will be around often. If you have any questions regarding my setup by all mean feel free to ask. If you have any suggestion or tips that you think will come in handy please post your mind. If you have any TAG questions I will try to help but like I said before we are learning this together. There is a ton of TAG info on the forum that I linked you too earlier, do not just read that one link and expect everything to be fine. Research with me fellas and share everything that you learn with the rest of us. Enjoy the show fellas.
Now on to where I am at right now. My camera arrived late so unfortunately I have no documentation of the build process. On the other hand I am sure anyone can find a DIY grow box tutorial somewhere online
The acronym "TAG" is nothing special... it stands for "TRUE AERO GROWING". This method of aeroponics is no different than any other "true" aeroponic sytems. The difference in this technique though is that we will want to optimize and try and perfect the aeroponic root zone environment or TAE ("TRUE AERO ENVIRONMENT"). There are many off the shelf aero systems, but perform in more of an NFT type of way. By this I mean that these system actually coat the root zone with a film of water. TAG on the other hand does coat but instead "mists" the root zone. TAG does not saturate the root zone like those off the self systems. Now that you have a familiarity with TAG I will move onto my setup. If you are interested in trying out TAG for yourself I am sorry but as of right now I cannot help you. We much do out research together and help out one another as we learn. Please check out the link and that site as well... lots of info to be learned in that thread.
Ok so here is my system as it stand right now in my garage. As you can see there is still lots of work to be done here. I am still waiting on my CMH HID light, and ballast to arrive, and I also just bought the CAP timer that I will need for my irrigation cycles. As for right now I have my plumbing, and drainage in place work as intended.
Here you can see the pump and the plumbing lines from the res to the root chamber.
Here is a picture of the misting system within the root chamber. Believe it or not these misters are on full blast, so you see what I mean by a very fine "mist", my camera is 8.3Mp and the mist is still to fine for it to see. You can also see how I configured the drainage back to the res. I just simply cut a hole in the bottom of the root chamber, and the lid of the res. I placed a piece of 2 1/4" PVC pipe in the hole and siliconed it very cleanly. I also siliconed the other side of the tote (that sits on the lid), and both sides of the lid.
You can see the part of the PVC drain as it comes into the res. lid. I was actually very happy with how well it worked out in terms of neatness, clean looking and functionality.
The grow box is powered by it's own power outlet that simple plugs into the wall. From withing the box I will be placing two power strips that will have all the timers and whatnot. I still need to do some drilling for the wires to run, and I was also thinking about running the wires through PVC pipe to make it look all neat and clean. In this picture you can see the outlet box and the pump power supply unit.
My exhaust hole is right above the PSU and pulls from a heater grate that I installed at the bottom left side of the box. I used a heater grate so that I can shut the grate closed when the lights go out. You can also see that I made it so that the floor can roll in and out. This make res changing a lot easier on the back, that is if I ever come into the situation that I need to lift it out.
I wanted to make sure that I could remove my light and the shelf with ease as well. I did this so that maintianence would be easier if another situation should ever arrive. I installed a dimmer switch on the Votex fan but now I get a humming noise if it not on full blast. I am hoping that I can figure out how to get around having to hear that buzzing sound with out having to go and buy the votex fan controller.
Well I believe that is all I have for you all right now but I will be around often. If you have any questions regarding my setup by all mean feel free to ask. If you have any suggestion or tips that you think will come in handy please post your mind. If you have any TAG questions I will try to help but like I said before we are learning this together. There is a ton of TAG info on the forum that I linked you too earlier, do not just read that one link and expect everything to be fine. Research with me fellas and share everything that you learn with the rest of us. Enjoy the show fellas.
Attachments
-
 79.2 KB Views: 1,844
 -
 72.4 KB Views: 1,864
 -
 45.3 KB Views: 1,799
 -
 19.5 KB Views: 1,808
 -
 56.6 KB Views: 1,786
 -
 52.6 KB Views: 1,797
 -
 66.5 KB Views: 1,812