ocgrower420
Member
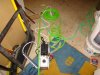
This is the vacuum chamber I am currently using. Its literally perfect cheap and super easy.
Supplies:
Vacuum pump (15 microns)
Vacuum hoses
Vacuum Gauge
Ball valve
Paint pressure pot
Some fititngs and such
quick connect and disconnect things for air compressors
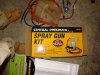
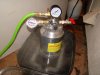
I was at harbor freight the other day. I saw some paint spray gun kits. They had a nice 2 gallon paint pressure pot but non in stock it would work great for purging large amounts of oil. So instead for 40 bucks i picked up a smaller one. Make sure you get the one i have in my pic as many other paint pressure pots have faults in the way the lid secures and the way the ports are. This one is super simple and super reliable. You can also get your self a vacuum gauge off of the brake bleeder they sell. Another thing is make sure you either get a vacuum hose at an hvac store or a air compressor hose that DOES NOT swivel. Fist things first the fittings are 1/4. So i had an 3/8 inch ball valve laying around and some connectors so i used that instead of a easy fit 1/4 inch. Back to the design. Right now the one in the pic is not 100 percent finished plus i really need to invest into a lab grade hot plate. But to start things off there is a t connector with the psi gauge. YOu can either leave it on or replace with a vacuum gauge. But i wouldnt do that because you have another spot where you could create a leak plus its a pain to remove. SO i would leave it on. So attach your vacuum gauge to on side of the tee and your ball valve to the other. This will be used to let air back in so you can take the lid off the canister. After that is complete i would attacha quick disconnect and connect where you will attach your hose. This is the only other open port on the canister and its behind the t connector. THis is where you want to attach the hose to the chamber. What is do is turn on the pump let it vacuum all the way. I then close the ball valve that the hose is attached to( this valve is already pre installed) and disconnect the hose. But i dont have a quick disconnect on it now but i still close it. Then i release it with the other ball valve on the t connector. The reason for this is to act as a cap or a pressure release. You could use the other valce but just make the valve on the t connector your pressure release valve as this is the easiest and best way. Make sure you obviously wash the container out and such. happy purging")
Supplies:
Vacuum pump (15 microns)
Vacuum hoses
Vacuum Gauge
Ball valve
Paint pressure pot
Some fititngs and such
quick connect and disconnect things for air compressors
I was at harbor freight the other day. I saw some paint spray gun kits. They had a nice 2 gallon paint pressure pot but non in stock it would work great for purging large amounts of oil. So instead for 40 bucks i picked up a smaller one. Make sure you get the one i have in my pic as many other paint pressure pots have faults in the way the lid secures and the way the ports are. This one is super simple and super reliable. You can also get your self a vacuum gauge off of the brake bleeder they sell. Another thing is make sure you either get a vacuum hose at an hvac store or a air compressor hose that DOES NOT swivel. Fist things first the fittings are 1/4. So i had an 3/8 inch ball valve laying around and some connectors so i used that instead of a easy fit 1/4 inch. Back to the design. Right now the one in the pic is not 100 percent finished plus i really need to invest into a lab grade hot plate. But to start things off there is a t connector with the psi gauge. YOu can either leave it on or replace with a vacuum gauge. But i wouldnt do that because you have another spot where you could create a leak plus its a pain to remove. SO i would leave it on. So attach your vacuum gauge to on side of the tee and your ball valve to the other. This will be used to let air back in so you can take the lid off the canister. After that is complete i would attacha quick disconnect and connect where you will attach your hose. This is the only other open port on the canister and its behind the t connector. THis is where you want to attach the hose to the chamber. What is do is turn on the pump let it vacuum all the way. I then close the ball valve that the hose is attached to( this valve is already pre installed) and disconnect the hose. But i dont have a quick disconnect on it now but i still close it. Then i release it with the other ball valve on the t connector. The reason for this is to act as a cap or a pressure release. You could use the other valce but just make the valve on the t connector your pressure release valve as this is the easiest and best way. Make sure you obviously wash the container out and such. happy purging