White Rhino under CFLs

rocksteady6

Well-Known Member
Hi all. Thanks for stopping by. This is my second grow but the first one is still going it just didnt go so well. Started with 3 plants and ended up with one outside. Anyway i am going to start two fem'd white rhino seeds very soon and needed some help on my grow area.
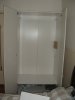
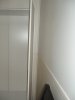
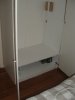
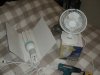
I am going to use an unused cabinet as was the same idea in the first grow but i obviously want things to improve this time round. I have done a few tests on it with the light on and no ventilation other than an oscillating fan blowing in the CFL as well as the doors closed. Today was hot where i am and it reached a pretty stable 32C.
This need to change so my first port of call is to get some good advice from some that know me and also maybe some new people who may be interested. The cabinet is 164cm/65in tall, 96cm/38in wide and 58cm/23in deep. I have 2 computer fans being delivered in the next few days and wasnt sure where i should put them for maximum effect. I will post some pictures so you can see the area. The reason there are a few at different angles is because i am sure the way the cab sits will effect air flow from the in/out take directly. I am not sure whether to go with the fans used for : one in and one out, two out with passive intakes, or even two intakes with passive outs but that i dont believe would be a good move unless someone that knows better can tell me. Also i would rather jigsaw the holes in the best position from step 1. Anway here are some pics.
I obviously appreciate advice from CFL and HID growers alike.
 

Attachments

del66666

Well-Known Member
is that a 125 cfl? how many you using? id invest in an inline fan and carbon filter, could use bathroom extractor fan but that wont help with the smell, should be able to get 600watts of cfl in that space pretty easy, good choice with rhino, fairly hardy plant.
 

rocksteady6

Well-Known Member
Welcome Del. Yes its a 125w 6500k cfl. I have another one in the 2700k range that i will use simutaneously when the plants need it. I am only going to grow these 2 babies small. I actually think one might die in the process knowing my technique. I am thinking two-three weeks veg and then into flower. As friends stay in that spare bedroom i cant have an inline fan thats why i have opted for the 2 computer fans. I will look into a home made carbon filter when the time comes. Thanks for your suggestions Del. Good to hear that the rhino is hardy. I also have a few 28w CFLs in various spectrums for side lighting when needed.
 

rocksteady6

Well-Known Member
Hi dude is this your new thread? - STELTHY :)
Yes stelth. Now give me some of your handyman knowledge. I want to have the outake on the right close to the wall but will the proximity to the wall make it hard for the little fans to exhaust the hot air? I also wanted the intake on that side but that would mean the air is not travelling across the grow area which i think would be beneficial. The rhino seeds are going into a mix of 70% perlite 30% potting mix tonight before bed.
 

stelthy

Well-Known Member
Welcome Del. Yes its a 125w 6500k cfl. I have another one in the 2700k range that i will use simutaneously when the plants need it. I am only going to grow these 2 babies small. I actually think one might die in the process knowing my technique. I am thinking two-three weeks veg and then into flower. As friends stay in that spare bedroom i cant have an inline fan thats why i have opted for the 2 computer fans. I will look into a home made carbon filter when the time comes. Thanks for your suggestions Del. Good to hear that the rhino is hardy. I also have a few 28w CFLs in various spectrums for side lighting when needed.
:leaf:

Firstly, that is a nice sized cab. its actually bigger than mine so fitting everything in will be a sinch! Those 125w bulbs are pretty bright, you'll get 2 going well with that, despite only 125w's the PAR is exact for the plants needs! Ok lets get started, If you use a circular hole saw and cut a hole in the bottom left or right hand corner (at shelf level,or a couple inchs highter) about 1/2 a cm smaller thant the circumference of the CPU fan's blade diameter, have this as your intake so air is pulled in with this fan, you can put a thin ammount of draft excluder strip around the outside edge of the fan (around the square part), so that when you screw it in place it'll reduce noise and vibration, and create a nice seal! if you place your other CPU fan bang in the middle of the top of the unit (inside), use the same technique as the other one to install and suck/blow air out! using a small ammount of draft excluder to seal this one too! Now wire these 2 CPU fans together, to a single plug! you could install a lighting dimmer switch at this point to act as a fan speed controller! less speed for cold days more speed for hot! the reason to wire them together is... providing you make your unit air/light proof (excluding your CPU fans), when you turn your fans on (use a timer - an hour on 20 mins off etc) running them will create a negative pressure and allow a greater amount and speed of air exchange, Ok, now that your fans are installed (and working like clockwork) take a min to look at light gaps, put a lamp or bright torch in side when its dark and jot down where cracks of light are visable! remove the lamp/torch and use silver duct tape or another very strong adhesive tape, and fold it in long strips all around the corners, down the middle of the back pannel to! so when you open and close the door you feel a vacume if you not to bothered about the look of it you can also seal all these gaps from the outside too! this will just leave the doors to sort out! Staple gun a blackout PVC curtain, to hang down from the top front edge ( I plan to do this when I do my 400w HPS project next!) you can now roll it up - opening the entrance to your grow space, this will stop light from comming in or excaping, at light sensitive times! when you ve rolled it right to the to where its joined by a neat fixing of staples attach 2 belt like straps to hold up the curtain, so you can work on them, take pics etc with out it pissing you off and rolling back down again! use the long draft excluder rubber stuff that comes in thin roles, and put this around the out side edge of the doors and outside edge of the unit, this will create a nice air/light tight space for your ladies and allow you to have more control over them :) Ok I see you have a low bottom shelf! you can copy my idea if you like! use this space to store all your nuits and extra growing stuff... select your tallest nuitrient container, or largest item you want to store in there!and fix the shelf 1cm above that, you will now have a stealth storage unit enclosed in you cupboard, keeps things tidy, out of harms way and away from nosey peeps who you want to know as little as poss. - If anything at all! - I'll post more info in a bit I need to eat lol - STELTHY
 

stelthy

Well-Known Member
PS/ are you ok with me posting pics etc on here either with parts of my set-up or other pics and info I have to help you make this probably one of the best cabs around......second to mine lol :) Its a quality sized unit I am exited about helpin ya :) As I am waiting to Harvest I am kinda bored cos all my latest pics look the same :) write back soon cheers mate :) - STELTHY
 

rocksteady6

Well-Known Member
You are a legend Stelth. Just the advice i needed. Keep it coming. I did a few light tests today where i opened the shutters on the windows in that bedroom and also turned on all the lights near by and climbed in the cupboard and closed the doors. Its completely light free except for the slit where the two doors meet. You have already solved that issue. The seeds are now in the mix and hopefully in a few days i will have something worth reporting. Just the heat issue to deal with.
 

rocksteady6

Well-Known Member
PS/ are you ok with me posting pics etc on here either with parts of my set-up or other pics and info I have to help you make this probably one of the best cabs around......second to mine lol :) Its a quality sized unit I am exited about helpin ya :) As I am waiting to Harvest I am kinda bored cos all my latest pics look the same :) write back soon cheers mate :) - STELTHY
haha. Of course mate. Post away. Your setup rocks and i need the help.
 

eightenough

Well-Known Member
hey rocky, good luck with the white rhino. i am subbed. when there is movement at the station keep the pics flowing. awesome cant wait.
8E:leaf:.
 

stelthy

Well-Known Member
I figured this is the easiest way I can show you things, I mean Ill guide you through things as well but not all my pics are relavent :), where the dotted line is down the center .. If you cover this with tape this will stop light, smell, warmth from excaping! it will also help to strengthen it, Its always good to strengthen things when you can and tape is not expensive so thats a nice easy cheap mod. - STELTHY
 

stelthy

Well-Known Member
Even though I haven't shown it in this diagram lol (after all that effort) lol, tape right from the bottom all the way up to the top!
 

stelthy

Well-Known Member
I have installed my CPU intake at the bottom left... it doesn't really matter so Ive depicted it on the right ...where you want it :). My rushed shitty diagrams show the air being 'sucked in' As long as you have a couple of inches before the wall the liitle intake fan will have no probs drawing in air! I would however stretch some womens tightes or a breathable cloth and band it in place so it doesnt interfear with the blades..this will stop fluff, dust, lint, bugs etc from entering and possibly causing you a great deal of probs! - STELTHY:leaf:
 

stelthy

Well-Known Member
I taped it with silver tape on the inside and color coded the fan with metallic silver paint. you could color code yours with white spray paint if you wanted, its all about making things inside the room reflective (and it looks nice) And I used self sticking pvc trunkin (small to hide the power wire/s) protecting the wires from being pulled by accident, avoiding possible shocks and also to avoid water whilst misting etc from coming in contact with the wires, and keeping your saftey in check! - STELTHY
 

stelthy

Well-Known Member
The intake will blow a nice breeze across you ladies and will help lift heat up away from your 125w CFL, more so when your elevated out take is installed! Another thing I forgot to put in this pic is :- on your shelf, in the center install 2 fans blowing upwards 1 on the left and 1 on the right, (about 2" away from either side), cut holes with a circular saw and install the fans (slightly smaller than your in and out takes!) this will push the air up away from your ladies forcing hot/warm air up towards your exhaling fan! and also as your ladies grow.. will aireate the underside of your leaves helping with photosynthisis! - STELTHY
 

stelthy

Well-Known Member
This is a very good place to put your exhaling fan, since heat rises, the hottest place, without venting will remain at the bottom (bad) or in the mid section of your room (also not great) so Install your out-take on the inside of your cupboard at the top sucking/blowing air out, if the room is airtight the air change over will be rapid and temps will not be an issue! with just 1 125w CFL heat shouldn't be a prob for you anyhow :) BUT.......... As you ladies grow and enter the FLOWERING stage smell becomes intense so a small CAN/other small carbon filter is the way to go! believe it or not once the doors are shut and its all running the in-line fan (4" or 5" is incredibly quiet) ill post a pic of mine... its not to expensive and will serve you better than well! - STELTHY
 

bigman4270

Well-Known Member
This is a very good place to put your exhaling fan, since heat rises, the hottest place, without venting will remain at the bottom (bad) or in the mid section of your room (also not great) so Install your out-take on the inside of your cupboard at the top sucking/blowing air out, if the room is airtight the air change over will be rapid and temps will not be an issue! with just 1 125w CFL heat shouldn't be a prob for you anyhow :) BUT.......... As you ladies grow and enter the FLOWERING stage smell becomes intense so a small CAN/other small carbon filter is the way to go! believe it or not once the doors are shut and its all running the in-line fan (4" or 5" is incredibly quiet) ill post a pic of mine... its not to expensive and will serve you better than well! - STELTHY
Hey Rock,

Looks like you have some awsome help with that cab. Can't wait to see how she turns out.

Subed.

:peace:

Big
 

stelthy

Well-Known Member
On the left is a small CAN filter (about the size of a tin of Roses chocs :) ) then a small amount of perferated ducting this 'Perferated ducting' will limit the heat of the exhaling breeze and also help to keep things running quiet :) next is the in-line 'SYSTEMAIR' fan suspended by bunjee cords attached to hooks, this will stop vibration (unwanted noise) then more perferated ducting which leads straight out the top and into another small CAN filter (double purification) + minimal noise output! you can buy connecters so the inside ducting will sit snug around the inside part of the connector and the top part of the connector will stick out the top barely a couple of inches! - your second small filter sits straight on top! Job done this will help you no end, has worked really really well for me so this advise is good advice :) - STELTHY PS/ the CAN filters are 30uk pounds, the ducting is 5uk pounds per meter, the AWESOME in-line fan! is just short of 50uk pounds and is a great bit of kit, if money is a prob, try n get by with just your top exit CPU fan, but once budding begins you'll see how much you need this setup. And them with a bit of the harvest use it to buy this upgrade for your next grow :) also I put in a chrome finished smoke alarm...piece of mind if thing decide to go wrong!! - STELTHY
 

stelthy

Well-Known Member
Ok this is the top of the cupboard, on the far left is the out side CAN filter the inside perferated ducting on the left is leading to! I placed an ONA air purifier in the indent of the filter so exhaled air has an extra bit of cleaning before its unleashed into the room....as a result no smell at all :) Dont worry abouth the suspended biscuit box in the middle this is for my 'HYDROPONIC' air pump...If you change from soil to DWC I'll explain in the future :) and the fan on the end has been scraped so don't worry about that either :) However the top of your unit is also a good place to hide plugs etc... But the point of this pic is just to show you where the inside ducting goes to once its fed outside the growroom - STELTHY
 

stelthy

Well-Known Member
After you feel happy with covering all the joins in your unit with silver tape, next is to sort out the face part! In this pic I have detailed where sticky draft strips would be bennificial :) Ill post a pic of mine if that helps!...I rushed the pics lol - STELTHY
 
Top