phenob
Active Member
Somewhere, in an ancient, forgotten corner basement of a mysteriously extensive OC datacenter, a mad philosopher of science labors tirelessly through the night in search of .. in search of .. well, something intersting. That's me.
I've lurked here for a looong time, no need to ask a thing with such a wealth of knowledge already compiled. Thank you everyone. Not many of my ideas are new, but it's time I've posted the project. Hopefully it helps someone out. I will post a materials list, etc asap.


This design was based almost entirely on a stealth metal storage cabinet build by FullMetalJacket documented here: https://www.rollitup.org/grow-room-design-setup/70716-building-stealth-super-cabinet-least.html THANK YOU FMJ, your work and documentation made this build much easier. If you're still around, pm me any time you're in so cal.
I had been working on a design for something like this for months, found his build journal after some random completely unrelated search and knew I had to get serious. I've made a few changes, mostly dropping the price of the build substantially. I bought non-matching cabinets on craigslist, used a rotozip rather than a plasma gun, stuff like that. I do have to say, at each step of the way I tried various ideas to improve on the design, and at almost every point I reached the same conclusion as FMJ, so hats of to you man. I know you did one hell of a bunch of homework on every aspect of your design, and you were dead on. You proving the 600W would work out in the small space was really great to know ahead of time. Especially thanks for sending me toward S&P fans and elastomeric paint.


One large chamber as vege or flower chamber or both. Small chamber housing mothers etc, and another large chamber will be built on the right, identical to the other large cab. This way I can rotate harvests to around every 4 or 5 weeks max, without worrying about what strains are in vege behind and this is ready but the flowers arent yet or blah blah. Throw em in the cabs, swap the lightbulb as needed, game on.


The build has a metal cabinet, heavier gauge steel, 36Wx24Dx78H, with the 6 x 19" cooltube on 600W. It's running a 600w MH conversion to start, with a HPS ready when needed. Two holes in the top provide incoming air for the cooltube and the chamber itself. Exhaust is 2X S&P TD-200 fans, one pulling through a Can-33 filter.

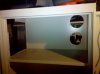
The smaller cabinet is 30Wx18DX72H, and divided into three air-separate chambers. The top chamber houses fans and guts for chamber 1. The exhaust is ducted right out of the rear of the cab.
The chamber below is empty for now as I put the current build through a test run. This way I can improve as much as possible before building another cabinet identical to the big one. When complete, this will have about the same stuff as the chamber above, feeding another large cab on the right side.

The bottom half of the smaller cab is a small T5 lit vege/mother chamber. Exhaust is a panaflow 120mm fan (jacked from my own personal workstation..) wired to a 9v power supply, with a smaller hole and crappy filter for incoming air. I have not paid much attention to ventialtion, filtering, etc here. Going to see what I can get away with, and if problems I will add a proper charcoal filter, etc. There is currently no thermostat here. This is on the short list of items to add, but even without it the chamber stays between 74 and 64f.
Chamber 2 has a shelf that can be stuck in to divide it in half, resting on the ledge. This ledge is also perfect to stick clones in little cups, stuff like that. I'll almost certainly add more lighting in here later, especially some light down in the lower half.
Mothers in here will be kept in small hempy bucket setups, manually watered. Later I may add a very small ebb and flow sort of system to flood hempy buckets above the drain hole for a minute or two each day, should do the trick. This chamber may yet be used for DWC, so we'll see how the test run works out.
After cutting, the inside walls of both cabinets were sealed for small leaks, had to seal existing ventilation holes, slits in the cabs. None were the slightest of problems, just slap some metal tape over both sides.
After sealing, I applied the first modification from FMJ's design. I used 1/2" styrofoam insulation instead of fatmat. I figured this would be a little more effective against the type of noise and vibration that will be generated in the cabs, and would also really help keep a constant temperature. I used heavy duty liquid nails to hold the styro in place (probably pointless, i don't think it adhered to either the metal or the stryo, which has a plastic film on both sides). Once cut to size, the styro pretty much tension held itself in place, allowing me to drop a SHITLOAD of caulk into all the cracks and seams.
Seriously, if you do this, don't even think "hmm i bet i just need one more tube of caulk" .. forget it. Buy 5. There is no end. I used Alex brilliant white caulk, couple of bucks a tube no matter where you get it. Works fantastically.
Everything then got 2x coats of Kilz 2 and 3x coats of Henry elastomeric roofing paint. Since we're painting on styrofoam it took extra drying time and extra attention to detail, but it came out fine, and really does a great job of sealing every possible little crack or hole, and is designed to flex so it won't crack when I flex the cabinets moving them around. This is especially good since these used metal cabinets have plenty of curve to the walls.
(Quick note on elastomeric roofing paint. I used Henry, but I suspect the Kool Seal brand that FMJ used is much better for our purposes. No doubt his pics are much, much more reflective than mine. I am going to special order the Kool Seal stuff for another 3 coats once the scrog screen etc are ready and will see what difference it makes.)

I later added a solid sheet of plywood to the back of the big cab. Was going to do the same to the bottom half of the little one but forgot about it before pushing them back into place. Oh well, that's how I roll sometimes. Blame Romulan.
Plywood is so I can drop a screw any damn place I want on the back walls and it will sink into something. This is used to mount the EVC and a small shelf, other random bits. The scrog screen isn't built yet, but the plan is to mount it on the back wall on hinges so that it can be lowered into place or pulled out of the way without any unscrewing or storage or bs. Like a murphy bed. Murphy scrog.


I opted to upgrade DWC totes for a 5-day cooler-based reservoir. My hope was that it would help keep a stable res temp despite seasonal fluctuations in room temp from 50f - 90f+. No air conditioning where this is stashed so every bit counts. I could not be more satisfied. In the month or so since this has been built, the room has been from 60f - 92f, and the res has stayed dead on pegged from 65f - 68f. The removable pot ports make access very easy for whatever needs doing down there, and the metal tape lining makes leakage and seepage a non-issue while providing some extra reflectivity, definitely helping keep res temp down.
I cannot stress how well this cooler res has worked out. I have a few modicifications in mind for the next run, then I'll post a run down specifically for the res build. Quickly though, it can hold 6x 5" net pots, with two small access holes for air tubing or whatever, and a 7th 5" hole incase I ever need to throw frozen bottles in there. The 7 hole is where I currently dangle the tri-meter probes, lightly taped into place so they dont flow around in the current.
Holes 1 - 6 have 4" airstones directly below. These are currently powered by a $10, 2 port air pump from a hydro shop, and a $40 omg super quiet silent best thing ever pump from petco. Both are equally shitty (never buy any air stuff from petco except tubing, lesson learned), but good enough for now. All holes have bubbly rolling surfaces so we're good. Air pump upgrade is on the short list. The res holds about 13.8 gallons, a little less as I pull the water level down some.
Wires for probes and webcams run through a port on the left side of the cab, just a hole sealed with metal tape. There is a desk and workstation on the left, with a piece of plyboard on the wall where gauges are mounted. I've had to come up with a crafty way to get the right light on to the gauges, glare was a pain in the ass. Picked up a cheap cfl and mounted it and the webcam on shims for now. Other items for the short list .. illuminated hydroterms. View from the website is below, just two cams for now.
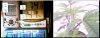
The laptop is running vh multicam and expression encoder 4, streaming to one of the servers in the datacenter running windows 2008/IIS7. This stream is directly published to a website that i can access anywhere that silverlight can run (so NOT my android phone goddammit). There's probably an easier way to do this, but these are the sort of resources we have on hand here, and Kush Kam HD is fucking sweet.
The long term plan is for major work in automation. This is pretty much the whole point, to see how far I can push automation. This is my specialty with computer systems and it's the unique flavor (VTB: "FlaaaVAAAA!") that I bring to the indoor growing table. However, automation is very expensive. The computer control system I have sketched out will cost around $2k just to start, so hopefully that price comes down in the meantime, or I come up with better ideas. If all goes really, really well I'll setup and try for some time lapse video action.
I'm still finishing weather stripping and door sealing, easily the biggest pain in the ass of this build. I'm on round 3 and making progress. Large channels at the side of each door on the small cab provide air leaks between chambers, going after that with expanding foam today. carefully.
You wouldn't believe how much air that 120mm fan moves. Just through the small leaks that exist now, it is enough to slightly open the backdraft dampener in Chamber 1. Proper sealing and fan control of some sort on that thing should do the trick.
As is, Chamber 1 stays room temp plus no more than 8f with the light in 600w mode. I've had it turned down to 400w while the clones get rooted, giving me room temp plus 3f to 5f. This is with MH converstion bulb, which I believe is much hotter than a straight up 600W HPS. All of this is producing chamber temps from 72f ish to mid 80s with 600W on and no vent fan. Nights have been cooler lately, have not seen cab drop below 70f even with room temp down around 60f. If that max of mid 80s temp holds, gonna be a sweet time adding CO2.
The stealth on this build is pretty damn good but by no means perfect. It sounds about the same as a server rack with a couple of devices going. Not nearly as loud as something like a dryer or room box fan. You can definitely hear something going in there but it's not enough to attract attention, especially when surrounded by computers etc.
The vents on the big cab are on top, and designed so I can attach 6" ducting as needed and pull directly from outside air or whatever. If I attach ducting, it goes from stealth to looking like some kind of science experiment, so that needs work. For the time being, if I need to do that, I'll put up a facade of techno-boxes on top and probably be done with it.
Have had multiple people in and around with zero suspicion or questions asked. I'm legal in CA, as is the entire grow, and I run the company here so I don't really fear exposure, looking more to keep it self contained and non-stinky. We'll see about that, I bet these OGs in there now will give that CAN-33 a run for it's money.
That's about it for the build. Still need proper backdraft dampeners here and there (currently only the Chamber 1 air intake and CAN-33 output are backdraft dampened), little stuff like that will be taken care of in the coming weeks as I figure out what works and what sucks.
I have pictures of EVERYTHING in this build. Hundreds of them. I will flesh out the post and add some more photos soon. If anyone has questions, wants to see how something was done, whatever, just ask and I'm sure I can drag an image up.
Thanks again FMJ, and to my couple of trusted cohorts that I've bounced ideas off of, helped me move shit, etc. Especially mah woman for not only doing all the painting for me but putting up with my incessant mumbling and chatterboxtivity for months now. You think I'm longwinded and won't stfu on a forum post ..
-> Here <- is the grow journal for the test run.
PhNb

I've lurked here for a looong time, no need to ask a thing with such a wealth of knowledge already compiled. Thank you everyone. Not many of my ideas are new, but it's time I've posted the project. Hopefully it helps someone out. I will post a materials list, etc asap.
This design was based almost entirely on a stealth metal storage cabinet build by FullMetalJacket documented here: https://www.rollitup.org/grow-room-design-setup/70716-building-stealth-super-cabinet-least.html THANK YOU FMJ, your work and documentation made this build much easier. If you're still around, pm me any time you're in so cal.
I had been working on a design for something like this for months, found his build journal after some random completely unrelated search and knew I had to get serious. I've made a few changes, mostly dropping the price of the build substantially. I bought non-matching cabinets on craigslist, used a rotozip rather than a plasma gun, stuff like that. I do have to say, at each step of the way I tried various ideas to improve on the design, and at almost every point I reached the same conclusion as FMJ, so hats of to you man. I know you did one hell of a bunch of homework on every aspect of your design, and you were dead on. You proving the 600W would work out in the small space was really great to know ahead of time. Especially thanks for sending me toward S&P fans and elastomeric paint.
One large chamber as vege or flower chamber or both. Small chamber housing mothers etc, and another large chamber will be built on the right, identical to the other large cab. This way I can rotate harvests to around every 4 or 5 weeks max, without worrying about what strains are in vege behind and this is ready but the flowers arent yet or blah blah. Throw em in the cabs, swap the lightbulb as needed, game on.
The build has a metal cabinet, heavier gauge steel, 36Wx24Dx78H, with the 6 x 19" cooltube on 600W. It's running a 600w MH conversion to start, with a HPS ready when needed. Two holes in the top provide incoming air for the cooltube and the chamber itself. Exhaust is 2X S&P TD-200 fans, one pulling through a Can-33 filter.
The smaller cabinet is 30Wx18DX72H, and divided into three air-separate chambers. The top chamber houses fans and guts for chamber 1. The exhaust is ducted right out of the rear of the cab.
The chamber below is empty for now as I put the current build through a test run. This way I can improve as much as possible before building another cabinet identical to the big one. When complete, this will have about the same stuff as the chamber above, feeding another large cab on the right side.
The bottom half of the smaller cab is a small T5 lit vege/mother chamber. Exhaust is a panaflow 120mm fan (jacked from my own personal workstation..) wired to a 9v power supply, with a smaller hole and crappy filter for incoming air. I have not paid much attention to ventialtion, filtering, etc here. Going to see what I can get away with, and if problems I will add a proper charcoal filter, etc. There is currently no thermostat here. This is on the short list of items to add, but even without it the chamber stays between 74 and 64f.
Chamber 2 has a shelf that can be stuck in to divide it in half, resting on the ledge. This ledge is also perfect to stick clones in little cups, stuff like that. I'll almost certainly add more lighting in here later, especially some light down in the lower half.
Mothers in here will be kept in small hempy bucket setups, manually watered. Later I may add a very small ebb and flow sort of system to flood hempy buckets above the drain hole for a minute or two each day, should do the trick. This chamber may yet be used for DWC, so we'll see how the test run works out.
After cutting, the inside walls of both cabinets were sealed for small leaks, had to seal existing ventilation holes, slits in the cabs. None were the slightest of problems, just slap some metal tape over both sides.
After sealing, I applied the first modification from FMJ's design. I used 1/2" styrofoam insulation instead of fatmat. I figured this would be a little more effective against the type of noise and vibration that will be generated in the cabs, and would also really help keep a constant temperature. I used heavy duty liquid nails to hold the styro in place (probably pointless, i don't think it adhered to either the metal or the stryo, which has a plastic film on both sides). Once cut to size, the styro pretty much tension held itself in place, allowing me to drop a SHITLOAD of caulk into all the cracks and seams.
Seriously, if you do this, don't even think "hmm i bet i just need one more tube of caulk" .. forget it. Buy 5. There is no end. I used Alex brilliant white caulk, couple of bucks a tube no matter where you get it. Works fantastically.
Everything then got 2x coats of Kilz 2 and 3x coats of Henry elastomeric roofing paint. Since we're painting on styrofoam it took extra drying time and extra attention to detail, but it came out fine, and really does a great job of sealing every possible little crack or hole, and is designed to flex so it won't crack when I flex the cabinets moving them around. This is especially good since these used metal cabinets have plenty of curve to the walls.
(Quick note on elastomeric roofing paint. I used Henry, but I suspect the Kool Seal brand that FMJ used is much better for our purposes. No doubt his pics are much, much more reflective than mine. I am going to special order the Kool Seal stuff for another 3 coats once the scrog screen etc are ready and will see what difference it makes.)
I later added a solid sheet of plywood to the back of the big cab. Was going to do the same to the bottom half of the little one but forgot about it before pushing them back into place. Oh well, that's how I roll sometimes. Blame Romulan.
Plywood is so I can drop a screw any damn place I want on the back walls and it will sink into something. This is used to mount the EVC and a small shelf, other random bits. The scrog screen isn't built yet, but the plan is to mount it on the back wall on hinges so that it can be lowered into place or pulled out of the way without any unscrewing or storage or bs. Like a murphy bed. Murphy scrog.
I opted to upgrade DWC totes for a 5-day cooler-based reservoir. My hope was that it would help keep a stable res temp despite seasonal fluctuations in room temp from 50f - 90f+. No air conditioning where this is stashed so every bit counts. I could not be more satisfied. In the month or so since this has been built, the room has been from 60f - 92f, and the res has stayed dead on pegged from 65f - 68f. The removable pot ports make access very easy for whatever needs doing down there, and the metal tape lining makes leakage and seepage a non-issue while providing some extra reflectivity, definitely helping keep res temp down.
I cannot stress how well this cooler res has worked out. I have a few modicifications in mind for the next run, then I'll post a run down specifically for the res build. Quickly though, it can hold 6x 5" net pots, with two small access holes for air tubing or whatever, and a 7th 5" hole incase I ever need to throw frozen bottles in there. The 7 hole is where I currently dangle the tri-meter probes, lightly taped into place so they dont flow around in the current.
Holes 1 - 6 have 4" airstones directly below. These are currently powered by a $10, 2 port air pump from a hydro shop, and a $40 omg super quiet silent best thing ever pump from petco. Both are equally shitty (never buy any air stuff from petco except tubing, lesson learned), but good enough for now. All holes have bubbly rolling surfaces so we're good. Air pump upgrade is on the short list. The res holds about 13.8 gallons, a little less as I pull the water level down some.
Wires for probes and webcams run through a port on the left side of the cab, just a hole sealed with metal tape. There is a desk and workstation on the left, with a piece of plyboard on the wall where gauges are mounted. I've had to come up with a crafty way to get the right light on to the gauges, glare was a pain in the ass. Picked up a cheap cfl and mounted it and the webcam on shims for now. Other items for the short list .. illuminated hydroterms. View from the website is below, just two cams for now.
The laptop is running vh multicam and expression encoder 4, streaming to one of the servers in the datacenter running windows 2008/IIS7. This stream is directly published to a website that i can access anywhere that silverlight can run (so NOT my android phone goddammit). There's probably an easier way to do this, but these are the sort of resources we have on hand here, and Kush Kam HD is fucking sweet.
The long term plan is for major work in automation. This is pretty much the whole point, to see how far I can push automation. This is my specialty with computer systems and it's the unique flavor (VTB: "FlaaaVAAAA!") that I bring to the indoor growing table. However, automation is very expensive. The computer control system I have sketched out will cost around $2k just to start, so hopefully that price comes down in the meantime, or I come up with better ideas. If all goes really, really well I'll setup and try for some time lapse video action.
I'm still finishing weather stripping and door sealing, easily the biggest pain in the ass of this build. I'm on round 3 and making progress. Large channels at the side of each door on the small cab provide air leaks between chambers, going after that with expanding foam today. carefully.
You wouldn't believe how much air that 120mm fan moves. Just through the small leaks that exist now, it is enough to slightly open the backdraft dampener in Chamber 1. Proper sealing and fan control of some sort on that thing should do the trick.
As is, Chamber 1 stays room temp plus no more than 8f with the light in 600w mode. I've had it turned down to 400w while the clones get rooted, giving me room temp plus 3f to 5f. This is with MH converstion bulb, which I believe is much hotter than a straight up 600W HPS. All of this is producing chamber temps from 72f ish to mid 80s with 600W on and no vent fan. Nights have been cooler lately, have not seen cab drop below 70f even with room temp down around 60f. If that max of mid 80s temp holds, gonna be a sweet time adding CO2.
The stealth on this build is pretty damn good but by no means perfect. It sounds about the same as a server rack with a couple of devices going. Not nearly as loud as something like a dryer or room box fan. You can definitely hear something going in there but it's not enough to attract attention, especially when surrounded by computers etc.
The vents on the big cab are on top, and designed so I can attach 6" ducting as needed and pull directly from outside air or whatever. If I attach ducting, it goes from stealth to looking like some kind of science experiment, so that needs work. For the time being, if I need to do that, I'll put up a facade of techno-boxes on top and probably be done with it.
Have had multiple people in and around with zero suspicion or questions asked. I'm legal in CA, as is the entire grow, and I run the company here so I don't really fear exposure, looking more to keep it self contained and non-stinky. We'll see about that, I bet these OGs in there now will give that CAN-33 a run for it's money.
That's about it for the build. Still need proper backdraft dampeners here and there (currently only the Chamber 1 air intake and CAN-33 output are backdraft dampened), little stuff like that will be taken care of in the coming weeks as I figure out what works and what sucks.
I have pictures of EVERYTHING in this build. Hundreds of them. I will flesh out the post and add some more photos soon. If anyone has questions, wants to see how something was done, whatever, just ask and I'm sure I can drag an image up.
Thanks again FMJ, and to my couple of trusted cohorts that I've bounced ideas off of, helped me move shit, etc. Especially mah woman for not only doing all the painting for me but putting up with my incessant mumbling and chatterboxtivity for months now. You think I'm longwinded and won't stfu on a forum post ..
-> Here <- is the grow journal for the test run.
PhNb
Attachments
-
 47.2 KB Views: 124
 -
 51.3 KB Views: 141
 -
 60.9 KB Views: 112


