twisting a cone - a tutorial

fdd2blk

Well-Known Member
an exchange student from germany taught me this in 1985. it takes a few extra minutes but the rewards are well worth it.:blsmoke:


getting started......

we need:

wraps
herb
grinder
small piece of notebook paper
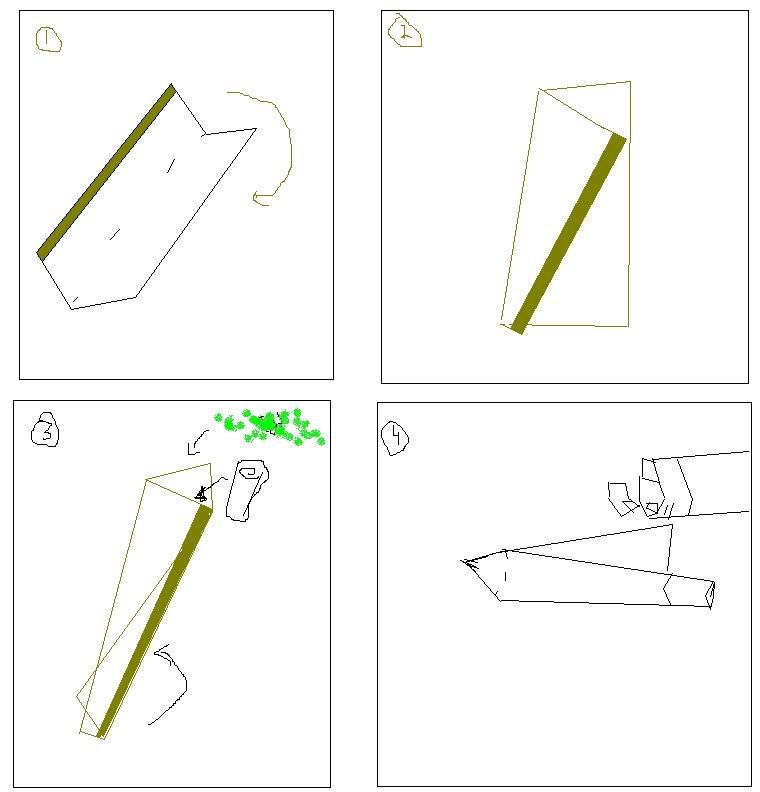
IMG_3373.jpg


step 1:

using three papers create one tapered paper. lay two side-by-side and lick-n-stick at an angle.

IMG_3376.jpg

now stick the third paper across the top.

IMG_3378.jpg

roll the small piece of paper into a coil. this will be the filter.

IMG_3379.jpg

time to grind some herb.

IMG_3380.jpg
 
step 2:

lay the herb into the paper placing the filter at the smaller end. place more herb at the larger end.

IMG_3382.jpg

time to twist.

IMG_3383.jpg

once it's all twisted up i pack the end nice and flat. make sure not overfill at this point. we need to leave some extra paper at the end.

IMG_3384.jpg

very carefully we need to twist and push, twist and push. using my finger tips i twist the end packing and flattening it as i slowly crimp the edge.

IMG_3388.jpg
 
step 3:

time to open the lid. using the very edge of a flame, lightly burn around the perimeter of the flattened end.

IMG_3389.jpg

carefully remove. if any edges are still stuck use the flame to re-burn until it lets go.

IMG_3392.jpg

IMG_3393.jpg

fire up!!!!!!

IMG_3396.jpg


:peace::joint::joint:
 
very nice !!!

instead of the notebook paper i have always used cards (birthday, etc.)

we call them carbs.....:joint:
 
I gave it a shot - mine didn't really come out cone shaped too much though... some practice and I'll get it down I guess.
 

Attachments

  • cone1.jpg
    cone1.jpg
    197.9 KB · Views: 41
  • cone2.jpg
    cone2.jpg
    155.8 KB · Views: 19
  • cone3.jpg
    cone3.jpg
    188 KB · Views: 22
  • cone4.jpg
    cone4.jpg
    170.3 KB · Views: 38
the rest..
 

Attachments

  • cone5.jpg
    cone5.jpg
    135.4 KB · Views: 25
  • cone6.jpg
    cone6.jpg
    155.6 KB · Views: 26
  • cone7.jpg
    cone7.jpg
    135.1 KB · Views: 27
  • cone8.jpg
    cone8.jpg
    154.6 KB · Views: 32
I gave it a shot - mine didn't really come out cone shaped too much though... some practice and I'll get it down I guess.

put your first 2 papers together at an angle. so the bottom is skinnier then the top. make the bottom as narrow as possible while staying on the glue of the other paper. you want the paper in a "cone shape" before starting.:blsmoke:

View attachment 35792
 
do you guys know how to roll backwards?
if not, you should figure it out... eliminates a lot of unneccessary rolling paper and will give you perfect cones everytime....

first, make the same three paper thing like fdd shows (or if you have the large kingsize papers, just use one of them) then, before filling, fold backwords and at an angle, then carefully glue it together.... wait a bit for it to stick good... then just pop in your filter in the end and pack you're bud down...

i know it a may sound a bit confusing, so i'm gonna go draw some stuff up in paint to illustrate...
 
ok so in pic one is a king sized paper (or just a few papers stuck together...)

turn it over, and fold it at an angle back over itself, so the sticky is facing you (box 2)

fold the part on the right over the sticky, and crease it. then lift that flap, lick the sticky, then replace the flap back over, to seal and thusly make the outer par of the cone... place filter in bottom and stuff weed (3)

twist tip when done, and you will be left with a massive cone joint with a wing, haha... light the wing on fire and watch it burn down to the join and go out, leaving you with a perfect cone joint with no excess paper to smoke... (4)

if done a certain way, when burning the wing off, you can also get it to light the tip of the joint and allow you to start smoking it... quite a show for stoner friends with all the fire and whatnot... haha


nice. a new challenge.:mrgreen:
 
Ah I see. I missed that detail the first time through. My second attempt came out much better - thanks for the tutorial!
 

Attachments

  • coneuno.jpg
    coneuno.jpg
    116 KB · Views: 23
  • conedos.jpg
    conedos.jpg
    166.2 KB · Views: 26
  • conetres.jpg
    conetres.jpg
    150.3 KB · Views: 16
Back
Top