sheckylovejoy
Well-Known Member
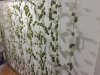
Just an update. Letting the girls grow up as of yesterday. As you can see, the screen is bulging in the middle. I need to pull the shock cord much tighter next time around


Yeah, was trying to post last few weeks, but Rollitup's been having lots of issues. Was afraid it was down for good for a moment there!How the girls looking in that shed? Bet they looking great now


I'd love that, esp since the dehumidifier pumps out quite a bit of heat. But it is very tight back there in the side yard, and there's no room. I didn't even have a spot to put a mini-split AC if I had wanted to go that route (no need, the portable works great)you ever think about ducting in your A/c, Dehu and hu from the outside? save ya a good amount of work space. Just build some waterproof min. storage areas.


Thanks.amazing thread and great work man. really enjoyed watching the process. how did you like those cxb3590's?

Sorry for the late reply; I wound up going to the ER with an allergic reaction to a bug bite. Ouch.Hey Bro,
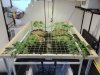
What kind of spray adhesive did you use to glue the insulfoam to the plastic shed walls? I used 3m Super 77 and the board would not stick to the shed walls. However, I have an older model 7x7 Rubbermaid big max and the walls are not 100% flat and straight. I was almost thinking of getting the washer and bolts and bolting it in. I am also in So Cal and I was really impressed by your journal and it inspired me to make my own out of a 10 year old shed. I am hoping to be done this week. Here is a pic from last week.

 . Looks great. Keep up the good work