ThatGuy1985
Well-Known Member
Once again i was hig and i was looking up things on the google im feelin lucky option and i found this maybe it'll help someone
Marijuana
Build Your Own Metal Halide Light Fixture
If you can get the parts needed for a good price, following these instructions will enable you to produce affordable metal halide fixtures. Once you understand how to make a metal halide unit you can substitute the ballast to make a high pressure sodium grow light.
You can greatly increase the efficiency of your light by getting a pre-made reflector made for growing plants. Prices start at about $40. If you use one, your light system will look and preform like a real grow light. Some reflectors come with an unswitched mogul base socket assembly (where the bulb screws in) included.
If you are going to build the light described below and money is too tight to think of getting a reflector now, you can always get one later. Just remove the mogul socket assembly from the old reflector and screw it into a new reflector (when you can afford to get one).
If you are going to buy a pre-made reflector, the only things you will need are a ballast, a bulb (must be the same wattage and type as that specified on the ballast), an extension cord, and an unswitched mogul base socket assembly.
Shopping List:
1 metal halide ballast
1 metal halide bulb (must be same wattage as ballast)
1 heavy duty extension cord (15A)
1 unswitched mogul base socket assembly
1 stove pipe end cap - 5"
3 stove pipe reducers - 1 each of - 8" to 7"- 7" to 6" - 6" to 5"
1 rubber grommet
3 wire nuts
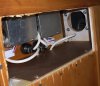
Prepare the end cap:
Drill a wire hole, mogul base mounting holes, ventilation holes and the ground wire screw hole. Install the rubber grommet around the wire access hole.

drilled end cap picture
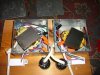
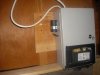
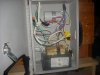
Ballast Wiring:
Take the male end (the end that plugs into the wall) of the extension cord and figure out how long it is from wall outlet it plugs into to where the ballast will be, length should be 15 feet or less.
Then cut the extension cord and bare the three extension cord wires and the three useful wires from the ballast. The fourth ballast wire is for 227V and remains unused.
Connect the wires as described by the ballast diagram (comes with ballast - usually affixed to the ballast itself). Be sure to utilize the ground wire. This will necessitate the use of a three prong timer and a GFCI for complete safety.
Cut a length of wire from the female end of the extension cord. This will go from the ballast to the unswitched mogul base socket wiring, length should be 15 feet or less. Wire one end to the ballast output. The other end will be wired to the mogul base socket. The female plug on the extension cord is not used.
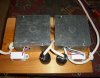
Mogul Base Socket Wiring:
Feed the socket wires through the grommeted wire access hole on the top of the end cap. Connect appropriately and be sure to use the ground wire. Secure the mogul base socket to the end cap with the socket bolts and provided nuts.
An unswitched mogul base socket assembly will work with standard metal halide and high pressure sodium bulbs.

unswitched mogul base socket assembly
Stove Pipe Assembly:
Using metal screws join the three stove pipe reducers and top off with the end cap/socket assembly.
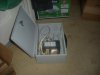
Final Check:
Double check the wiring and plug the ballast into an outlet. Within less than a minute the MH should be glowing brightly, but don't expect it to spark right away. Cold bulbs will require a 30 to 45 second delay. If you did everything right it should look like this.

home made metal halide light
Marijuana
Build Your Own Metal Halide Light Fixture
If you can get the parts needed for a good price, following these instructions will enable you to produce affordable metal halide fixtures. Once you understand how to make a metal halide unit you can substitute the ballast to make a high pressure sodium grow light.
You can greatly increase the efficiency of your light by getting a pre-made reflector made for growing plants. Prices start at about $40. If you use one, your light system will look and preform like a real grow light. Some reflectors come with an unswitched mogul base socket assembly (where the bulb screws in) included.
If you are going to build the light described below and money is too tight to think of getting a reflector now, you can always get one later. Just remove the mogul socket assembly from the old reflector and screw it into a new reflector (when you can afford to get one).
If you are going to buy a pre-made reflector, the only things you will need are a ballast, a bulb (must be the same wattage and type as that specified on the ballast), an extension cord, and an unswitched mogul base socket assembly.
Shopping List:
1 metal halide ballast
1 metal halide bulb (must be same wattage as ballast)
1 heavy duty extension cord (15A)
1 unswitched mogul base socket assembly
1 stove pipe end cap - 5"
3 stove pipe reducers - 1 each of - 8" to 7"- 7" to 6" - 6" to 5"
1 rubber grommet
3 wire nuts
Prepare the end cap:
Drill a wire hole, mogul base mounting holes, ventilation holes and the ground wire screw hole. Install the rubber grommet around the wire access hole.
drilled end cap picture
Ballast Wiring:
Take the male end (the end that plugs into the wall) of the extension cord and figure out how long it is from wall outlet it plugs into to where the ballast will be, length should be 15 feet or less.
Then cut the extension cord and bare the three extension cord wires and the three useful wires from the ballast. The fourth ballast wire is for 227V and remains unused.
Connect the wires as described by the ballast diagram (comes with ballast - usually affixed to the ballast itself). Be sure to utilize the ground wire. This will necessitate the use of a three prong timer and a GFCI for complete safety.
Cut a length of wire from the female end of the extension cord. This will go from the ballast to the unswitched mogul base socket wiring, length should be 15 feet or less. Wire one end to the ballast output. The other end will be wired to the mogul base socket. The female plug on the extension cord is not used.
Mogul Base Socket Wiring:
Feed the socket wires through the grommeted wire access hole on the top of the end cap. Connect appropriately and be sure to use the ground wire. Secure the mogul base socket to the end cap with the socket bolts and provided nuts.
An unswitched mogul base socket assembly will work with standard metal halide and high pressure sodium bulbs.
unswitched mogul base socket assembly
Stove Pipe Assembly:
Using metal screws join the three stove pipe reducers and top off with the end cap/socket assembly.
Final Check:
Double check the wiring and plug the ballast into an outlet. Within less than a minute the MH should be glowing brightly, but don't expect it to spark right away. Cold bulbs will require a 30 to 45 second delay. If you did everything right it should look like this.
home made metal halide light