Closet build. 600 + 400 hps PICS

Mike@420

Active Member
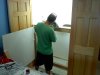
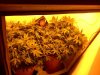
My previous flower box was an 18"x34" scrog box with an air cooled 400 hps.


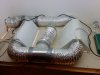
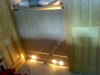
Im taking over the rest of the closet now, which gives me 48"x60", and adding another light, a 600 hps. That air duct hanging there goes into my attic. At the other end are 2 inline fans that suck 24/7 and a carbon filter.


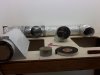
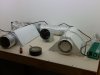
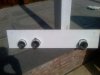
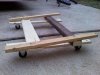
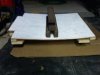
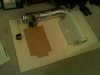
Im top mounting the lights, to keep more heat out of the box. Heres a pic of the top while im laying everything out.
 

Attachments

Mike@420

Active Member
For the door I used hardwood plywood. Its a little more resistant to warping. Heres my friend in the process of screwing down the top after all the holes were cut and the underside was painted white.


The duct in the back is suction to cool the lights, the one in the middle is the vent for the box itself.
 

Attachments

Mike@420

Active Member
Lights hooked up. 400 on the left, 600 on the right. The ballast for the 400 is already in my attic where i dont care about heat. I'll be running the wires to move the 600's ballast in there today.


Ducting finished, until i decide i need one of those little air conditioners.


Today Im going to seal up holes, neaten up the wires, and build some intake ducts on the bottom. I'll post more pics in a few days.
 

Attachments

TheoryGV

Active Member
Wow that's quite impressive in the middle of my first cfl grow and am soon gonna be updating to a hps system trying to figure out how to cool a 36'x36' box with about 400 or 600 watts? Might be taking your ideas
 

ginjawarrior

Well-Known Member
looks neat i really like the top mounting of the lights. with the way the exhaust is set up tho are you sure the light on the right is going to get enough airflow through it? looks like it would mostly go through the left hand one
 

Drr

Well-Known Member
Looks awsome but I would minimize ducting between the grow area and the light.. less ducting = better air flow..
 

SnoCap

Well-Known Member
Looking good my friend, very clean and professional. I'm designing something very similar but I am utilizing the top half of my my closet rather than the bottom. how is your ducting routed to the attic?
 

Mike@420

Active Member
Building the intake ports for the box.


The light traps will be dryer hoses coiled vertically and mounted to the inside of the front wall. I used 4" ducts instead of 6" for this because we all know how good an extra 2" can be when the room is packed.


A 6" hose has an area of roughly 28 square inches, a 4" hose has only 12.5, so I used 3 of them so they wont restrict air flow. I mounted them so that the flanges stick out the front by 2 inches so I can attach hose to the outside when i need to hook up air conditioning next month.
 

Attachments

Mike@420

Active Member
Wow that's quite impressive in the middle of my first cfl grow and am soon gonna be updating to a hps system trying to figure out how to cool a 36'x36' box with about 400 or 600 watts? Might be taking your ideas
Air cooled lights are one of the best things that ever happened to us.
awesome set up, cant wait to see more pics
Thanks.
looks neat i really like the top mounting of the lights. with the way the exhaust is set up tho are you sure the light on the right is going to get enough airflow through it? looks like it would mostly go through the left hand one
I have 2 different reflectors, and the one on the right is much less restrictive to air flow. The intake side of the light is cool and the exhaust duct is real hot. I have confidence in it, for now lol.
Looks awsome but I would minimize ducting between the grow area and the light.. less ducting = better air flow..
I went a little overkill with the fans at the other end, 3 of them all in series. That hose has enough suction to pick up garbage off the floor.
Looking good my friend, very clean and professional. I'm designing something very similar but I am utilizing the top half of my my closet rather than the bottom. how is your ducting routed to the attic?
Thanks. My house is a split level, meaning 6 steps between floors, and the top half of my closet has the attic right next to it. I just had to cut a 6" hole in the drywall.
I thnik the same it looks awsome and keep us updated :D
Thanks.
 

Mike@420

Active Member
Having two unequal lights, I needed a way to shift a crop from the 400 side to the 600 side each month. I grow under a screen so that complicates things, I dont want to be pulling the screen off 1 month into flowering. So for the past month ive been thinking about ways to build a mobile scrog. I decided to build dollys for the plants, and tried to design them with features that will ease the inaccessibility problems common with scrogging.

Starting from the ground up - mobility. Each dolly sits on 4 non-swiveling castors so it can only roll left or right.


Next is drainage. The structure of the dolly is built as a wedge. I warped some 1/4" plywood so that the lowest point will be in a good spot for my catch can.


Then I cut out a 2" hole to keep that part of the wood away from the flow of water. Anti freeze jugs with a hole cut in the side make great catch cans.
 

Attachments

Mike@420

Active Member
Next I built a sheet metal tray to sit on the dolly. The lip is 5/8" high all around and I cut out a notch at the low point for the water to drain out.


The notch also lets the tray bend to the shape of the plywood underneath. And now the 2" hole in the plywood probably makes more sense.
 

Mupphet.Man

Active Member
Having two unequal lights, I needed a way to shift a crop from the 400 side to the 600 side each month. I grow under a screen so that complicates things, I dont want to be pulling the screen off 1 month into flowering. So for the past month ive been thinking about ways to build a mobile scrog. I decided to build dollys for the plants, and tried to design them with features that will ease the inaccessibility problems common with scrogging.

Starting from the ground up - mobility. Each dolly sits on 4 non-swiveling castors so it can only roll left or right.


Next is drainage. The structure of the dolly is built as a wedge. I warped some 1/4" plywood so that the lowest point will be in a good spot for my catch can.


Then I cut out a 2" hole to keep that part of the wood away from the flow of water. Anti freeze jugs with a hole cut in the side make great catch cans.
Hey man, I hope you're a medical patient, you left your license plate in the picture!
 

Mike@420

Active Member
Ok now for the screen. At first I was going to build a bracket on the back of the dolly to reach up 2 feet and hold the screen in place. But that would be a pain in the ass to reach back there to raise or lower the screen. Then I thought about individual scrogs, i saw a few cool ones on here. With the shape of my growing space, that wasnt the best option for me either. I did get the idea from one of them to let the dirt support posts to hold up the screen. I cut a few 1/4" dowels to 2 feet long to use for posts. Each bucket will have 2 or 3 of them, im not sure yet. I have 2" chicken wire which will be loosely wire tied to the posts so I can move it up or down. Low when they're stretching hard at the beginning of flowering, then up high at the end when the buds get top heavy and need support.


Heres my prototype screen. I need to build a lightweight, rigid frame for it.
 

Attachments

Paperhouse

Active Member
Very cool. I'm doing a similar setup in my own closet. Which air cooled reflector is that? How much did it cost?
 
Top