Yesdog
Well-Known Member
Alright guys, I've been picking away at this damn build for almost 5 months now. I have finally have it up and running, software and everything.
So this is basically a cheap automated DIY 4x CXB3590 system, driving at 1050mA.

Goals
* Steady-state operation within specified thermal bounds
* Automated dimmer and fan speed controls
* 'Appliance' operation- can be turned on/off with AC like a normal light.
* Doing it all CHEAP AS FUUUCCKKK (sorta)
Tools
* Soldering iron
* Cordless drill
* Wire strippers/cutters
* Whatever else I had around. This build was mostly dictated by not having to buy more tools. But trust me, I don't have much...
Materials
* Raspberry Pi (3 B, in this case)
* Rubbermaid enclosure (the clear plastic they use is brittle AF, but has a very high combustion point)
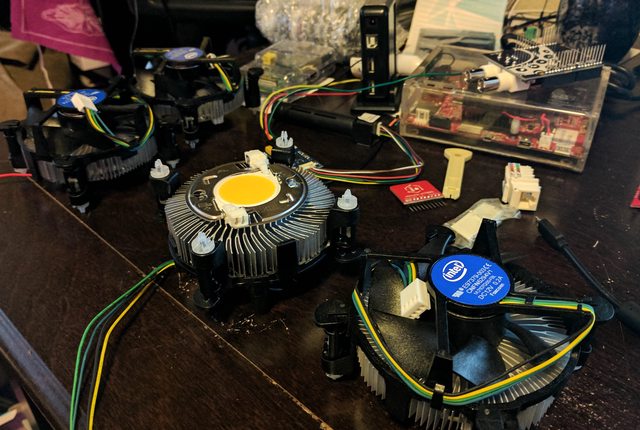
* Intel CPU heatsinks with 4-pin fan - the ones i got were rated for i7s, which can have a TDP of up to about 70W
* Meanwell driver with dimmer (HLG-185H-C1050B in my case)
* 4x CXB3590 CD
* Breadboard for various circuitry
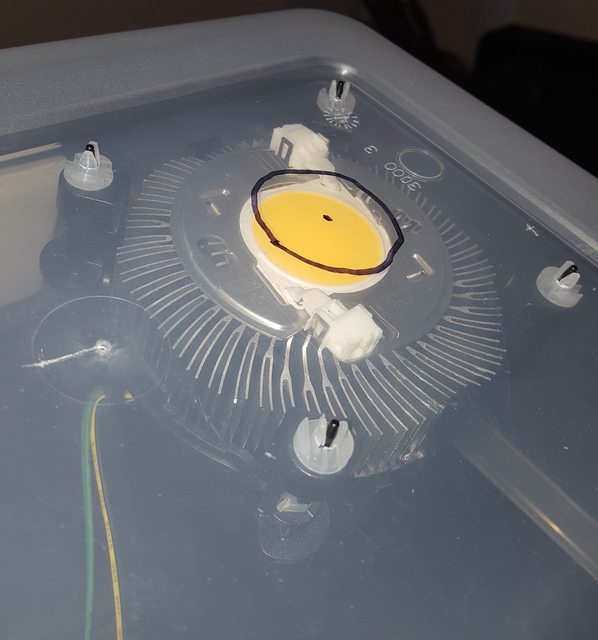
* DS18B20 temperature sensor, waterproof enclosure (had a metal housing, great for thermal epoxying)
* Ideal COB holders (50-2303cr ?)
* Thermal epoxy
* Various screws, connectors, wires, mounting, etc
* 12V power supply for the fans
* DC-DC buck converter to 5V for the raspberry pi from the 12V fan power.
COB Mounting
* No drilling into the heatsink, just using thermal epoxy for the COB directly onto the CPU chiller
* Also thermal epoxy the LED holder to the heatsink. Doesn't have to be super good, but needs to be pressed against the COB to get any sort of reasonable connection. I just didn't want them to slip off in any way.
* Chose one assembly to thermal epoxy the DS18B20 therm to. It was the worst done assembly, so should have the worse thermals.
* Compression fit with the CPU heatsink + COB holder provide a perfect fit to the mounting surface. The holder is pressed slightly (maybe 1mm tolerance) by the mounting surface. Keeps things tight, the thermal epoxy on the holder is more of a backup. I'm not sure what the tolerance allowed for the material thickness is, or whether or not this would work when mounting to a metal surface.
* Drilled holes for heatsink grabber 'legs' and large hole a bit bigger than the COB surface for light. I have reflectors, but not sure if ill mount em or not yet. I kinda like the lateral throw.
IO
* DS18B20 sensor thermal epoxied to the bottom of one heatsink. I chose the one that was most poorly mounted, as it'll have the worse thermal characteristics.
* PWM control for fan speed. 4-pin CPU fan spec has a pin just for a low-amperage PWM, so you dont have to deal with amplifiers or mosfets, or any of that. Was able to bundle the control pins of all 4 fans and connect them directly to a single PWM out (rpi IO provides juuusstt enough amperage to control all 4 fans speed).
* PWM dimmer control. This involved some circuitry, but basically I had to turn the PWM out into a circuit that can switch the DIM circuit from closed (0 resistance, most dim) to mostly open (max brightness as totally open, or a fixed XXkOhm resistor, or a potentiometer to physically set the max). Will post the schematic for that here.
Overall, I decided to glue the COB directly to the heatsinks, because each of these intel heatsinks I got was about $8-$10. Far cheaper than the COB itself, plus I don't have the tools to drill into aluminum. If you do, you might want to consider that option lol
The plastic container happens to press perfectly against the white COB holder brackets, but not too much.
The raspberry pi controls the dimmer, fans, and eventually the on/off relay to turn the LEDs totally off. Right now I'm just turning it on/off via the AC for the whole thing.

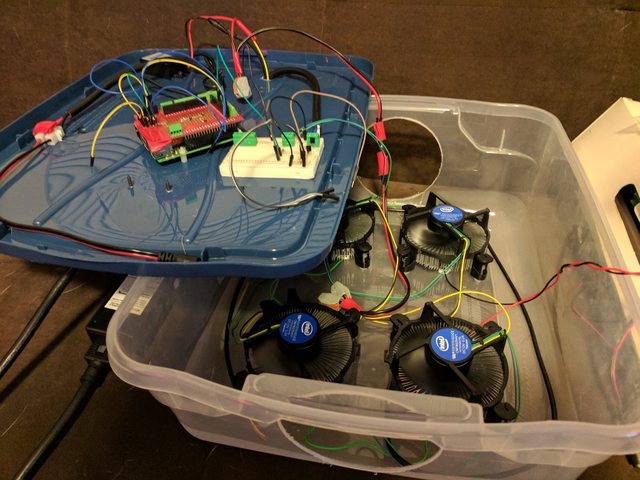
This could all be done without the computer, but you'd need to probably just run the fans at maximum speed all the time. They're pretty powerful and loud, so the computer control seemed important here, for me anyways. Otherwise each of these heatsinks at max fan can easily shed a massive amount of heat.
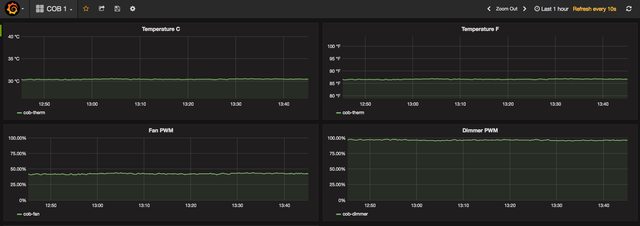
And finally, the monitoring! Done via grafana + graphite (off the shelf stats-tracking stuff) I can get the metrics I really care about. Right now, the system is clamped at 50% power (100% dimmer PWM = 50% driver power right now, so about 500mA), but it shows a nice beautiful steady state.
EDIT: as a note, all the tape and stuff will be gone once im settled with this setup. Ill hot glue everything in place- there's definitely lots of dangly wires by high-speed fans, i do not trust tape lol
EDIT2: and the schematic im using for the PWM dimmer is here: https://www.rollitup.org/t/i-need-help-5v-to-10v-pwm.894383/page-5#post-13327756 I use 2 NPNs to re-invert the phase, and the 100kOhm resistor is where I put my "clamp", for the physical max the pi can drive the driver. Will eventually use a potentiometer.
So this is basically a cheap automated DIY 4x CXB3590 system, driving at 1050mA.
Goals
* Steady-state operation within specified thermal bounds
* Automated dimmer and fan speed controls
* 'Appliance' operation- can be turned on/off with AC like a normal light.
* Doing it all CHEAP AS FUUUCCKKK (sorta)
Tools
* Soldering iron
* Cordless drill
* Wire strippers/cutters
* Whatever else I had around. This build was mostly dictated by not having to buy more tools. But trust me, I don't have much...
Materials
* Raspberry Pi (3 B, in this case)
* Rubbermaid enclosure (the clear plastic they use is brittle AF, but has a very high combustion point)
* Intel CPU heatsinks with 4-pin fan - the ones i got were rated for i7s, which can have a TDP of up to about 70W
* Meanwell driver with dimmer (HLG-185H-C1050B in my case)
* 4x CXB3590 CD
* Breadboard for various circuitry
* DS18B20 temperature sensor, waterproof enclosure (had a metal housing, great for thermal epoxying)
* Ideal COB holders (50-2303cr ?)
* Thermal epoxy
* Various screws, connectors, wires, mounting, etc
* 12V power supply for the fans
* DC-DC buck converter to 5V for the raspberry pi from the 12V fan power.
COB Mounting
* No drilling into the heatsink, just using thermal epoxy for the COB directly onto the CPU chiller
* Also thermal epoxy the LED holder to the heatsink. Doesn't have to be super good, but needs to be pressed against the COB to get any sort of reasonable connection. I just didn't want them to slip off in any way.
* Chose one assembly to thermal epoxy the DS18B20 therm to. It was the worst done assembly, so should have the worse thermals.
* Compression fit with the CPU heatsink + COB holder provide a perfect fit to the mounting surface. The holder is pressed slightly (maybe 1mm tolerance) by the mounting surface. Keeps things tight, the thermal epoxy on the holder is more of a backup. I'm not sure what the tolerance allowed for the material thickness is, or whether or not this would work when mounting to a metal surface.
* Drilled holes for heatsink grabber 'legs' and large hole a bit bigger than the COB surface for light. I have reflectors, but not sure if ill mount em or not yet. I kinda like the lateral throw.
IO
* DS18B20 sensor thermal epoxied to the bottom of one heatsink. I chose the one that was most poorly mounted, as it'll have the worse thermal characteristics.
* PWM control for fan speed. 4-pin CPU fan spec has a pin just for a low-amperage PWM, so you dont have to deal with amplifiers or mosfets, or any of that. Was able to bundle the control pins of all 4 fans and connect them directly to a single PWM out (rpi IO provides juuusstt enough amperage to control all 4 fans speed).
* PWM dimmer control. This involved some circuitry, but basically I had to turn the PWM out into a circuit that can switch the DIM circuit from closed (0 resistance, most dim) to mostly open (max brightness as totally open, or a fixed XXkOhm resistor, or a potentiometer to physically set the max). Will post the schematic for that here.
Overall, I decided to glue the COB directly to the heatsinks, because each of these intel heatsinks I got was about $8-$10. Far cheaper than the COB itself, plus I don't have the tools to drill into aluminum. If you do, you might want to consider that option lol
The plastic container happens to press perfectly against the white COB holder brackets, but not too much.
The raspberry pi controls the dimmer, fans, and eventually the on/off relay to turn the LEDs totally off. Right now I'm just turning it on/off via the AC for the whole thing.
This could all be done without the computer, but you'd need to probably just run the fans at maximum speed all the time. They're pretty powerful and loud, so the computer control seemed important here, for me anyways. Otherwise each of these heatsinks at max fan can easily shed a massive amount of heat.
And finally, the monitoring! Done via grafana + graphite (off the shelf stats-tracking stuff) I can get the metrics I really care about. Right now, the system is clamped at 50% power (100% dimmer PWM = 50% driver power right now, so about 500mA), but it shows a nice beautiful steady state.
EDIT: as a note, all the tape and stuff will be gone once im settled with this setup. Ill hot glue everything in place- there's definitely lots of dangly wires by high-speed fans, i do not trust tape lol
EDIT2: and the schematic im using for the PWM dimmer is here: https://www.rollitup.org/t/i-need-help-5v-to-10v-pwm.894383/page-5#post-13327756 I use 2 NPNs to re-invert the phase, and the 100kOhm resistor is where I put my "clamp", for the physical max the pi can drive the driver. Will eventually use a potentiometer.
Last edited: