for anyone tired of M3 drilling and then tapping....
- Thread starter Howard i know
- Start date
Will Thayer
Well-Known Member
I have started using a 3MM drill bit and 3.5mm stainless panhead self tapping screws. Only tried it because I finally managed to snap my tap. Seems to do the trick.
Cheers,
Will
Airwalker16
Well-Known Member
That's all I've ever done.I have started using a 3MM drill bit and 3.5mm stainless panhead self tapping screws. Only tried it because I finally managed to snap my tap. Seems to do the trick.
Cheers,
Will
BOBBY_G
Well-Known Member
yeah im ready to graduate from 4-40 to 6-32 those tiny taps are so fucking fragile. i cant twist a 1/4" tap in half by hand so im trying to find that happy medium
NOTHING AGGRAVATES AN OBSESSED STONER LIKE A FUCKING UNDRILLABLE PIECE OF TITANIUM NITRIDE WEDGED IN THE FUCKING HOLE YOU NEED TO MAKE YOUR NICE CLEAN DESIGN WORK
NOTHING AGGRAVATES AN OBSESSED STONER LIKE A FUCKING UNDRILLABLE PIECE OF TITANIUM NITRIDE WEDGED IN THE FUCKING HOLE YOU NEED TO MAKE YOUR NICE CLEAN DESIGN WORK
ichabod crane
Well-Known Member
I drill a 7/64 hole and drive these in and they tap their own hole.
https://www.menards.com/main/building-materials/drywall/screws/specialty-screws-accessories/grip-fast-6-x-7-16-pan-head-metal-stud-screws-100-pc/p-1444451973563.htm
Except I buy the one pound box.
https://www.menards.com/main/building-materials/drywall/screws/specialty-screws-accessories/grip-fast-6-x-7-16-pan-head-metal-stud-screws-100-pc/p-1444451973563.htm
Except I buy the one pound box.
Zulunature
Well-Known Member
I've found that using a little cutting oil and making sure to apply it for every new tap results in not breaking taps.
Oh and take your time making sure to back it off to clear the chips should just about be all one needs to do.
PS. Think I've tapped at least 100's of 3mm screws over the last few weeks building my lights and not a single broken tap, and I used a bottoming tap for the whole time.
But I can definitely see why people would want to use self tapping screws.
Rahz
Well-Known Member
Those little bottles e-juice comes in are perfect for filling with cutting oil.I've found that using a little cutting oil and making sure to apply it for every new tap results in not breaking taps.
ichabod crane
Well-Known Member
Yesterday I drilled and tapped 32 hole with that oil the screws above and a 7/64" drill bit in 45 minutes. During that time I checked on my chicken, set up the tools, then let the chickens out, and drilled and tapped the 32 holes.
Abiqua
Well-Known Member
Damn....I went the same route, from hand drilling to buying an actual drillpress [which is tits by the way] to just buying Pre Drilled's.
Im thinking Pre Drills are where its at, at the moment. Bars are nice especially for throwing multiple diodes quickly up in space.
I seem to only break screws off in copper sinks?
otherwise.....same tap after 2 years, rooks
oil.patience.repeat....
https://www.rollitup.org/t/a-thread-on-tapping.856745/
ichabod crane
Well-Known Member
I drilled threw the sink with a 18 volt cordless drill. I stopped to add oil to the holes 3 or 4 times while doing this. When ever the drill bit slowed down in speed I oiled the hole again. This made the chips fall of the drill and cleared them out of the hole. I had enough oil that the chips floated a little in the oil. By gently wiping they came off the sink with out scratching the surface.
After the holes were drilled I oiled the tip of a screw and drove it into the hole. I almost always had to back it out two or three times and run it down again till the screws were flush to the surface of the heat sink. I could get about 2 holes before the screw started having a hard time screwing in. Since I have a pound which is over 300 screws I just threw the screw out when that happened.
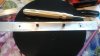
Before I started I used a jig I made to get the holes where I wanted them located. It is just a flat piece of aluminum that I drilled 4 holes in. Two of the holes lined up with the cob holder screws and the other two I used a punch in. I simple screwed two screws in the cob holder screws and used the punch. I marked 8 heat sinks in just a few minute.
For people who ordered heat sinks from Pacific Light Concepts this may help you drill your holes to mount them It is really easy to do this way.
I put a picture below of my jig.
After the holes were drilled I oiled the tip of a screw and drove it into the hole. I almost always had to back it out two or three times and run it down again till the screws were flush to the surface of the heat sink. I could get about 2 holes before the screw started having a hard time screwing in. Since I have a pound which is over 300 screws I just threw the screw out when that happened.
Before I started I used a jig I made to get the holes where I wanted them located. It is just a flat piece of aluminum that I drilled 4 holes in. Two of the holes lined up with the cob holder screws and the other two I used a punch in. I simple screwed two screws in the cob holder screws and used the punch. I marked 8 heat sinks in just a few minute.
For people who ordered heat sinks from Pacific Light Concepts this may help you drill your holes to mount them It is really easy to do this way.
I put a picture below of my jig.
Attachments
-
 645.4 KB Views: 18
ichabod crane
Well-Known Member
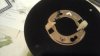
I did not mention that my final assembly is using the same screw that I tapped with. It is a black screw and will blend in with a black heat sink though.
And the holes are not a square pattern. They are in a rectangle. So if you dont pay attention with which hole you use with a jig like mine your wiring connections could alternate 90 degrees. To make sure they line up the way you want them to just put a cob holder on the holes to tell which way it will line up when installed. If you do not see the screw holes for the reflector holder the wiring spot will be 90 dgress of where you have it.
Here are two pictures that show what I am talking about. In one you can see the screw hole and the other you can not. Both pictures are the same heat sink with just the cob holder rotated when installed.
Attachments
-
 594.9 KB Views: 12
 -
 588.5 KB Views: 12
Howard i know
Member
with the drill tap combo and the aid of the jig I have pre prepared I can drill/tap the 32 M3 holes in my 1200mm HS to accept the 4 cobs, 4 lenses and 2 (four hole 120mm) fans as well as the M5 outriggers and the placement of my dim Pot/switch combo and 1.75 amp driver within 6 minutes. It used to take me well over 2 hours. By far and away the biggest saving has come from making a template/jig and using a drill tap combo. If someone knows a quicker way without resorting to the indignity of a self tapping screw please do let me know.
ichabod crane
Well-Known Member
I would rather spend the money on cobs than a drill press. So I use a drill that I have and self tapping screws.
And if I am buying a tool it wont be some cheap Harbor Freight one that I have to replace it 1 to 2 years. But since I mostly will have it just sit there most of the time I will just use my cordless drill.
But hey if it makes you feel better use the drill press.
And if I am buying a tool it wont be some cheap Harbor Freight one that I have to replace it 1 to 2 years. But since I mostly will have it just sit there most of the time I will just use my cordless drill.
But hey if it makes you feel better use the drill press.
BOBBY_G
Well-Known Member
with the drill tap combo and the aid of the jig I have pre prepared I can drill/tap the 32 M3 holes in my 1200mm HS to accept the 4 cobs, 4 lenses and 2 (four hole 120mm) fans as well as the M5 outriggers and the placement of my dim Pot/switch combo and 1.75 amp driver within 6 minutes. It used to take me well over 2 hours. By far and away the biggest saving has come from making a template/jig and using a drill tap combo. If someone knows a quicker way without resorting to the indignity of a self tapping screw please do let me know.
whats your jig made out of? mild steel?
Howard i know
Member
just a 4mm thick ally plate the same size as the HS (i clamp it on top on the smooth face) with some holes just large enough to accommodate the punch, I follow up with a 2mm pilot hole but I probably could get away with just the drill/tap. Biggest arse is the 4 blind holes I cant avoid with the fin spacing.
Airwalker16
Well-Known Member
That was one thing I found very nice when using pin sinks. Never had to worry about that.just a 4mm thick ally plate the same size as the HS (i clamp it on top on the smooth face) with some holes just large enough to accommodate the punch, I follow up with a 2mm pilot hole but I probably could get away with just the drill/tap. Biggest arse is the 4 blind holes I cant avoid with the fin spacing.
ichabod crane
Well-Known Member
I am glad it is working for you.FWIW im using a $79 harbor freight drill press from 2004 and i use if for a shitload more things than cobs...
Here is my experience with lower quality tools.
Had a jigsaw and on the first cut the base bent up to the motor.
I have a chop saw that has a one piece forged fence that is to the right and left of the blade. It is not straight and on one side is about a sixteenth out of alignment. Can not use it to get a angle the same from side to side.
Had a router that would not go up or down after about a month.
I have a table saw the the miter slides are wider at the blade. So it makes the use of the miter slide worthless.
I have a dust collector that blows dust all over the place before it gets to the filter bag.
So now I will only buy a tool that is of quality that will perform the way it is suppose too whether it cost twice as much or not. I want something to last and not be junk right out of the box. And Harbor freight just does not fit that bill from tool to tool. Might be good and might not.