DesertHydro
Well-Known Member
what's up everyone? this is my first COB experience so bear with me. i did a ton of research over the past few weeks and laid out plans which seemed to change every 30 minutes but i finally got all my ducks in a row. after watching and re-watching Growmau5's videos several times i decided it was time to take the DIY plunge.
this is nothing new or crazy here. i simply took bits and pieces from everyones threads and ran with it. the basic concept of how im designing these 2 lights is 1 COB per sq/ft. some would say that's overkill but i like overkill. can a cockroach be too dead? i think not.
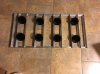
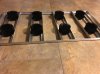
there will be 8 CITI 1212's 6500K going over a 2x4 area. i am building 2 of these identical because when my vert run finishes in my 4x4 it will be converted to a veg tent and I will put the second 2x4 COB array in there with the first, thus filling the tent with 1 per sq/ft.
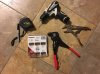
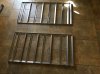
I got all my metal locally at a metal supply/welding place. i got about 53' of 1/8" 1x1 angle aluminum cut to all my dimensions for only 52$ out the door. it would have been around 100 at lowes and i would have had to cut it all myself.
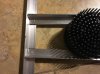
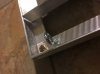
drilling the aluminum was easy, even with my little 12V drill. just get yourself a nice new bit for metal ~6$ and go to work. i used vice grips to hold my pieces together while drilling so my holes line up. they are bolted together with grade 8 bolts and nylon lock nuts. the pieces that hold the heatsinks will be riveted into their final position.
i dont know if i'll bother with securing the heatsinks down or not. it may be advantageous to be able to slide them around a little, but then again with 1/sqft i dont think i will ever need to.
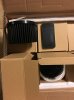
i am waiting on my parts to show up from Cobkits.com. i would like to thank him for helping me out all along the way with all of my newb questions and setup help. i might be adding fans onto these heatsinks to help them stay cool and efficient, but mostly just because i want the practice wiring and soldering them lol.
i plan to cable wrap everything and build it as clean as possible.
it may get a little boring in here over the next few days until the exciting stuff shows up but i will build and update as i go. thanks to everyone around here for the help and inspiration.
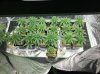
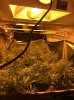
the plants vegging now are under t5's but soon to be blasted by these COBs. they are exotic genetix Future(GG#4 X starfighter f2) and ethos collective Blackfire(WIFI X afghan cultivar). stay tuned for more!
this is nothing new or crazy here. i simply took bits and pieces from everyones threads and ran with it. the basic concept of how im designing these 2 lights is 1 COB per sq/ft. some would say that's overkill but i like overkill. can a cockroach be too dead? i think not.
there will be 8 CITI 1212's 6500K going over a 2x4 area. i am building 2 of these identical because when my vert run finishes in my 4x4 it will be converted to a veg tent and I will put the second 2x4 COB array in there with the first, thus filling the tent with 1 per sq/ft.
I got all my metal locally at a metal supply/welding place. i got about 53' of 1/8" 1x1 angle aluminum cut to all my dimensions for only 52$ out the door. it would have been around 100 at lowes and i would have had to cut it all myself.
drilling the aluminum was easy, even with my little 12V drill. just get yourself a nice new bit for metal ~6$ and go to work. i used vice grips to hold my pieces together while drilling so my holes line up. they are bolted together with grade 8 bolts and nylon lock nuts. the pieces that hold the heatsinks will be riveted into their final position.
i dont know if i'll bother with securing the heatsinks down or not. it may be advantageous to be able to slide them around a little, but then again with 1/sqft i dont think i will ever need to.
i am waiting on my parts to show up from Cobkits.com. i would like to thank him for helping me out all along the way with all of my newb questions and setup help. i might be adding fans onto these heatsinks to help them stay cool and efficient, but mostly just because i want the practice wiring and soldering them lol.
i plan to cable wrap everything and build it as clean as possible.
it may get a little boring in here over the next few days until the exciting stuff shows up but i will build and update as i go. thanks to everyone around here for the help and inspiration.
the plants vegging now are under t5's but soon to be blasted by these COBs. they are exotic genetix Future(GG#4 X starfighter f2) and ethos collective Blackfire(WIFI X afghan cultivar). stay tuned for more!

 )
)