ONE MORE TIME Around FOR THE OLD MAN in The Wardrobe Grow

Tim Fox

Well-Known Member
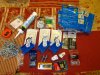
I am heading out to home depot and the hydroponics store, going to follow Fishdeth's refridgerator idea and mount electrical boxes in the bottom and send romex wire out the back, makes for a very small hole to be drilled and plenty of current flow, pictures of everything this afternoon, the paint is dry, so construction will continue this after noon
 

Tim Fox

Well-Known Member
IMG_7475.JPG Dude at the hydro store was so cool. We had some good laughs, I have learned so much on this forum that I was actually able to have this conversation with him in this sorrta "lingo" that if someone who knew nothing about what we do here, they would think we were talking French!!, even at that I felt really rusty , and the hydro guy could tell, he's like "first time huh" , I am like crap it shows that bad huh,, LOL.
Any way they had Fox Farms Ocean for really cheap since they buy it by the pallets, one bag was only $12 dollars usa. And they had a ripped bag they threw in for free!!
 

Tim Fox

Well-Known Member
IMG_7478.JPG SO I asked about growing pots for the plants, and we walk across this huge wharehouse, gessh get me a golf cart!, and he sales me 3 of these fabric bags , oxegen bags or some shit. made by REDI ROOT 5 Gallon bags,, got 3 bags for $12 dollars usa. I walked out of there with 2 bags of foxfarms ocean and 3 grow sacks for $24 dollars!
 

Tim Fox

Well-Known Member
Check that out, got the passive 4" exhaust in place, and two fabric grow bags side by side, the grow bags hold 5 gallons, and one bag of foxfarms ocean will fill both up for this grow! IMG_7477.JPG
 

Tim Fox

Well-Known Member
I AM SICK AND TIRED OF BLEEDING MONEY ON THIS WARDROBE!!! Grrrr, another $44 dollars given to home depot, oh wait, this thing is going to grow me some gonza!! sweet.. other than some saucers or a tub to put under the grow sacks I think I have everything to finish the build IMG_7479.JPG
 

MAJOR-RED-EYE

Active Member
Lol it does feel like an endless money pit at first but once everything is set up the costs are minimal it's just keeping supplies topped up and fine tuning. Those pots are a great mate at this rate you'll be ready to pop those seeds very soon :) the guys at my local hydro shop are awesome they always look after me well I've never paid full sticker price and always walk out with something free to try :) they hold meet ups most weekends for their regular medi users and grower customers to share tips and sample each others home grown and raise money for the united patients alliance it's a charity for cancer patients in the uk supplying them with free equipment to grow and produce their own oil :)
 

peralta

Member
I been reading up on what your doing... When I did my first grow I use soil (happy frog) I also went with organic fertilizer it's called iguana juice there is two parts first on if for grow and 2nd one is for flowering I really recommend it!! 1337222977006.jpg1335412370332.jpg
 

peralta

Member
By the way I use CFL in a grow lab tent 2ft by 2ft by 6ft...I should had gone wit led would of had better results but still pretty good for my first time
 
Last edited:

Tim Fox

Well-Known Member
By the way I use CFL in a grow lab tent 2ft by 2ft by 6ft...I should had gone wit led would of had better results but still pretty good for my first time
hell yes thats great for you first time, one thing i am not looking forward to is figuring out water schedules, with a hydro you just set a timer and let it run and maintain the res. everyone is saying soil is easy, just lift the pot and feel the weight some say, ugh, should i get one of those moisture meters they sale for around 10 dollars, plus if i scrog it i cant be lifting the pots after the scrog is in place. ideas?
 

peralta

Member
Just make some sort of stand where you can put the pot on top of, so the water can drain and put a try or something to catch all the water that way you won't have to take the plants out just the try full of water... it will be easy to water like that
 
Last edited:

Tim Fox

Well-Known Member
I had to lay the wardrobe down again and put a second 2x4 brace underneath, it leveled out the cab on the carpet and provided outstanding strength to the floor now, also while it was laid over I put 4 screws in the 4" take off for the passive intake, this made the sheet metal really strong. also in this photo you can see the small hole on the left I drilled for the romex wire to enter the cabIMG_7484.JPG
 

Tim Fox

Well-Known Member
I made final adjustments on the door latches and the door lock now the doors dont rattle and are snug when latched and locked, its almost light tight now before I even put the weather stripping on IMG_7486.JPG
 

Tim Fox

Well-Known Member
I ran the romex thru the back wall and installed a 90 degree plug in for the wall, then ran the romex across the corner to 3 house hold sockets and plates, I mounted them to a wood plate and then screwed the plate to the cab, this way I can move the outlets if I am not happy with thier location , i mounted the sockets with enough space to fit timers between them, also you may notice that I used the caulking gun and ran white caulking all around the inside of the box light sealing any and all corners, and around the 6 inch and 4 inch ducting IMG_7487.JPG
 

cashgrassnazz

Well-Known Member
I ran the romex thru the back wall and installed a 90 degree plug in for the wall, then ran the romex across the corner to 3 house hold sockets and plates, I mounted them to a wood plate and then screwed the plate to the cab, this way I can move the outlets if I am not happy with thier location , i mounted the sockets with enough space to fit timers between them, also you may notice that I used the caulking gun and ran white caulking all around the inside of the box light sealing any and all corners, and around the 6 inch and 4 inch ducting View attachment 3335635
Sweeet I could just watch you construct shit, forget the grow lol.
 

Tim Fox

Well-Known Member
hanging the fan is a bitch, and why is the shinny flexable duct tubing so freaking tight, would it kill them to make it 1/8th inch bigger around, so it slides right over the fan and exit tube,, i know right,, GRRR,,
 

cashgrassnazz

Well-Known Member
hanging the fan is a bitch, and why is the shinny flexable duct tubing so freaking tight, would it kill them to make it 1/8th inch bigger around, so it slides right over the fan and exit tube,, i know right,, GRRR,,
Had that same prob a few weeks ago. My exhaust is behind the cab, and instead of pulling the cab all the way out.

I figured I'd just lean over it bad mistake. When it was all said and done my back hurt and I was sweating lol.
 

Tim Fox

Well-Known Member
IMG_7488.JPG got the fan installed, bolted it right to the ceiling zero vibration, and quiet with the variac speed controller, using the rope light hangers to bring the carbon filter up, dang filter is huge for this box, so it better scrub the smell!!, thanks for the ideas on getting the flexable duct on
 
Top