sleepytown
Well-Known Member
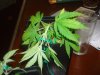
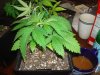
Alright, so I just cut down the last of my first harvest, and didn't want to waste any time in starting a new grow. As I was trimming my last plant, I immediately threw 8 Nirvana Aurora Indica seeds into some moist paper towels to germ. All I did was fold a paper towel over twice, throw it on a plate, fold the paper towel over my seeds, and put another (identical) plate on top. It gives them a nice, moist little package.


And this is me pHing some water for the germination. Since going through some serious pH catastrophes in my first grow, I have been quick to grab my pH pen at every opportunity.

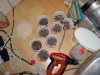
I did all of this Wednesday night [2/6/08]. This morning [2/8/08], the plate looked like this:

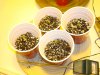
I now have tap roots showing on 4 of my 8 seeds. I would have let them go a little bit longer, and tried to plant them all together; but I have read some terrible things about germ rates with Nirvana seeds. So, I got things started. I am going to start these in disposable cups. I will transplant to proper pots at a later date. So, first, I filled 8 cups with a mixture of Fox Farm Ocean Forest soil and about 30% perlite by volume.

(Oh, and the cat litter has nothing to do with the grow)
I think the cups will work well, but I needed to give them a little bit of drainage for run off water. I did it like this, with a pair of wire cutters.

I clipped each cup four times, so they looked like this. If I find that it is not sufficient, I can easily cut more.

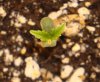
Now, with all of that taken care of, it was time for me to put the seeds in the soil. I poked a little hole in the soil of my four cups, and put in the four seeds that cracked. I used tweezers for precision, and put the seeds in with the taproot facing down.


I then gently covered them with soil while still holding on to the seed with tweezers. When the seed was covered and well situated, I gently pulled the tweezers out from the soil. Then, it was time to sweep them out to the grow room. I immediately ran upstairs to prep their first watering. Once again, I pHed my water (see, it's important!!)

I made sure to make sure to pH the water, soak my hand thoroughly in the water, and pH it again. The reason for this is that I like to water seedlings by sprinkling them with my hand, as it gives me a chance to lightly soak the soil without disturbing the seed. Many people have other methods, but I like this one. I decided to use very lightly acidic water, but will knock the pH down a couple of tenths of a point when they grow larger. I use rice wine vinegar, but will get some proper pH down soon.
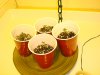
After that, I gave them a good sprinkling and threw them to the wolves. They will veg under a 400W High Pressure Sodium lamp. It is air-cooled (cooltube) with a 250cfm in-line duct fan. The exhaust goes out the door and the intake is passive. I hope they sprout soon!


(The fan in the room is not yet on. I will use it later)
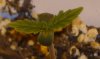
And that is it so far! I hope to see some sprouts by tomorrow, and have the remaining 4 seeds germ ASAP. I am still debating on many aspects of the grow, but am very excited for what's to come. Those 2 days that I didn't have any plants growing were hell! Thanks for stopping by, and check back soon. I absolutely welcome comments or any questions you may have.
S-Town
And this is me pHing some water for the germination. Since going through some serious pH catastrophes in my first grow, I have been quick to grab my pH pen at every opportunity.
I did all of this Wednesday night [2/6/08]. This morning [2/8/08], the plate looked like this:
I now have tap roots showing on 4 of my 8 seeds. I would have let them go a little bit longer, and tried to plant them all together; but I have read some terrible things about germ rates with Nirvana seeds. So, I got things started. I am going to start these in disposable cups. I will transplant to proper pots at a later date. So, first, I filled 8 cups with a mixture of Fox Farm Ocean Forest soil and about 30% perlite by volume.
(Oh, and the cat litter has nothing to do with the grow)
I think the cups will work well, but I needed to give them a little bit of drainage for run off water. I did it like this, with a pair of wire cutters.
I clipped each cup four times, so they looked like this. If I find that it is not sufficient, I can easily cut more.
Now, with all of that taken care of, it was time for me to put the seeds in the soil. I poked a little hole in the soil of my four cups, and put in the four seeds that cracked. I used tweezers for precision, and put the seeds in with the taproot facing down.
I then gently covered them with soil while still holding on to the seed with tweezers. When the seed was covered and well situated, I gently pulled the tweezers out from the soil. Then, it was time to sweep them out to the grow room. I immediately ran upstairs to prep their first watering. Once again, I pHed my water (see, it's important!!)
I made sure to make sure to pH the water, soak my hand thoroughly in the water, and pH it again. The reason for this is that I like to water seedlings by sprinkling them with my hand, as it gives me a chance to lightly soak the soil without disturbing the seed. Many people have other methods, but I like this one. I decided to use very lightly acidic water, but will knock the pH down a couple of tenths of a point when they grow larger. I use rice wine vinegar, but will get some proper pH down soon.
After that, I gave them a good sprinkling and threw them to the wolves. They will veg under a 400W High Pressure Sodium lamp. It is air-cooled (cooltube) with a 250cfm in-line duct fan. The exhaust goes out the door and the intake is passive. I hope they sprout soon!
(The fan in the room is not yet on. I will use it later)
And that is it so far! I hope to see some sprouts by tomorrow, and have the remaining 4 seeds germ ASAP. I am still debating on many aspects of the grow, but am very excited for what's to come. Those 2 days that I didn't have any plants growing were hell! Thanks for stopping by, and check back soon. I absolutely welcome comments or any questions you may have.
S-Town