420 Watt CFL Growbox Construction and Grow

Joos Springsteen

Well-Known Member
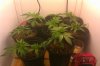
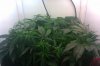
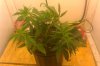
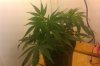
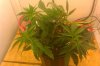
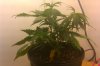
After having spent quite some time lurking around rollitup, doing my homework, it is finally time to begin my first grow journal!

All of the posts here at rollitup have really helped me get this project successfully off the ground so before we get to pictures, I would like to say thank you to everyone on the site for all of the knowledge you've taken the time to share!

On to pictures!

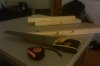
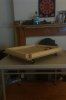
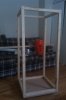
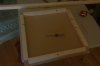
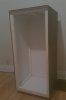
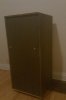
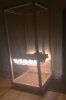
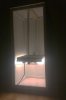
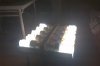
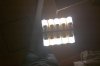
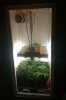
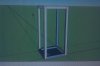
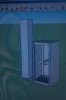
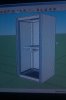
I needed a growbox. With a little time spent on Google Sketch up, I had a plan!

The growbox is approximately 2x2x4

The column next to the box is a 6 feet tall relative to the growbox
 

Attachments

Joos Springsteen

Well-Known Member
Next it was time to make a trip to Home Depot to collect supplies.

I used 2x2 treated pine to build the frame and finished it with painted MDF.

I attached casters to the bottom in order to make the box mobile. MDF is pretty heavy stuff.

I then built a light fixture. It holds 10 CFLs up to 42 watts. More powerful bulbs would be too large.
 

Attachments

Joos Springsteen

Well-Known Member
I still needed a fan, so I used a 4" inductor booster fan rated for 80 cfm.

I don't think this fan would hold up very well in a larger space, however it keeps air flowing quite well inside the box and keeps the temperature right in the sweet spot , 75-79 degrees.

I put a flange on the end and created a wire cage so that I'll be able to fit a sheet of carbon filter over it. I picked up a power tool replacement cord to wire the fan.
 

Attachments

Joos Springsteen

Well-Known Member
To finish off the box, I installed the fan in the top right corner and sealed it with finger caulk weather strip I found at home depot. I cut intake holes in the bottom and picked up two, 4" desk fans from Target to act as circulation fans.


I ordered a pack of 10 Blue Mystic seeds from Nirvana and after a trip to my grow shop for pots and soil, I was ready to germinate and plant!
 

Attachments

Joos Springsteen

Well-Known Member
Plants at 2 weeks following a recent a transplant from the soda bottles. I began LST and other grow technique experiments shortly after this point.


In some of the pots I have left the soil down low so I can bury the stem of the plant and test that technique of increasing the plants number of roots. A few of the plants will go to LST, while the others are supercropped or FIM'd.
 

Attachments

Joos Springsteen

Well-Known Member
Here we are at the beginning of the 5th week.

The plants have been responding well to LST, supercropping, and topping. As a result of the LST and supercropping, the lower branches have reached upward to become tops themselves.

Being my first grow I hope I'm not being too rough with the plants. I would certainly like 3 or 4 females, hermies just wouldn't do.

Today I buried the stems of the several the plant in order to observe any effects of extra root growth.
 

Attachments

MaD420MaN

Well-Known Member
I like it, Nice idea and good way to plan ahead, You can never do too much reading with growing! you WILL learn something new each and every day lol. A+ I'm subbed!
 

Joos Springsteen

Well-Known Member
nice how much $$$ did u spend total i am going to build the same thing jus a litle diferent
Too much, but you live and learn right? I spent about the same as I would on an ounce of weed. It came out to a little over $300, but a decent portion of that was for tools that I didn't have and decided it was finally time to buy.
I spent about $105 on 14 lights at 1000bulbs.com
Around $50 for the fan and components
Material also made up a large portion of the cost as I didn't have access to any scrap and had to buy everything new.

If you can be more resourceful than just buying everything new at Home Depot (like I did), bum tools, use scrap wood, and plan ahead so as to avoid surprises, you can probably keep the total cost under $200

Here is the thread I got the original idea to use google sketchup to design a similar box to my size requirements.
 

Joos Springsteen

Well-Known Member
I used the plans from this thread. The supplies list, and tools used are all there. Unfortunately, however, it appears that the pictures were being hosted on photobucket and have been taken down.
 

MaD420MaN

Well-Known Member
I see them now, Stellar fucking job! Great way to come in at it too!! Love the setup 100% its nice and well thought out!
 

Deltsy85

Active Member
looking great dude I can't wait to see the end product. My little darlings are just completing week 3. good luck to ya :)
 

MaD420MaN

Well-Known Member
To be honest, I haven't seen the mother plant within the past 3 weeks or so. Been busy with the clones and trying to get the hydro stable enough. ( pain in the ass ). I will get out there today or tonight and get some pictures of her, she has to be sexy as hell now lol
 
Top