FatMarty
Well-Known Member
Hey all I just finished installing my homemade contactor/timer assembly and thought I would share.
Most people won't want to necessarily use it the way I do for my side lighting.
That does not matter though - you can run a large current through a Contactor, and control it with a small current timer.
This would work equally well for large loads for the main lighting with a contactor rated for the load.
Here is the contactor I used:
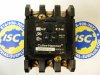
Pretty close anyway.
This model has 3 poles; I only used 2 of them for my purposes.
My model was a freebie of a new unit, and I was gifted a 24VAC transformer to fire the coil with.
Here is a drawing I made using one with a 110VAC coil:

It is much easier if yours has the 110VAC coil as you don't need a transformer to step down voltage from wall timer.
Mine is a 40 Amp 3 pole contactor; but I only have it wired for 15 amps with plug in wiring method.
If you need to switch more than 15 amps through the contactor you will need to wire direct from the panel to contactor;
you would also need to distribute the output to rated connections such as duplex outlets.
I did not take any pictures of the inside of my unit because it is one of a kind and would only confuse.
I used an old Belkin 12 volt battery backup unit that I gutted for the high impact high heat plastic case.
Here is a picture on my unit mounted inside a milk crate shelf I made for it:
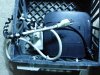
Crude I know but it works for me.
The black wire that is coiled around the white input plug is the 110VAC I plug that timer mounted on rear into.
(In my case the main timer energizes this when on and then this timer runs my side lighting 1/2 on followed 1/2 off repeated throughout lights on bloom cycle.)
You could just plug your cheap timer into the wall outlet, and then run the cord from the timer output to the coil on the contactor.
The only reason I put mine on the unit is I had the room and wanted my timer protected in the milk crate so it doesn't get bumped.
You are supposed to mount anything like this at least 3 feet from the floor in a garden environment.
I don't have much room; but I made it fit at the required height:
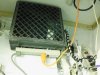
The power strip on the right comes from my main timer and runs my fans.
I plug into there for my 110VAC trigger voltage for the contactor coil.
You can see two of my sidelights plugged into the power strip I used for output of the contactor.
There are actually two circuits on that wall, and I split my loads as much as possible.
In this case it's about 1200 watts on the main line and about 600 watts on this switch plus my veg room is on that side.
You don't usually need to worry about load balancing until you get into mega watts; but it's good practice none the less.
Here is another shot after I put the sidelight up in front of the contactor assembly:
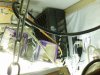
That's a homemade CFL array with 95% relective wing and PVC (non-corrosive) construction on the left.
I cut the milk crate in half - again I always go non-corrosive - for a shelf to hold switch.
And here we are with the lighting array all hooked back up:

That's a 1000 watt Metal Halid air-cooled in center. 3300K color.
I think I got 28 CFL's in there right now - I am going to make one more PVC array and call it good.
600 watts of CFL at present. all 2700K color.
So there you go - that's how you turn on a big electric hose with a small electric hose.
I made my switch to regulate temps better by running my sidelighting only half the time.
The HID lamp never flickers; so plants don't freak.
I like to think of the on/off action of the CFL's as clouds moving through my grow room sky...
It dropped my temps about 3 degrees today for first full day in operation.
I'm really liking this. I've run my sidelights intermittent for quite a while; but it was all manuel switching.
Most people won't want to necessarily use it the way I do for my side lighting.
That does not matter though - you can run a large current through a Contactor, and control it with a small current timer.
This would work equally well for large loads for the main lighting with a contactor rated for the load.
Here is the contactor I used:
Pretty close anyway.
This model has 3 poles; I only used 2 of them for my purposes.
My model was a freebie of a new unit, and I was gifted a 24VAC transformer to fire the coil with.
Here is a drawing I made using one with a 110VAC coil:
It is much easier if yours has the 110VAC coil as you don't need a transformer to step down voltage from wall timer.
Mine is a 40 Amp 3 pole contactor; but I only have it wired for 15 amps with plug in wiring method.
If you need to switch more than 15 amps through the contactor you will need to wire direct from the panel to contactor;
you would also need to distribute the output to rated connections such as duplex outlets.
I did not take any pictures of the inside of my unit because it is one of a kind and would only confuse.
I used an old Belkin 12 volt battery backup unit that I gutted for the high impact high heat plastic case.
Here is a picture on my unit mounted inside a milk crate shelf I made for it:
Crude I know but it works for me.
The black wire that is coiled around the white input plug is the 110VAC I plug that timer mounted on rear into.
(In my case the main timer energizes this when on and then this timer runs my side lighting 1/2 on followed 1/2 off repeated throughout lights on bloom cycle.)
You could just plug your cheap timer into the wall outlet, and then run the cord from the timer output to the coil on the contactor.
The only reason I put mine on the unit is I had the room and wanted my timer protected in the milk crate so it doesn't get bumped.
You are supposed to mount anything like this at least 3 feet from the floor in a garden environment.
I don't have much room; but I made it fit at the required height:
The power strip on the right comes from my main timer and runs my fans.
I plug into there for my 110VAC trigger voltage for the contactor coil.
You can see two of my sidelights plugged into the power strip I used for output of the contactor.
There are actually two circuits on that wall, and I split my loads as much as possible.
In this case it's about 1200 watts on the main line and about 600 watts on this switch plus my veg room is on that side.
You don't usually need to worry about load balancing until you get into mega watts; but it's good practice none the less.
Here is another shot after I put the sidelight up in front of the contactor assembly:
That's a homemade CFL array with 95% relective wing and PVC (non-corrosive) construction on the left.
I cut the milk crate in half - again I always go non-corrosive - for a shelf to hold switch.
And here we are with the lighting array all hooked back up:
That's a 1000 watt Metal Halid air-cooled in center. 3300K color.
I think I got 28 CFL's in there right now - I am going to make one more PVC array and call it good.
600 watts of CFL at present. all 2700K color.
So there you go - that's how you turn on a big electric hose with a small electric hose.
I made my switch to regulate temps better by running my sidelighting only half the time.
The HID lamp never flickers; so plants don't freak.
I like to think of the on/off action of the CFL's as clouds moving through my grow room sky...
It dropped my temps about 3 degrees today for first full day in operation.
I'm really liking this. I've run my sidelights intermittent for quite a while; but it was all manuel switching.