FR/NIR plant Imaging.Photosynthesis Rates and plant Health

stardustsailor

Well-Known Member
Prologue : http://www.eumetrain.org/data/3/36/print.htm

Equipment needed :
-Cheap digital compact photographic camera.
-Old exposed negative colour film,
or a piece of x-ray negative,
or some blue+red colored "gels" for lights ,
or piece of the dark purple plastic covering the IR led(s) of a remote controller ,
or any sort of visible cut-out & NIR pass-through filter.....

How to customise ordinary camera into a FR/NiR camera: http://www.publiclaboratory.org/tool/near-infrared-camera
( Caution:Be aware of the camera's "Flash " capacitor. It can/may kill you,if is charged and be touched !!! )

[video=youtube;XFOHWaL7XsM]http://www.youtube.com/watch?feature=player_embedded&v=XFOHWaL7XsM[/video]

More info : http://www.publiclaboratory.org/wiki/ndvi

http://www.publiclaboratory.org/wiki/ndvi-plots-ir-camera-kit


Software needed :

-Fiji Biomedical/scientific image processing package (open source freeware ) :http://fiji.sc/wiki/index.php/Fiji
http://valelab.ucsf.edu/~schindelin/
Mirror downloading : http://valelab.ucsf.edu/~schindelin/

- Photomonitoring plug-in for fiji : http://github.com/nedhorning/PhotoMonitoringPlugin

-Additional files needed : https://github.com/nedhorning/PhotoMonitoringPlugin/downloads


* 1 ) Install FIJI ,first .(no need for installation,though..Works as is .From a USB stick .

2 ) Run FIJI and full update it..( starts automatically..2-3 updates...) .Close program after updating .

3 )Download & Unzip Photomonitoring plug-in for fiji.
Copy whole folder as is in " Plug-ins " folder of FIJI.

4)Download & Unzip " metadata-extractor-2.6.2 " .
Copy the 'metadata-extractor-2.6.2.jar 'file to " jars" folder at FIJIprogramfolder .

5 ) Files " metadata-extractor-2.6.2-src .jar " and" xmpcore .jar " ,
are copied both to " Plug-ins " program folder of FIJI.

6) Download and unzip 'PhotomonitoringLuts" .
Copy files to "luts" folder ,inside FIJI program folder .

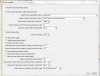
7 ) Fiji and Photomonitoring plug-in ,are ready to align and automatically generate :

-B/W floating point NDVI image .
-Coloured NDVI image.(with your 'Lut' colour gamut selected )
-NRG image .


NDVI
(which stands Normalized Difference Vegetation Index) and for NRG images. NDVI and NRG are methods taking the information in pictures and quantifying the amounts of infrared and other wavelengths of light reflected from vegetation. This can be used to evaluate health of vegetation by comparing ratios of blue and red light absorbed versus green and IR light reflected. It's a snapshot of how much photosynthesis is happening. This is helpful in assessing vegetative health or stress.
https://www.agronomy.org/publications/jeq/articles/36/3/832
....
Now ..Once,you got everythin' there....
Say..What about ....
A bit of training ,maybe ? ......
 

stardustsailor

Well-Known Member
First of all you need one normal ( visible wls ) photograph of the plant(s) .
This can be taken with a normal photo camera or
with the NIR-modified one ,
as long as the IR-cut out filter( that was removed from sensor ),is placed in front of the camera len,to take the shot.


***(Alternatively ,a visual+Nir mixed photo can be used ,
but with the white balance fixed (more greens/ess magenta & just a tiny bit of more yellows /less blue)
,
at camera Raw or PhotoShop.)***


You can use these for experimentation ....(OHHH..You'll be amazed.... )


Now ,a second picture of the same exact(or as close as possible to original ) scene is needed. This time ,only in FR/NIR .
( Visible light has to be cut-out with exposed film or other method,attached in front of camera lens. )
Like this :
..

Now....
Make one folder in your desktop .Name it i.e " vis " .Put inside the visual spectrum-normal photo.
Make another one .Name it "nir" . Put inside the NIR spectrum-"magenta" photo.
Make a third folder and last one . Name it "final " .Leave it as is......Empty.

On with the FIJI.....
Open program.....


Go to "plugins" tab.
Way to the bottom...
"PhotomonitoringPlugin -Master" => "src"=>"list files" .
Choose "calculate from pair" =>"ok"

"Open visible reference image " path ...
Choose folder "vis" and the normal image....
"ok" ...

"Open NIR reference image"
Choose folder "nir" and the magenta-nir image...

"output text file" ..
Choose to be inside i.e. "nir folder " ....
"Save " .....

Go to "plugins" tab.Yes.Again....
Way to the bottom...
"PhotomonitoringPlugin -Master" => "src"=>"Register Images "
.....

For starters ,until you learn more of it ,type in, these :
start from here......jpg...
Hit "ok".....

"photo pair file " is asked ....
The text file in "nir " folder ......( " matchedimages.txt " )
"open "

.....
"output directory & log file name " is asked ...

Choose the empty folder "final " ..
Hit "open" & "save" ...
Wait for a while ,for the plugin to align,combine and generate the new images....

It's almost over,now......
 

stardustsailor

Well-Known Member
Now,after a bit of processing time....
Open the "empty" .."final " folder....
Ohhhhh....Ohhhhhhh...
What we 've here ?

NRG image :


NDVI float point (0-255 ) B/W image :


And....


NDVI colour image .............(At our pre-selected orange-blue " lut " (look up table )

{ FIJI Tab " Image " => " look up tables " .... Open an B/W 8 bit image ,to have a look at all of them,if you like... )
 

stardustsailor

Well-Known Member
Now...
With a bit of experience and a steady hand (or a tripod ,better yet...) ,you'll manage to shoot nice NIR pics...

And If you will teach yourshelf the easy-to-use PhotoMonitoring plugin
and spend a bit of time to learn some few basics ,
of the vast ( biomedical ) FIJI image processor .....

(.....it has tremendous scientific-oriented (biology,mainly ) image processing abilities...Just go through it's manual .... Really a very powerful tool ,there... )

Then you'll get way better results....


Analysing some example images....
(Different than those generated above but all generated,
with the first two samples ..And a bit further experimenting with FIJI's capabilities ....)


NRG


An image where NIR/FAR RED is the red channel (where red colour ,plenty of FR/NIR irradiated and/or reflected and /or transmitted .
PS rates there are pretty high. Red=good

Red irradiation is the green colour on image....Where is green ,there's a problem ..No PS there.....Green=trouble....

Green rays are of blue color in the image....
If much blue ,lots of green irradiated and/or reflected and/or transmitted .
Could mean Low PS rates(shade adapted plants ) and/or shade light .Blue= Maybe ok ,maybe not..Depends on case...


Notice one thin stem on top of image ..Green....More red is reflected by them / less absorbed....
That's rather normal Nothin' to be afraid of ....

But....
Notice some burned leaf tips ,that 've start curling....
Green...No PS there...Leaf necrosis.....Red light is not absorbed there,anymore...


Flowers are blue/ green...(pistils do not photosynthesise.... )
So the top leaves do not much.......( due to Photoinhibition & photorespiration?? )
....But not in a such degree,to be worried about...


NRG images are pretty good for have a general idea of PS rates and sites of intense PS rates ,as also for
monitoring plant health problems....(burned leaves,Photorespiration-photoinhibition,ect )....

Also NRG images are way efficient for vegetation density/activity "scouting"...
In general....
Active plants,being red at NRG imaging ,they get distinguished easily ,from "green" that it is not living vegetation ...
(....But rather i.e. a camo net ..Or whatever else,that looks like vegetation but it is not ...
Those are showin' just blue....)
 

stardustsailor

Well-Known Member
Normalized Difference Vegetation Index Image aka NDVI

This one is tricky...."Normalised" ....

Meaning a rat
io without spesific units ,but within a very specific range....
Remember the Φ (PSS => Photostationary Phytochrome State ...) ?

Photostationary Phytochrome State = Pfr / Phy total =>PSS = Pfr / ( Pfr+ Pr )....
Well,they have pretty big relation those NDVI and PPS ...


What about the range of values....?

It goes from -1 up to +1 .....

NDVI = FR/NIR radiation - visible wls (PAR ) / FR/NIR radiation + visible wls (PAR ) ...

So If Visible light is zero.....
Then value of NDVI would be x-0 / x+0 = 1
(calibrated in FIJI for white colour => value of 255 ,for an 8 bit B/W image )

If some or all NIR/FR is absorbed then at this case (no RGB light there ) ,the values of NDVI,are between 1 (max ) & 0 (min) ...
......
+1 means no visible light at all ,all NIR/FR reflected / emitted /transmitted ...
0 means (at this case of no visible light at all) ,all NIR/FR radiation is absorbed ...
(Value "zero" calibrated in FIJI for 50% grey => value of 128 ,for an 8 bit B/W image )

The opposite case now....

If NIR/FR light =0

Then value of NDVI would be 0-x / 0+x = -1
(calibrated in FIJI for black colour => value of 0 for an 8 bit B/W image )
If some or all PAR light is absorbed then at this case (no NIR/FR light there ) ,the values of NDVI,are between -1 (min ) & 0 (max) ...
-1 means that all Par light reflected / emitted /transmitted ...(black )
0 means (at this case of no NIR/FR light at all) ,all PAR radiation is absorbed ...( 50% grey )..

So in a NDVI image ,black colour means that all PAR is reflected and all FR/NIR is absorbed.(bad,unhealthy,trouble)
White means ,that all PAR is absorbed and all
FR/NIR is reflected (good ,healthy)...
All the 254 grades of grey in between ,is the different ratios between +1 and -1 ....
128 (neutral grey 50% ) is 0 ....


Since it is normalised I chose the increasement to be of a straight line ....
( Arithmetic Progression )
FIJI => "Analyze" tab =>"Calibrate"..
And "Analyze"=> "tools" => "calibration bar " .Read manual,about "Calibrate ","measure" and "Calibration bar"...
....
Now...What and which "infos" this image,is offering ?
Well ,for starters,now I'm pretty sure that ,the deeper leaves,work harder ..Or more efficiently,if you like...
The white reflectance (NIR/FR ) and PAR maximal absorption is not happenin' on top layer of canopy...
(Not at the moment,when I shot the photos,at least... )..

FR light is way much more under the top layer of canopy....
I've also some over-fertilization occuring =>black-dead- leaf tips..(It was about time,to happen..I knew that !!!! )

I'm also aware by now ,that the FR/NIR emitted by the panels,is way low....
(otherwise ,the top leaves would have been white...All of them... )

FR is irradiated from deep in the canopy ( chlorophyll fluorescence ..) ..
Active chloroplasts there...

I do not see insect eggs or fungus "spots" (Which is nice...)...
(No need to search thoroughly the canopy....Or the leaves one by one...
Once an intruder,there...Easy to spot....Way easy... (black dots ,spots )

(This pics have more than thousand words ,hidden within ...
Myshelf ,I've plenty of their aspects still to discover ,I guess.... )..

But B/W NDVI images are rather boring ,dull and....."monochromatic"..
(They remind me of somethin' else...Guh-guh...Ahhh-hem.... )


ru4r34l

Well-Known Member
+rep, great reading ;-)

A very interesting thread and read indeed, but seems rather academic and would not have a lot of use in grow room applications apart from novelty.

regards,
 

stardustsailor

Well-Known Member
Oh,I think you're quite wrong ,brother...
It's the cheapest and pretty easy,I should say ,way,to monitor ,real time ,
many aspects of plant growth....
Specially,when dealing with DIY led panels.....
(But not only...You i.e. can find out about a "trouble" comin' ,way before you would have seen it ,
confined by the "limitations" of human vision...And way many more... )

Not that academic....
Being a indoor grower ,then ,is academic all the way...
Growing plants inside an aluminised tent,within a totally fragile controlled environment ....
.....with just a few watts of leds..??? !!!!!!!
.....
If that's not academic,for starters,what else is ?
CERN is ?
So much of wasted growing space..& energy (-underneath ground ,way super-duper donut-shaped grow-room...- ),
just to spin around some protons ,neutrons ,whateva ...
And have them collide...
Just to record the "boooooommm"....
Kids in white lab uniforms.....Ts.ts.ts....

Just kids,playin ' God....
Or just havin' really big fun with the best & most expensive "firecrackers"......
 

stardustsailor

Well-Known Member
Considering you've thought about this way more than I, can you come up with some use cases?
-Ps rates .
-Photoinhibition/Photorespiration sites and "degree" ..(can be monitored for a certain period of time )
-Shade adaptance/Sun Adaptance grade.
-Canopy/plant overall and specific health and efficiency.
-Canopy active PS sites
-Shade / dark spots of growth space..
-FR/R calculation in light used.
- way helpful into trimming' the lights used ..
- Scanning for alien non-photosynthetic organisms/parasites or injuries from them ..
-Scaning for high irradiances or low irradiances...
-Homogeneity / dispersion /diffusion /scattering /reflectance /absorbance/transmitance of light ...
...
Oh ,there are more...
....
Step by step....
Let's take it easy...
It's a very powerfull ,advanced (space tech ) and useful tool...
And quite easy to "make" & "utilise"..
Not academic at all....
On the contrary...
Way much fun...
 

tenthirty

Well-Known Member
Ok, you talked me into it.

How are we going to setup standards to go by?
Kinda like standard gels and a standard color chart???? (simplistic)

I have to read more.........(research) looks good for cheep!!
 

stardustsailor

Well-Known Member
" Look up table (aka lut ) " gamut coloured NDVI image....

(LUT chosen.."Royal" somethin...)=>
When at "register Images "stage of photomonitoring plugin ..
"Enter variables " window....
Last input....Way to the bottom of window....
"select color table-somethin -for NDVI image "....
Has some very interesting-scientific oriented- luts there....
(One can make his own "colour gamut" luts ...
But I haven't got there yet...
Vast program.... )

Like the previous ..But ....with colours ....
More "detail " or " scaling "emphasised...

Shade adapted plant....For sure....
Low / moderate overall top canopy PS rates,better and more work deep within....
Led panel,overhead (10x CW ,10 x 630 ,2 xWW & 2 x UV ) sure has pretty good....." penetration"...
No blues( low PS rates ) deep in canopy...
Probably also,those panels need a ...lift to a bit higher ...place....
Too close....
And I've to be careful with the ferts ...
I'm that close ,startin' burning leaves....
Some R/O water for the next days....
On a diet from now on ,my fat little ladies...
For a short while...


stardustsailor

Well-Known Member
That was pretty much it....
Let's hope that some of you are going to have , a fun and educational time ,
with just a cheap digital camera ,there....

......
Stardust is hidden ,sometimes, in places ,you can't just imagine...
Space -tech ,for the poor....

Now....
It's play-time...
 

stardustsailor

Well-Known Member
Spectrometer is also easy enough DIY "task " ...
(VHS tape case or plastic PVC pipe with cap ,a piece of DVD and a cheapo web-cam ,are all of what is needed...)
(Although directly,taking measurements from leds with one ,isn't.... )
Nice idea there,brother 10-30...
But I guess....
Pretty tough for everyone to have same equip ..
(Same camera,same filters,same processing....)
But it is the outcome that has a lot to ..tell,anyway...
But still ,yes...
A "standardisation" would 've been nice & helpful ...
Hey..!!
Step by step...
We 've first to learn to take ,every possible advantage offered here ...
(This FIJI thing...OHHHHH..It can do way a lot of useful stuff...)..
 

stardustsailor

Well-Known Member
DIY Vis Cut / IR Pass Filters :

-Crossed polarizers ( from LCD displays ,two needed ): Very Good.
-Floppy discs : Good .
-Fully Exposed (" burned " ) photo film .( processed ) : Very Good .
-Fully Exposed (" burned " ) photo film .( unprocessed ): Blurry image
-X ray Film : Not Good ,blurry image.
-Welders Protective Glass: Not good .(cuts IR )
-Dark purple tinted glass/ PMMA ( PlexiGlass ) : Very Good.
-Remote controller IR led plastic cover : Some are very good (Darkest ones ),some let a bit RED pass through( reddish ones ) .

IR photography Basics : http://dpfwiw.com/ir.htm
 
Top