HPA DIY first system question/ newbie

Larry3215

Well-Known Member
First of all the way I have it drain still has maybe 1 " of water before it can roll into the balkhead I can't think of anyother way unless I just drill few wholes in the bottom and then let that drain into a sip tray same concept how @Wastei has the 2 bucket setup same concept it can be pumped out bottom tray
Water in the bottom isnt a fatal flaw. Roots that end up there will just be smooth roots. if you the double tray thing, line the bottom of the chamber with fabric or the roots will just spill through and grow right down to the other tray. They will even grow through the fabric if there is enough humidity in the lower section. Be sure it has lots of air flow so the roots air-prune.

that brings me to another thing I was noticing when I opened the lid to look at the roots it felt stagnant too humid if there is a such thing but it felt like it should be aired out if u know what I mean
Thats bad. The chamber absolutely need fresh air or you could have an anerobic situation = bad bacteria. More importantly, the entire point of doing HPA or AA aero is the AIR part of aeroponics. Roots need oxygen, so you absolutely do need fresh air constantly being refreshed.

Doing that with plastic root chambers is not easy and I believe thats one reason many HPA setups fail.

So that brings me back to what you told me from the start I should make the chamber out of breathable meterial, ya I think that's the way to go , so now I am trying to still possible use the plastic tote but some how vent it with the fabric from the fabric pots Idk if it would even work I'm trying to wrap my head around what a breathable chamber looks like can I build it with PVC frame and wrap it with fabric but then how do I build foam around it ? I read some of older post and I think u said to build walls around the outside and fabric liner on the inside but I guess I can't visualize it in my head I don't know how u make the gap there! Anyway this has been a awesome learning experience and I can't wait to be able to give my brother some of the best medicine he can get he deals with rheumatoid arthritis it helps his inflammation so much better than any doctor can give it's amazing the power of the plant lol
I use fabric pots. Most of them are rather shallow, so I cut the bottom out of one pot, then hot glue that to the top of a second pot to get the height I want. Im using 2ea 30 gallon pots to make my 56 gallon chamber. Its 24" in diameter x 29" tall IIRC. Those pots come in all sizes, so you can pick what ever fits your space.

Here is how I would do it using chambers like mine at 24" diameter. You could just build a cube out of PVC pipe. If you use pots that are 24" in diameter, that means the circumference = 2 x 3.14 x 12 = 75". Make the frame 75/4 = 18.75" on a side. Then attach the fabric to the PVC. Then build a 1" thick foam box a little larger on all sides, but the same height. Use the same foam for the lid if you are growing autos. You may need to reinfoirce it of growing larger plants.

Then, if this is inside a grow room, just use a small fan like maybe a 4" computer fan than blows air into the chamber. Use an Inkbird temp controller to turn the fan ON/OFF based on temps. You want the root chamber to stay at no more than 70F on the INSIDE.

Each root chamber should be at least 16"-18" deep minimum. My 29" is probably excessive for HPA nozzles.

If you need more than one pot to hold more plants, they could be built into a long section all enclosed by the same foam 'box', but it will be better for temp control to have each one with its own fan and controller. It will cost more for controllers and foam though. Probably 4 modules in a square shape could all use a single controller and fan.

You will need a catch basin of some sort under each chamber to catch runoff and a way to dump or pump them out. I use a plastic water heater drain pan. They come in lots of sizes. This one will work for a 24" chamber. The water only drips out in the center. If need be put a small weight in the center of the fabric pot to form a dip.


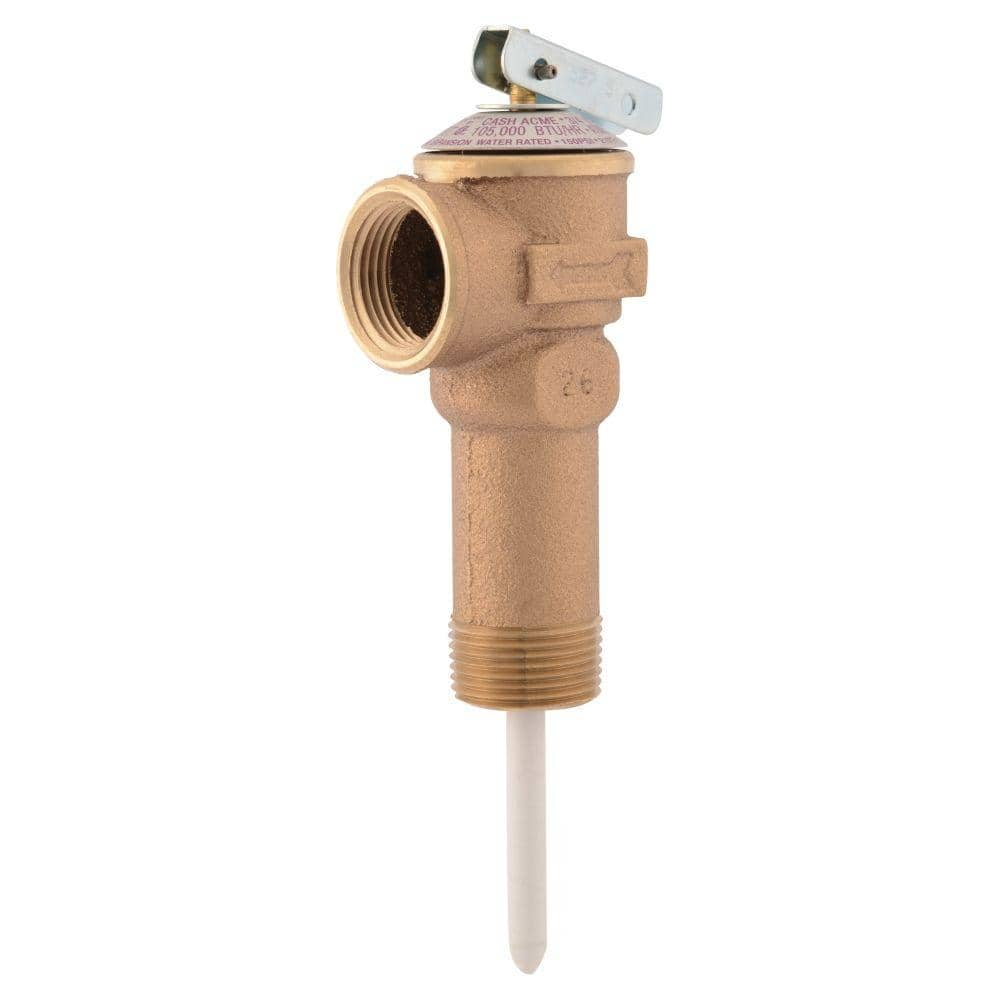
edit : forgot to mention I played around with the regulator I purchased and you can’t dial the out put past 65 psi at the nozzle sucks that they don’t give u that little detail before u purchase and wait 3 weeks buts it’s ok I’m still using it I like that stopped the squirt after it’s shuts off gives more uniformity in the entire system there’s no more fluctuations in pressure to me that is actually a good add on just need to look for a better Regulator they are hard to find and the ones I do find are like 50-60$, just gotta keep looking but for now I’m going to go with it and see where it takes me I know droplet size is bigger but it’s that or I have it going from 110-85psi maybe I should just let it idk anyway I’m going to run with it for now until it’s replaced
Interesting. I used that regulator and ran my HPA nozzles at 100 PSI with out issue......oh wait. I had to modify it. Hmmmmm. now I cant remember what I did. It involved the spring used to control the pressure. Let me see if I can find the darn thing and take it apart. Im thinking I had to put a washer under the screw to increase the pressure, but let me check.....
 
Last edited:

Larry3215

Well-Known Member
Ok, lucky I had not thrown it out!

Yes, I used a thick plastic nylon washer I cut down to fit to increase the pressure on the spring. The plastic is aprox 1/16" thick. You could also use a stainless washer or two if needed. Here are some pics.

reg1.jpgreg1.jpgreg2.jpgreg3.jpgreg4.jpg
 

Larry3215

Well-Known Member
P.S. be careful as you unscrew the spring. There is some pressure, and parts could go flying, but not a lot.
 

Wastei

Well-Known Member
IMG_20210131_190020311.jpg
System running for now. Got it somewhat stable at 90-130psi. The pressure switches is a pain in the ass to work with. Plants are growing and liking the little extra pressure though. Still looking for a bigger accumulator tank.
They don't have the 150psi one in stock anywhere. Also looking for a 10" 1 micron inline filter that can tolerate 150psi.

The pressure switch failed on me and was building pressure all the way up to 180psi. Got it somewhat stable for now. Not going over 130psi no matter what. No cycling.

Surprised something didn't break or explode. Need way more fine tuning. Got to other switches I'm gonna check how they operate.

Going to try to find hex keys in inches tomorrow. We don't use that here except for G threads. We convert them also in to metric standard. In production we still use inches for taps like G 1/2" , R 1/8" etc.

Now I can at least feel somewhat safe regarding over pressure. It was running 180psi for probably 6 hours straight. Cheez!

Do you know if people use different pressure switches than what Aquatec provide? I think I read it a couple of weeks ago but can't remember the name. Do you know what I'm talking about @Larry3215? Cheers!
 
Last edited:

Larry3215

Well-Known Member
For over pressure protection you can use a water heater safety valve. They are very reliable. Only down side is they are brass, so you need to have a one way valve in-line before the release valve.

There are stainless versions, but they are hard to find and $$$.

You also need to plan where the discharge is going to go. I had mine plumbed to feed back into a 5 gallon bucket because I was using a 5 gallon accumulator tank..

They are typically pre-set to 150 PSI.


I used one of these PVC check valves to prevent the brass from feeding copper back into the system.


Rdubz

Well-Known Member
Water in the bottom isnt a fatal flaw. Roots that end up there will just be smooth roots. if you the double tray thing, line the bottom of the chamber with fabric or the roots will just spill through and grow right down to the other tray. They will even grow through the fabric if there is enough humidity in the lower section. Be sure it has lots of air flow so the roots air-prune.
Very true !
I think I should at the very least put a 3/8" for the drain instead of the 1/4" but still I think even then it's not enough . But like u said the point is the air!

I use fabric pots. Most of them are rather shallow, so I cut the bottom out of one pot, then hot glue that to the top of a second pot to get the height I want. Im using 2ea 30 gallon pots to make my 56 gallon chamber. Its 24" in diameter x 29" tall IIRC. Those pots come in all sizes, so you can pick what ever fits your space.

Here is how I would do it using chambers like mine at 24" diameter. You could just build a cube out of PVC pipe. If you use pots that are 24" in diameter, that means the circumference = 2 x 3.14 x 12 = 75". Make the frame 75/4 = 18.75" on a side. Then attach the fabric to the PVC. Then build a 1" thick foam box a little larger on all sides, but the same height. Use the same foam for the lid if you are growing autos. You may need to reinfoirce it of growing larger plants.

Then, if this is inside a grow room, just use a small fan like maybe a 4" computer fan than blows air into the chamber. Use an Inkbird temp controller to turn the fan ON/OFF based on temps. You want the root chamber to stay at no more than 70F on the INSIDE.

Each root chamber should be at least 16"-18" deep minimum. My 29" is probably excessive for HPA nozzles.

If you need more than one pot to hold more plants, they could be built into a long section all enclosed by the same foam 'box', but it will be better for temp control to have each one with its own fan and controller. It will cost more for controllers and foam though. Probably 4 modules in a square shape could all use a single controller and fan.

You will need a catch basin of some sort under each chamber to catch runoff and a way to dump or pump them out. I use a plastic water heater drain pan. They come in lots of sizes. This one will work for a 24" chamber. The water only drips out in the center. If need be put a small weight in the center of the fabric pot to form a dip.
Wow okay so I had to sit down write everything down and process so much good info ! Ok so my goal has been to duplicate my 4x4 flood table set up I always liked being about to put 10 plants that are smaller not big I have 7 foot ceiling and with the light also taking up room I can't really go supertall but maybe now since I can put the chamber pretty much sitting on the concrete but raised enough for it to drip into pan, the 4x4 was sitting 2ft off the ground ... So no I'm not apose to 1 plant I definitely really thinking now to keep things simple I'm going to do that or maybe I can make it for 2 instead cube I'll go rectangular idk I don't want to complicate it more than it already is but I don't want to Veg for 3 months either so I'm going to keep the chamber about the size the 24" cube , like you explained I can have a little more control over temp..

about the temp control with a 4" computer fan how do u hook the Inkbird to the fan , maybe a 12v converter ? And that converter would just plug in to the Inkbird maybe I'm over thinking this but would it be better to have the fan pull air out instead of blowing in? I guess my thinking is pulling air out will have more cooling effect.

Now with a cube like that 1 plant can I get away with running one nozzel centered with a good spread as long as it fills the entire chamber ? Or should there be one on each side for good measure I feel like 1 still should be able to get booth sides of a root ball, as long as mist reaches all sides of the chamber but Honestly don't know..

P.S. Using my phone so sorry for any mistype
 

Rdubz

Well-Known Member
Ok, lucky I had not thrown it out!

Yes, I used a thick plastic nylon washer I cut down to fit to increase the pressure on the spring. The plastic is aprox 1/16" thick. You could also use a stainless washer or two if needed. Here are some pics.

View attachment 4811778View attachment 4811778View attachment 4811779View attachment 4811780View attachment 4811781
This is GOLD I couldn't wait to do it Found the perfect piece of plastic I couldn't asked for any better fit lol that's why I keep everything !!!image.jpg
Its a spacer from my TV mounting bracket kit of screws that come with it for every known tv lol well all I had to do was put it in the vice and cut it with my metal blade .

Well I would have never done that because never took one of those apart it's genius! Thank you for that now I'm hoping anyone else trying to attempt this can learn from my experience and also more important the information that can't be taught !

Thank you this one is brilliant!
 

Larry3215

Well-Known Member
Also looking for a 10" 1 micron inline filter that can tolerate 150psi.
There are lots of filters that can take 150 PSI. Thats a pretty standard rating.


or I like this one because it has the drain valve built in. That comes in handy sometimes.


Note those are all 200 mesh which is about 70 micron. Are you sure you want 1 micron? You are going to have to clean that filter almost every day.

Your nozzles orifice are probably between 0.2 - 0.5mm which is like 200-500 microns. A 200 mesh filter should be more than good enough and not clog nearly as often.


Do you know if people use different pressure switches than what Aquatec provide? I think I read it a couple of weeks ago but can't remember the name. Do you know what I'm talking about @Larry3215? Cheers!
There are tons of pressure switches. Price of course is a factor. I use this one because its a standard model that come on many well pump setups. Plus its cheep ;) I use the CXA-S3 - last one on the list.


Larry3215

Well-Known Member
I may not have time to finish replying right now, but I want to ask if you have seen my aero thread? I already posted a lot of the info you need.


Very true !
I think I should at the very least put a 3/8" for the drain instead of the 1/4" but still I think even then it's not enough . But like u said the point is the air!
I havent run the numbers for your nozzles or root chamber, but your flow rate is going to be pretty low. Like in the 1 gallon per day range max, and most likely a lot less. It wont take much of a hole to keep up.

So no I'm not apose to 1 plant I definitely really thinking now to keep things simple I'm going to do that or maybe I can make it for 2 instead cube I'll go rectangular idk I don't want to complicate it more than it already is but I don't want to Veg for 3 months either so I'm going to keep the chamber about the size the 24" cube , like you explained I can have a little more control over temp..
You should be able to fit 3 small plants in a 24" cube comfortably
about the temp control with a 4" computer fan how do u hook the Inkbird to the fan , maybe a 12v converter ? And that converter would just plug in to the Inkbird maybe I'm over thinking this but would it be better to have the fan pull air out instead of blowing in? I guess my thinking is pulling air out will have more cooling effect.
You can run the computer fans with a cheap wall wart 12 volt power supply. Plug it into the Inkbird. You for sure want them blowing IN. Other wise you will be sucking mist towards the sides of the fabric chamber and out of the system. Blowing in will actually help force the mist out the net pot and keep the roots at the top wetter. BUT - you dont want a lot of pressure. Thats why a computer fan. You also need to leave openings on the opposite side of the foam box for the air to exit. You are trying to enhance the evaporative cooling effect that the wet pots naturally have, so you need the moist air to exit the space between the foam and the pot - but - you dont want to pressurize the system or you will loose mist too soon and have low hang times. Just a gentle flow is more than enough.

You are going to have to experiment to see what works best as far as fans speed, exit openings, etc. It will depend on how hot and how humid your grow room is. Humidity is going to be the biggest factor. If it gets too humid, the water wont evaporate from the fabric fast enough to cool things down. In that case you will need to draw in dryer air from outside the grow room.

Now with a cube like that 1 plant can I get away with running one nozzel centered with a good spread as long as it fills the entire chamber ? Or should there be one on each side for good measure I feel like 1 still should be able to get booth sides of a root ball, as long as mist reaches all sides of the chamber but Honestly don't know..
Roots have an absolutely amazing ability to find nozzles and completely cover them up. I have placed nozzles in every possible position in a chamber and every single time the roots get to at least one of them. Roots will grow across the ceiling of your chamber, and sideways, and vertically across open space over amazing distances like gravity doesnt exist at all to reach a nozzle. They have a 6th sense about where the water is coming from.

If you place your nozzle directly under the net pot, your just making it that much easier for them :D

My best setup is where I keep the plants near the center of the chamber, but still several inches apart - maybe 6"-8". You should be able to fit three in a triangle. Then place the nozzles near the bottom, but up a few inches (the roots will collect in the bottom and can climb walls very easily), and as close to the sides as possible. Point them up, but angled toward the center some. I actually have mine pointed to the side about 45 degrees so the mist swirls in a circular motion around the chamber. That also keeps the nozzles from pointing directly at the roots. Indirect mist works better, but isnt an absolute requirement.

The roots will spread out and mix together but thats not a problem unless one plant dies or is a male. You will have to be careful culling males. I grow autos, so I just trim the male bits off and leave the plant alive so the roots dont die.

This is GOLD I couldn't wait to do it Found the perfect piece of plastic I couldn't asked for any better fit lol that's why I keep everything !!!
Good find! I keep several junk drawers for the same reason. Well, to be honest, my entire shop is one huge junk drawer!! :D
 

Wastei

Well-Known Member
There are lots of filters that can take 150 PSI. Thats a pretty standard rating.


or I like this one because it has the drain valve built in. That comes in handy sometimes.


Note those are all 200 mesh which is about 70 micron. Are you sure you want 1 micron? You are going to have to clean that filter almost every day.

Your nozzles orifice are probably between 0.2 - 0.5mm which is like 200-500 microns. A 200 mesh filter should be more than good enough and not clog nearly as often.


There are tons of pressure switches. Price of course is a factor. I use this one because its a standard model that come on many well pump setups. Plus its cheep ;) I use the CXA-S3 - last one on the list.

I think we're the kind of people that have more than one "junk drawer" lol. I'm going to try it out at least. I've seen people having great results with 1 micron filters in Aeroponics. Its one of the few things I can actually buy locally. 10" filters are really cheap locally. They also offer 5 micron and 10 micron filters.

Do that pressure switch run on 24VAC? I see max psi is 204. "Deadband" is 30-40 psi. That means if the pressure switch is set to 130psi you will get a range between 130-90 psi correct? Seems to be about the same numbers as Aquatec, hope they are more reliable.

Thanks @Larry3215. Really appreciate it!
 
Last edited:

Rdubz

Well-Known Member
System running for now. Got it somewhat stable at 90-130psi. The pressure switches is a pain in the ass to work with. Plants are growing and liking the little extra pressure though. Still looking for a bigger accumulator tank.
They don't have the 150psi one in stock anywhere. Also looking for a 10" 1 micron inline filter that can tolerate 150psi.

The pressure switch failed on me and was building pressure all the way up to 180psi. Got it somewhat stable for now. Not going over 130psi no matter what. No cycling.

Surprised something didn't break or explode. Need way more fine tuning. Got to other switches I'm gonna check how they operate.
Wow that not good I was having issues getting mine stable as well and I don't like those aquatec switchs they are not as responsive as you would want them but man good thing nothing happened !

[/QUOTE]


Going to try to find hex keys in inches tomorrow. We don't use that here except for G threads. We convert them also in to metric standard. In production we still use inches for taps like G 1/2" , R 1/8" etc.
[/Quote]
That was an issue I had to I honestly thought I had stripped the adjustment screw ! But I found the right one

Now I can at least feel somewhat safe regarding over pressure. It was running 180psi for probably 6 hours straight. Cheez!

Do you know if people use different pressure switches than what Aquatec provide? I think I read it a couple of weeks ago but can't remember the name. Do you know what I'm talking about @Larry3215? Cheers!
[/QUOTE]

Also this is what @Larry3215 showed u .
I should be using this pressure relief valve as well its set for 150psi I just haven't installed in the system yet it isn't easy getting the right fittings To retro fit it to going back to 1/4" tubing

Good luck cheers!
 

Attachments

Rdubz

Well-Known Member
I may not have time to finish replying right now, but I want to ask if you have seen my aero thread? I already posted a lot of the info you need.

Wow I must of missed your break down there of timing and flow rates with how many liters of water to use and this is exactly what I was trying to wrap my head around , not saying I have it figured out but now I have a base to start from I still need to purchase a camera scope and start killing off some seedlings lol as u said become a mass murderer I don't expect to get it right , from the start . Maybe one these days in the near future i can get it dialed .
 

Larry3215

Well-Known Member
Do that pressure switch run on 24VAC? I see max psi is 204. "Deadband" is 30-40 psi. That means if the pressure switch is set to 130psi you will get a range between 130-90 psi correct? Seems to be about the same numbers as Aquatec, hope they are more reliable.
24 volts shouldnt be a problem. Its just a switch. The only thing to watch is the max amps, and a single aquatec shouldnt come close to the max, but if you are running two it might get close.

Yup, thats how the dead band works. You can increase it to some degree if you want. Increasing the dead band will reduce the number of times the pump runs per hour, but you have to watch your min/max as far as the tank and nozzle pressure. Instructions are under the cover of the switch where you do the electrical connections.

it isn't easy getting the right fittings To retro fit it to going back to 1/4" tubing
LOL Im sure I have spent more on adaptors, reducers, etc than the basic plumbing has cost - by a lot!
 

Larry3215

Well-Known Member
The main fault I can see is they switch to a default setting of 34.5C/94F if they loose power. That would be bad for the roots.. Other than that, the reviews look ok.

They are 1/4 the price of the basic inkbird,


But the inkbird saves settings and has a heat and cool cycle, plus you can set the dead band. You will need two of those - programmed to different temps for the dead band - to replace one inkbird.

By the way - I forgot to mention that there is a good chance you will need to heat the root chamber when lights are off, so two stage will be important. It will depend on the lights OFF temp. My chamber drops the temp an average of 7 to 10 deg F below ambient room temp.
 

Rdubz

Well-Known Member
The main fault I can see is they switch to a default setting of 34.5C/94F if they loose power. That would be bad for the roots.. Other than that, the reviews look ok.

They are 1/4 the price of the basic inkbird,


But the inkbird saves settings and has a heat and cool cycle, plus you can set the dead band. You will need two of those - programmed to different temps for the dead band - to replace one inkbird.

By the way - I forgot to mention that there is a good chance you will need to heat the root chamber when lights are off, so two stage will be important. It will depend on the lights OFF temp. My chamber drops the temp an average of 7 to 10 deg F below ambient room temp.
ok ya so the room drops a good 10-15f bellow room temp so if my room is running at 75 sometimes it can drop to 60f night time at least just now in the winter basement temps . Would a floor heater , one smaller hand held that’s heating the area around the chamber help or Would I have to heat the inside ? I’m sure just getting the temp up a little near the chamber should suffice ?

I ordered the mesh pots let’s see how she goes! I already had a full 4x8 sheet of foam so that was nice, I don’t have PVC but I had a bunch of 2” ABS laying around I’m going to use that just have to account for it being bigger in diameter but it should be good and sturdy actually so it will hold some weight that way I guess lol

thanks for the help ... cheers!
 

Larry3215

Well-Known Member
Would I have to heat the inside ? I’m sure just getting the temp up a little near the chamber should suffice ?
My heater is in the space between the foam and the fabric pots, so its heating the area just outside the fabric pot. I have a small personal heater Im using. I was using a tiny 750 watt heater but I switched it out for a slightly larger 1500 watt model because I needed the smaller one for inside my tent. I have the 1500 turned down quite a bit. The 750 watt version worked just fine.

My foam box is not a close fit. I have a lot of space to heat around my chamber. My foam box is about 36" x 48" x 34" tall. That happens to be the space under the work table my tent sits on. My root chamber is 24" in diameter. If your space is smaller, you wont need as much heat.

But - your situation may end up different. Its going to depend on your room temps when lights are on/off.

By the way, my chamber only drops the temps 7F to 10F below room temp - not 10 to 15F. So if your room temp is 75, then your root chamber will be around 65-68F. Thats a tad on the low side, but not bad. You might be able to get by with no heater by just increasing the fan flow rate.

You want fresh air circulating between the foam and the chamber, but you do NOT want to let light in. So keep that in mind. Any openings need to be light traps. Those pots are not light proof. Just put one over your head and you can see light right through it. Thats good, because it means air can get in/out - which you will need for the roots to get enough o2, but its bad because you dont want light on the roots. You dont have to be fanatical about it, just try to keep direct light from hitting the pots.
 
Last edited:

Larry3215

Well-Known Member
You should do some tests before you go hog wild buying fans and heaters. Id suggest you set up a pot inside a foam box, then run your nozzles on a 1 sec ON x 60 sec OFF cycle for maybe 30 minutes while measuring temps inside the chamber. Id keep the probe about 6" down from the top about half way between the center and the side.

Take any old fan you have laying around and play with air hitting the pot, etc and see what the temps do fan ON and fan OFF. Dont worry about light leaks at first. Just get a good feel for how much the temps will drop with the root chamber sealed up and open, fast flow, and slow flow, etc.

It wont take long to get some good data.
 

Rdubz

Well-Known Member
Ok here goes nothing..... this actually took me a lot of hours surprisingly but I think I’m getting somewhere at least I hope, regardless I am invested already with mostly time I have spent a little bit of money but not a lot I can’t say this broke the bank mostly because everything I used I already had except for the fan and temp controller. So basically this went from one project to another it started with let just try making a cloner and if I like It and it works I’ll move on to growing a plant in it and now my mind has been blown!! The one thing didn’t like with using the plastic was that I couldn’t air it out it felt like a steam bath inside as much reflective tape and insulation used it doesn’t matter so that combined with the community @RIU , and all of the atomizing professionals that have been doing this since before I even knew what weed was . Well regardless there innovations have made this possible.. now making a breathable root chamber and controlling temps is up there in damn that’s brilliant, but then actually try implementing NOT EASY , maybe one day I can add some “dare I say “ innovation maybe with experience down the road and with trial and error.... ok I’m going to stop rambling here are some photos and a link with short video for spray pattern..

4140852F-5F2A-4DC2-B6EE-FD755D432F5A.jpeg
this is me testing under 1000w MH open bulb 2-3ft away so I can see if she heats up and so far so good and if it keeps temps in the 70-71 I’m happy because this will be running under vented 1000w HPS so it won’t even be as hot.

as u can see the reason I made the over hang on each side of the lid was to put the fan underneath the overhang with the vent on the other side just to help with light leak . That was the idea for that and so far no light leaking in I’m pretty happy that I think it will do.CF358FFA-0563-4643-9095-6D5AA947B903.jpeg
D56A5FBC-3710-400E-BEB7-8B133D2DF06F.jpeg
BB518A42-D27C-4414-B51B-606ECAF2E1F0.jpeg
405F768C-82D4-40E8-9E96-57CCF1AF2EAC.jpeg

Short video to show spray

now if anyone has suggestions,question, comments please feel free this isn’t anything I invented so please tell me if I’m doing wrong only trying to give justice to what I have learned and from what I am told and from how I perceived things.....cheers and happy growing to everyone I can’t to drop a little baby in here and see what she does but before I do I have to make sure there isn’t anything else I should of done.

FYI : while I’m testing I didn’t use 2 solenoids so I will be adding on more and my wiring is all temporary I will use a control panel to mount timer and temp control just need more low voltage wire I only have solid strand and it’s very hard to work with in this type of situation connection power loss just from moving a wire because you can screw them down tight enough on the boards maybe if I solder everything witch I did on the solenoid itself just easier if I get 20-26gauge wire stranded...
Also one more thing I might do is use panda film white part on the outside I did use it on the inside of the foam board black part towards chamber . Thanks

E1B961E0-DF82-4F72-BC6C-CB7C1CABEAA9.jpeg
I forgot to include what it looked like before the foam board. I attached 2x4 to the bottom of the OSB frame inside the mesh pot and I did end up using 1 plus half of another I used the half to pull over the top and over lap a little on the Inner side of the bottom pot. So water rolls down with out a gap so mist doesn’t leak out .
 
Last edited:

Larry3215

Well-Known Member
Looks like you are off to a good start! I have some questions but dont have time now.

My only concern is if you left enough space between the fabric pots and the foam box. You ant good air circulation all the way around the chamber or you could get uneven cooling or places that stay dryer/wetter than others.

The spray pattern looks good so far. You will want to test hang time of the mist, but you have toi have it all sealed off to do that.
 
Top